Quick Reference
Usage: redaxserver [options] <stamp file> <pdfdoc1> [ <pdfdoc2>...]

-pref <file>        : Read preferences from an XML file

Redaction Commands

-redact             : Redact document
-rmarkup            : Redact converted markup at conversion time
-redaxcat <string>  : Comma-separated list of categories to redact

Find and Place Redax Boxes

-fbracket           : Find bracketed text
-markpages <string> : Mark list of entire pages for redaction
-flist <file>       : Find using list file of exemptions and phrases
-fpattern <file>    : Find file of patterns names
-fregex <file>      : Find using list file of regular expressions
-exemptpat          : Use the matching pattern name as the exemption code
-annotmatch         : Use the matching document text name as the Redax box note
-ignorecase         : Ignore case during -flist or -fregex

Debugging Options

-ftext              : Find all text  areas
-fimage             : Find all image areas
-fpath              : Find all path  areas

Command List File Options

-cmds <file>        : Path to the file of commands -cmds only compatible with General Options

Remove Redax Boxes and Annotations - ALWAYS remove boxes and annotations before making a document public!

-rembox             : Remove redax boxes
-remall             : Remove all annotation

Create Summary File

-impfile <file>     : Import redax boxes from an XML file
-expfile <file>     : Export redax boxes to an XML file
-sumfile <file>     : Write redax summary report to file
-textfile <file>    : Write document text to file
-textindex <file>   : Write redax document text with location data to file
-textxml <file>     : Write redax document text to file in XML format

Convert Acrobat Markup into Redax Boxes

-cm                 : Convert all highlight, underscore and strikeout markups
                      (not required for converting individual markup)
-ch                 : Convert highlight markups
-chc <string>       : Convert highlight markups using exemption code
-cs                 : Convert strikeout markups
-csc <string>       : Convert strikeout markups using exemption code
-cu                 : Convert underline markups
-cuc <string>       : Convert underline markups using exemption code
-cr                 : Convert rectangle markups
-crc <string>       : Convert rectangle markups using exemption code
-ca                 : Convert Acrobat redaction markups
-cac <string>       : Convert underline acrobat redaction using exemption code
-crem               : Remove converted markup boxes when using any convert option

Watched Folders

-watch <string>     : Watched folder base directory

Encryption Options

-encrypt            : Encrypt out file
-keylength <int>    : Key Length.  Valid options are 40 and 128.  Default is 128.
-ownerpass <string> : New Owner Password (Required)
-userpass <string>  : New User Password
-noprint            : Do Not Allow Printing
-nomodify           : Do Not Allow Modifying the Document
-nocopy             : Do Not Allow Copying text or graphics
-nonotes            : Do Not Allow Adding or changing notes or form fields
-nofill             : Do Not Allow Fill or Sign of Form Fields
-noaccess           : Do Not Allow Accessibility
-noassembly         : Do Not Allow Document Assembly
-nohighres          : Do Not Allow High Resolution Printing

General Command Line Options

-w                  : Linearize to support byte serving across the web.  Forces full save
-o <file>           : Save to a new output PDF file
-optimize           : Optimize the output file to try to reduce file size
-iso32000           : Set file for ISO 32000 compliance (PDF 1.7)

-subdirs            : Process pdf files in subdirectories of NAMED DIRECTORIES
-v                  : Version information
-help               : Help information
-h                  : Help information
-p                  : Write progress information to diagnostics
-n                  : Do not write information to screen
-l <file>           : Write progress info to a given file name
-d <string>         : Owner password to open this document
-r <string>         : Registration number
Introduction
Overview
Redax® is a family of products that enable you to completely and permanently delete (redact) sensitive information from PDF (Portable Document Format) files. Redax Enterprise Server operates on the server rather than on individual desktops, like the Redax Plug-in, and does not require Adobe® Acrobat® to perform a redaction.
How Redax Enterprise Server can be used
Redax has a wide range of uses:
- Government agencies can redact PDF documents in accordance with the Freedom of Information Act (FOIA) and the Privacy Act.
- Pharmaceutical companies can redact PDF documents for submission of a preliminary NDA (New Drug Application) or IND (Investigational New Drug Application).
- Manufacturing and technology companies can protect proprietary information when filing for patents.
- Legal professionals can redact private information from public documents before submitting briefs to US courts or agencies that accept electronic filings.
What Redax Enterprise Server offers
Designed for use in high-volume settings, Redax Enterprise Server offers these advantages:
- Redact specific text or entire pages on the server
- Adobe PDF Library-based WordFinder for enhanced text-finding
- Mark for redaction by word or phrase list
- Mark for redaction by pattern
- Mark for redaction by regular expression
- Redact documents by category
- Improved control over appearance of redacted areas — Different colors and transparency levels can be assigned to the frame and interior of the final redacted areas in the document. A character can be assigned to replace redacted text, or the area can be left blank.
- Separate preferences utility — RedaxESconfig, is supplied with Redax Enterprise Server, lets you easily define preferences in an XML file through a graphical user interface. Designating the file on the command line enables you to define all your preferences at once, instead of individually with separate options.
- Easy system integration — Redax Enterprise Server can be easily integrated with existing enterprise workflows and document management systems.
- Ability to process large quantities of data — Multiple documents can be marked for redaction, and then redacted, in batch mode.
- Automated markup and redaction — The server-based command-line solution enables automation of markup and redaction through scripting.
- User-friendly bulk processing capability — Server commands implemented through watch directories allow reviewers to process multiple documents from their client workstations by simply dragging and dropping files.
- Workgroup features — Redax boxes can be color coded and associated with a reviewer’s name, enabling multiple reviewers to work on the same documents — encrypted documents can be redacted with an Owner password.
- Exemption code support — Redax Enterprise Server supports predefined exemption codes associated with specific types of markup in accordance with the United States Freedom of Information Act, the Privacy Act, and the Health Insurance Portability and Accountability Act.
- Acrobat and Redax plug-in integration — Redax Enterprise Server accepts markup from both Acrobat and Redax plug-in products. In addition, Redax boxes can be viewed in Acrobat and Acrobat® Reader™ without any Redax plug-ins installed.
Installation
Introduction
Redax enables users to first markup and then completely and permanently delete sensitive information from PDF (Portable Document Format) files. Designed for high-volume settings, Redax Enterprise Server performs markup and redaction on the server rather than on individual desktops.
Memory Requirements
Minimum free memory available to run the application: 512 MBytes
Windows Installation
Windows installation is handled by the installer and does not require any special handling.
Unix Installation
Setting environmental variables (All Unix Platforms)
In this release, UNIX platforms require two additional environmental variables that need to be set. If you run Redax Enterprise Server from the Redax Enterprise Server script created during installation, these environmental variables will be set by the script. If you run redaxserverapp directly, you will need to set these environmental variables yourself. Once Redax Enterprise Server is installed, you can view the variables needed by looking at the Redax Enterprise Serverapp script created by the installer.
Setting the Appligent home directory (All Unix Platforms)
The environmental variable that stores the location of the Appligent home directory is APPLIGENT_HOME. The default location for the Appligent home directory is /usr/local/appligent. The Appligent home directory contains the library files and resources needed to run Redax Enterprise Server.
It also contains license information for Redax Enterprise Server.
Example:
export APPLIGENT_HOME=/usr/local/appligent
Setting the APDFL library path ( All Unix except AIX )
The APDFL library path must be added to the LD_LIBRARY_PATH variable. The APDFL library path is located in a subdirectory of the APPLIGENT_HOME directory.
The path should be set to ${APPLIGENT_HOME}/APDFLX.X.X/Libs
Example:
export LD_LIBRARY_PATH=${LD_LIBRARY_PATH}:${APPLIGENT_HOME}/APDFLX.X.X/Libs
Setting the APDFL library path ( AIX Only )
The APDFL library path for AIX must be added to the LIBPATH variable. The APDFL library path is located in a subdirectory of the APPLIGENT_HOME directory.
The path should be set to ${APPLIGENT_HOME}/APDFLX.X.X/Libs
Example:
export LIBPATH=${LIBPATH}:${APPLIGENT_HOME}/APDFLX.X.X/Libs
Registration numbers for Redax Enterprise Server 3
In previous versions of Redax Enterprise Server, the Redax Enterprise Server registration number was required as a command line option with the -r flag each time redaxserverapp was run. A Redax Enterprise Server script was provided that automatically added -r and the registration number to the Redax Enterprise Serverapp command line when the script was run.
In the 3.x release, in addition to getting the registration number from the command line, Redax Enterprise Server can get the registration number from a license file in the Appligent home directory. On UNIX systems, license files are created by the installation script and stored in the ${APPLIGENT_HOME}/license directory. For Windows, the license file is created by the installer and stored in the /All Users/Application Data/Appligent/License directory. With a valid license file, the -r is no longer required on the command line. The -r option can still be used as in previous versions, and will override the value in the license file.
Supported Platforms
Windows: 7 & higher
Linux: 32 bit &, 64 bit
Solaris: 10 & above
General Options
Introduction
These options deal with product information, progress messages, and file maintenance. The following sections detail the use of these options.
General options — summary
The following table provides a summary of the general command-line options.
| Option | Parameter | Description |
|---|---|---|
| -r | RegNum | Pass registration number to Redax Enterprise Server |
| -d | oPassword | Enter Owner password to open this document |
| -l | logFile | Write progress information to logfile |
| -p | Provide progress messages | |
| -n | Do not write information to screen | |
| -v | Display version information | |
| -h or -help | Display current usage information | |
| -o | outFile.pdf | Save output to a new file or directory |
| -w | Linearize the file upon save | |
| -optimize | Optimize the output file to try to reduce file size | |
| -iso32000 | Set file for ISO 32000 compliance (PDF 1.7) | |
| -cmds | CommandFile.txt | Process multiple commands and files. Compatible with -l, -p, -r, -h or -help and -n |
General options — detailed
The following sections provide details on using the general command-line options.
-r RegNum — Pass registration number to Redax Enterprise Server
This option can be used to supply your registration number to Redax Enterprise Server from a script or another application:
$ redaxserverapp -r XXXX-XXXX-XXXX-XXXX-XXXX-XXXX [other options]
This option is typically not necessary and is available for use in cases where the Appligent License File can not be located by the application because of runtime environment restrictions.
-d <oPassword> — Owner password to open encrypted document
Supplies the current Owner password to open an encrypted document. You can then mark up, redact, or apply new encryption options to the document, but you cannot remove encryption.
Note: If you log your transaction (see the -p and -l options, below) the Owner password is not written to the log; random characters are used instead.
-l <logfile> — Log to a log file
Write to a text file any errors and/or progress messages. This option is helpful for debugging. The -l <logfile> option must be followed by a file name.
Note: If the log file you specify is a read-only file, a warning is displayed and nothing is written to the log file. Make sure that your log file is write-enabled.
Note: Your log file will look different if you are also using the -p option, see A note on using -p and -l <logfile> together.
-p — Show progress
Write progress messages to the screen (STDOUT – the standard output of your system). This option is helpful for debugging and for understanding how Redax Enterprise Server works.
Note: Please see the sections below: A note on using -p and -l <logfile> together for more clarification on using log files and writing progress messages to the screen.
-n — Do not write information to screen
Do not write anything to the screen (or STDOUT). This prevents progress message from building up.
A note on using -p and -l <logfile> together
As outlined in the above section the -p option gives you progress messages on your screen and the -l <logfile> option writes error messages to a file if errors occur. The following table provides more detail on using these options alone or together.
| -l | -p | errors found | Result |
|---|---|---|---|
| Nothing will be written to the screen or to the log file you specify | |||
| Progress message will be written to the screen and redaxserver.log | |||
| Progress messages will be written to the screen and to the log file | |||
| A redaxserver.log file will be created with the errors in your working directory | |||
| Errors will be written to the log file | |||
| Errors will be written to redaxserver.log and your screen | |||
| Both progress and error messages will be written to the screen and to the log file |
Therefore, -l <logfile> used on its own will only go into action if there are errors. With -p and -l <logfile> combined, you will get a text file with full details on Redax Enterprise Server operations whether there are errors or not.
-v — Print version information
Display the version of Redax Enterprise Server you are running. This is important when corresponding with support@appligent.com. In order to best understand your problem, we must know what version of the software you have. Redax Enterprise Server will not do anything else if you use this option.
-h or -help — Display usage information
Display all current command-line options. Redax Enterprise Server will not do anything else if you use one of these options.
-o outFile.pdf — Save to a new file or directory (required)
If you are processing one input file, specify an output file to save the results to. If you are processing more than one input file at a time, specify an existing directory to save the resulting files to.
Note: If you do not specify an output file or directory, the command will fail.
-w Linearize the file upon save
Save the output file as a linearized document. Linearization reorganizes the file to make it more efficient for web delivery. Individual pages can be rendered before the entire document has downloaded, so the user can start reading the document sooner.
-optimize
This option will do the following: 1) encode any non-encoded streams using Flate compression, 2) remove ASCII85 filters from all streams, 3) replace LZW encoded streams with Flate encoding, 4) merge identical XObjects and images, 5) optimize common sequences in page content, and 6) merge identical font descriptors and encodings. This option will usually result in a smaller file size.
-iso32000
This option will do the following: Set file for ISO 32000 compliance, resulting in a document that is PDF version 1.7.
-cmds — Allows you to process a collection of files at one time
To process multiple commands quickly and efficiently, use the -cmds <filename> option. The file specified by -cmds, the commands file, should contain one or more single line commands. Each command is just like an ordinary command-line without the executable name. The commands file does not support wildcards in filenames. Example of command line syntax when running with -cmds:
$ ./redaxserverapp -p -l logfile.txt -cmds CommandFile.txt
CommandFile.txt contains a list of commands for Redax Enterprise Server to process. Example of the CommandFile.txt:
-p  -redact -pref /appligent/redaxserver/samples/prefs/prefs.xml -o /appligent/redaxserver/samples/out_redacted.pdf /appligent/redaxserver/samples/sample_marked.pdf
-p  -flist /appligent/redaxserver/samples/sample_find_list.txt -o /appligent/redaxserver/samples/out_find.pdf  /appligent/redaxserver/samples/sample.pdf
-p  -redact -iso32000  -o /appligent/redaxserver/samples/out_iso32000.pdf  /appligent/redaxserver/samples/sample.pdf
Command Collections
The -cmds option allows you to process a collection of files at one time
To process multiple commands quickly and efficiently, use the -cmds <filename> option. The file specified by -cmds, the commands file, should contain one or more single line commands. Each command is just like an ordinary command-line without the executable name. The commands file does not support wildcards in filenames. The following is an example of command line syntax when running with -cmds:
$ ./redaxserverapp -p -l logfile.txt -cmds CommandFile.txt
CommandFile.txt contains a list of commands for Redax Enterprise Server to process. This is an example of the CommandFile.txt:
-p -redact -pref /appligent/redaxserver/samples/prefs/prefs.xml -o /appligent/redaxserver/samples/out_redacted.pdf /appligent/redaxserver/samples/sample_marked.pdf
-p -flist /appligent/redaxserver/samples/sample_find_list.txt -o /appligent/redaxserver/samples/out_find.pdf /appligent/redaxserver/samples/sample.pdf
-p -redact -iso32000 -o /appligent/redaxserver/samples/out_iso32000.pdf /appligent/redaxserver/samples/sample.pdf
Preparing for Redaction
Establishing preferences
Before you run Redax Enterprise Server, you should establish preferences to specify:
- The properties of Redax boxes and Full-Page tags, which are used to mark information for redaction.
- The appearance of redacted areas in the final redacted document.
- The way information is processed during markup and redaction.
You establish preferences in a preferences file that you create using the RedaxESconfig utility, supplied with Redax Enterprise Server. You can create as many preferences files as needed for the different markup and redaction scenarios in your organization. When you run Redax Enterprise Server, you specify which preferences file you want to use with the -pref command-line option.
For information about using RedaxESconfig, see the online help supplied with the utility. For information about using the -pref command-line option, see Marking Text for Redaction and Redacting Documents.
Creating redaction list files
Redaction list files are text files containing lists of words, phrases or regular expressions grouped by exemption. With a list of words and the -flist command-line option, for example, you can mark a PDF document for redaction in just one step. Regular Expression (-fregex) searches provide powerful text-finding to meet a wide variety of requirements.
When you use a list file, Redax Enterprise Server searches through the document, draws a Redax box around each “hit”, and applies the corresponding exemption code if one is specified.
Creating or editing a redaction list file
The redaction list file is a plain text file.
- Create a new list file, or open the list file you want to edit in the text editor of your choice. You can use the sample file, sample_find_list.txt, which can be found in the Samples directory where Redax Enterprise Server was installed. The default location on Windows is C:\Appligent\RedaxServer\Samples. For Unix, the Samples directory is in the location you selected on your server.
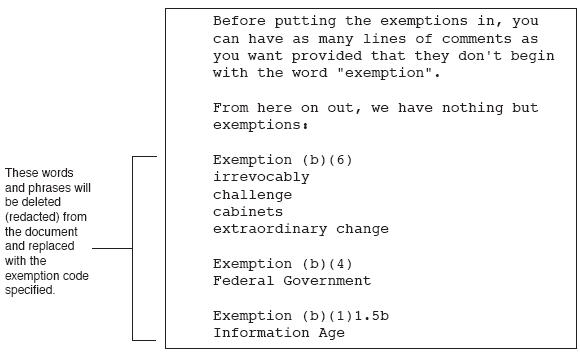
- At the beginning of the file, type any comments or notes you want to include. You can have any number of comment lines, as long as they do not begin with the word “Exemption”.
- To begin making a list of words and/or phrases for redaction, enter the word “Exemption”, followed by the exemption code you wish to use. If you do not wish to use an exemption code, then the word “Exemption” should be on the line by itself. Each word or phrase in the redaction list must appear on a separate line.
- Underneath the exemption definition, add all of the terms that you want to redact with that exemption code.
- By default Redax Enterprise Server performs a case-sensitive search, but you can have it ignore case by adding -ignorecase on the command line when running -flist or -fregex. See Marking Text for Redaction for details. If you use the case-sensitive default, the text you enter in the list file must contain the proper upper- and lowercase letters. For example, “govern” will not find “Govern”, “GOVERN”, or “GOVERN” set in small caps, so you must include them in the list if you want them to be marked for redaction in a case-sensitive search.
- Repeat the process of adding exemptions and lists until you are finished.
- Save the file and close it.
Sample redaction list files
Sample redaction list files, sample_find_list.txt and sample_regex_list.txt are included in the samples folder of the directory where you installed Redax Enterprise Server. (In Windows, the default location is C:\Appligent\RedaxServer\samples\.) You can use any of these files as the basis for your own redaction list files. Remember that each word, phrase, pattern or regular expression to be redacted must appear on a separate line following an Exemption heading.
Using redaction list files
When using any list file (-flist or -fregex) on the command-line, if you choose to have exemptions without codes in the list file, make sure to use either -pref followed by the name of a preferences file that allows redaction without exemption, or -noexempt.
Note: Failure to set either option means you will have to set the property manually for each Redax box using Redax plug-in. The -pref and -noexempt command-line options are described in more detail in subsequent chapters. The -pref option is preferred, because the -noexempt option is deprecated.
Key Considerations
- You cannot specify an image for redaction in a redaction list file.
- Words you enter will be found even if they’re embedded in other words. For example, the word “govern” will be marked for redaction from the word “government”.
- Misspelled words in the PDF document will not be marked for redaction unless you add possible misspellings to your redaction list.
Appligent Document Solutions recommends that you check each redaction individually to confirm that Redax Enterprise Server processed the list as intended. Any misspellings, unexpected hyphenations, or other irregularities may cause Redax Enterprise Server to miss information you intended to redact.
Using Acrobat to select text for redaction
You can use Adobe Acrobat’s commenting tools — Highlight, Underline, and Cross Out/Strikethrough — to select the text you want to redact. Redax Enterprise Server will also redact Acrobat redaction annotations.
How Redax Enterprise Server uses Acrobat-selected text
Once you have used the commenting tools to select text you want to redact, then run Redax Enterprise Server, and have it do one of the following:
- Convert the selected text to Redax-marked text, which can then be redacted with any other text you have marked for redaction. Command-line options are available to either convert all Acrobat-selected text or to convert only text selected using a specific Acrobat tool (-cm, -ch, -chc, -cs, -csc, -cu, -cuc, -ca, -cac). These options are described in detail in Marking Text for Redaction.
- Redact the selected text directly, without prior conversion to Redax-marked text, using the -rmarkup command-line option described in Redacting Documents.
Redax Enterprise Server’s capability to utilize Acrobat-selected text provides the following advantages:
- Members of your workgroup who do not have Redax can select text for redaction, or use Acrobat’s redaction tools to mark up documents.
- You can assign a different exemption code to each type of markup: Highlight, Underline and Cross Out/Strikethrough.
Note: Versions prior to Acrobat 6 use the term strikeout for crossout.
Selecting text with Acrobat tools
To select text for redaction using the Acrobat selection tools:
- If you are using exemption codes, decide which code you want to assign to each tool. You can assign one exemption code to each tool, for a maximum of three exemption codes if you are using all three tools. (You do not have to use exemption codes.)
- Use the Acrobat tool(s) of your choice — Highlight, Underline, and/or Cross Out/Strikethrough — to select the text in your PDF document that you want to redact. If you use the underline tool, you must select the straight (default) mode; the squiggly mode does not work with Redax Enterprise Server. (For information about Acrobat’s selection tools, refer to Adobe’s online help.) If you assigned different exemption codes to different tools, make sure to use the appropriate tool for each piece of text. (You will apply the exemption codes later when you run Redax Enterprise Server.)
- Save the file.
Note: We recommend you always keep backup copies of the file during all stages of redaction.
Evaluating Your Document
Command-line options
This section describes the command-line options for evaluating documents for redaction.
Command syntax
$redaxserver -o <output> [options] input1.pdf [input2.pdf ...]
Options for evaluating documents — summary
| Option | Description |
|---|---|
| -ftext | Find all text areas |
| -fimage | Find all image areas |
| -fpath | Find all path areas |
Options for evaluating documents — details
-ftext — find all text areas
Finds all text areas in the document and marks them with Redax boxes. This option is used for debugging purposes and for finding potential problems with the text in your document before you begin the redaction process.
-fimage — find all image areas
Finds all bitmap images in the document and marks them with Redax boxes. This option is used for debugging purposes and for finding potential problems with bitmap images in your document before you begin the redaction process.
-fpath — find all path areas
Finds all path areas in the document and marks them with Redax boxes. This option is used for debugging purposes and for finding the paths that make up the vector images in your document before you begin the redaction process.
Determining what can be redacted
Before you begin to mark a PDF document for redaction, check for any potential problems Redax Enterprise Server might encounter. Documents that are scanned with OCR (Optical Character Recognition) software and then converted to PDF can contain an unpredictable mix of images and text that can result in these potential problems:
- Hidden text — Sensitive text might be hidden behind an image.
- Inline images — The OCR process may substitute inline images for characters it cannot decipher and Redax Enterprise Server does not recognize words that contain inline images.
- Unredactable content — Some text or images might be unredactable.
The following command-line options can help you detect these problems:
- -ftext finds and marks all text areas in the document, and can alert you to hidden text.
- -fimage finds and marks all bitmap images, including inline character images in words.
- -fpath finds and marks all paths in vector images. All images not detected by -fimage should be detected by -fpath.
Text and images that are not detected by any of these options are not redactable.
Finding all text
Note: If you subsequently decide to remove the Redax boxes inserted by this procedure, all Redax boxes in the file will be removed.
To find all redactable text in a document, enter the following command:
$redaxserver -ftext -o <output> <input.pdf>
Redax Enterprise Server searches for text in the input.pdf document, marks each occurrence that it finds, and saves the results to the specified output file or directory. The input.pdf file remains unchanged.
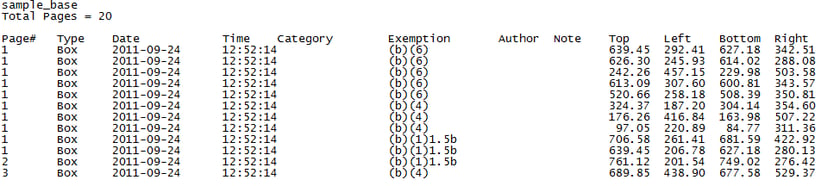
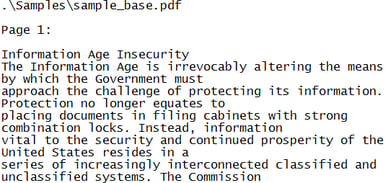
Example: Mark all text in the sample_base.pdf file, located in the samples directory, and save the output to find_all_text.pdf.
In Windows:
>redaxserver -ftext -o samples\find_all_text.pdf samples\sample_base.pdf
In UNIX:
$redaxserver -ftext -o ./samples/find_all_text.pdf ./samples/sample_base.pdf
A segment of the output for this example is shown below.
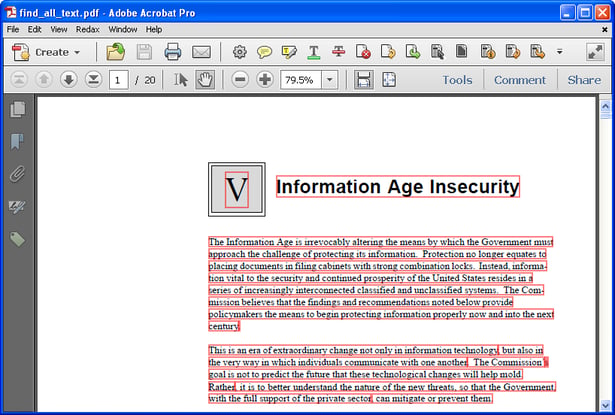
After you run -ftext, examine the document for these potential problem areas:
- Text not marked with Redax boxes — This area cannot be redacted. Run -fimage to find out whether any characters have been converted to inline character images. If so, you will be able to redact these images with Redax plug-in.
- Redax box on an image — This indicates that text is hidden beneath the image. To see the text, apply the Adobe Select Text tool to the Redax box, and then copy the selection and paste it to a text file.
Finding all bitmap images
Note: If you subsequently decide to remove the Redax boxes inserted by this procedure, all Redax boxes in the file will be removed.
To find all redactable bitmap images in a document, enter the following command:
$redaxserver -fimage -o <output> <input.pdf>
Redax Enterprise Server searches for bitmap images in the input.pdf document, marks each occurrence that it finds, and saves the results to the specified output file or directory. The input.pdf file remains unchanged.
Example: Mark all bitmap images in the sample_base.pdf file, located in the samples directory, and save the output to find_all_images.pdf.
In Windows:
>redaxserver -fimage -o samples\find_all_images.pdf samples\sample_base.pdf
In UNIX:
$redaxserver -fimage -o ./samples/find_all_images.pdf ./samples/sample_base.pdf
A segment of the output for this example is displayed in the figure below.
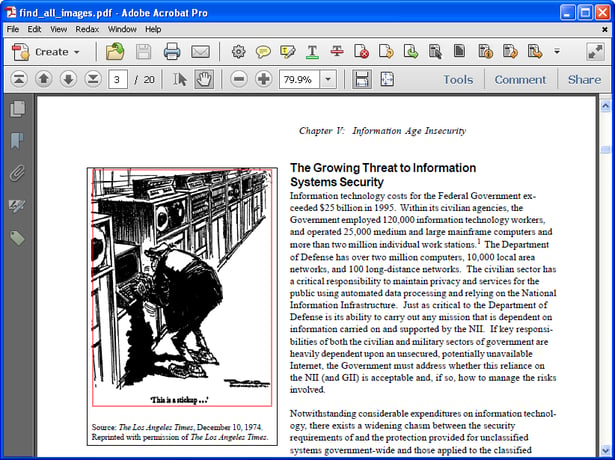
After you run -fimage, examine the document for text marked with Redax boxes.
Any marked text is actually an image of text. The word that contains the image cannot be redacted as text. It must be redacted as an image. Either use the -fimage option to mark up all bitmap images or use Redax plug-in to draw a Redax box around specific character images.
Note: Images not marked with Redax boxes are probably vector images. To make sure, run -fpath, as described in “Finding all paths in vector images” below.
Finding all paths in vector images
Note: If you subsequently decide to remove the Redax boxes inserted by this procedure, all Redax boxes in the file will be removed.
To find all redactable paths in vector images in a document, enter the following command:
$redaxserver -fpath -o <output> <input.pdf>
Redax Enterprise Server searches for paths in the input.pdf document, marks each occurrence that it finds, and saves the results to the specified output file or directory. The input.pdf file remains unchanged.
Example: Mark all paths in the sample_base.pdf file, located in the samples directory, and save the output to find_all_paths.pdf.
In Windows:
>redaxserver -fpath -o samples\find_all_paths.pdf samples\sample_base.pdf
In UNIX:
$redaxserver -fpath -o ./samples/find_all_paths.pdf ./samples/sample_base.pdf
A segment of the output for this example is displayed in the figure below.
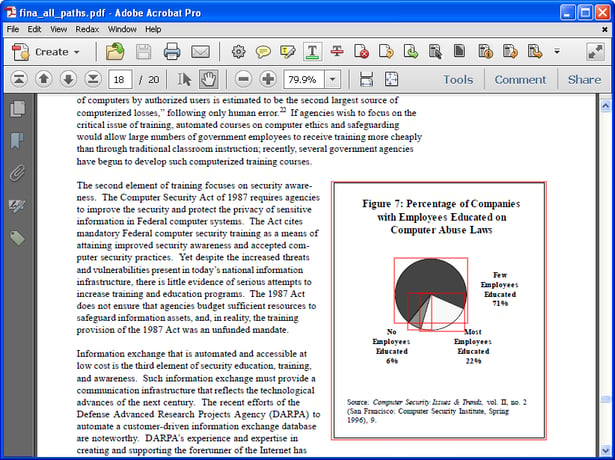
After you run -fpath, examine the document for any images not marked with -fimage or -fpath. These images are not redactable.
Marking Text for Redaction
Marking up a document
You can mark a document for redaction in the following ways:
- Mark all text between square brackets [ ] — Mark the text between every set of square brackets in the documents.
- Mark one or more pages — Mark an entire page or a list of pages.
- Convert Acrobat-selected text to Redax boxes — Convert text that you select with the Acrobat Highlight, Underline, and Cross Out/Strikethrough tools to Redax boxes. Each Acrobat selection type can have its own exemption code.
- Mark by category — Place Redax markup in one or more categories, as defined in a preferences file.
- Use a redaction list file — Mark all occurrences of text matching the words and phrases in the list.
- Use a pre-defined pattern file — Mark all occurrences of text matching one of a pre-defined set of patterns.
- Use any regular expression — Mark occurrences of text matching your preferred regular expression.
Note: Once you have marked a document for redaction, you can use it as a template to mark up other documents in which the information to be marked up is in the same position on the page. For more information, see Import & Export Markup with RESxml.
Redaction markup
When text is marked for redaction, a Redax box is placed around it, as in the following example:
![]()
When a page is marked for redaction, a Full-page tag is placed on the page, as in the following example:
Redax boxes and Full-page tags are visible in Adobe Acrobat and can be printed from Acrobat to a PostScript or non-PostScript printer. The markup can be adjusted, if necessary, using the Redax plug-in.
Marking all text between square brackets
To mark all text that is between square brackets, enter the following command:
$redaxserver -o <output> -fbracket [other options] <input.pdf>
Redax Enterprise Server searches through the document. Each time it finds text that’s contained between square brackets [ ], it draws a Redax box around the text.
Whether or not the brackets are also included in the Redax box depends on your preferences file. (See Remove Brackets when Find Bracketed Text in Appendix B: RedaxESconfig is selected.) If you do not designate a preferences file, the brackets will not be included in the Redax box and will, therefore, not be removed during redaction.
Note: In your preferences file, you should either specify an exemption code or, if you do not wish to use exemption codes, check Allow Redaction without Exemption.
Example: Mark bracketed text in the sample_base.pdf file, located in the samples directory, and save the output to mark_bracketed.pdf. Use a preferences file that specifies to mark the brackets for removal, as well as the text (in other words, to include the brackets in the Redax box).
In Windows:
>redaxserver -o samples\mark_bracketed.pdf -fbracket -pref samples\prefs\remove_brackets.xml samples\sample_base.pdf
In UNIX:
$redaxserver -o ./samples/mark_bracketed.pdf -fbracket -pref ./samples/prefs/remove_brackets.xml ./samples/sample_base.pdf
Marking one or more pages
To mark one or more pages for redaction, enter the following command:
$redaxserver -o <output> -markpages <pages> [other options] <input.pdf>
For pages, substitute a single page or a list of pages. In a list of pages, use a comma to separate individual pages or a dash to indicate a range of pages. If you include spaces, enclose the list in quotes.
When the command is executed, Redax Enterprise Server places a Full-Page tag on each listed page in the input.pdf file and saves the results to the specified output file or directory.
Example: Mark pages 1, 3, and 5-7 in the sample_base.pdf file, located in the samples directory, and save the output to mark_pages.pdf. Use a preferences file that specifies an exemption code of Confidential. You can use the sample file, confidential.xml, located in the samples directory or you can create your own preference file using RedaxESconfig, which is supplied with Redax Enterprise Server. When you open mark_pages.pdf, you can display the exemption code by double-clicking in the Full-Page tag. In Acrobat, you can also display it as a tooltip when you move the pointer over the Full-Page tag.
In Windows:
>redaxserver -o samples\mark_pages.pdf -markpages 1,3,5-7 -pref samples\prefs\confidential.xml samples\sample_base.pdf
In UNIX:
$redaxserver -o ./samples/mark_pages.pdf -markpages 1,3,5-7 -pref ./samples/prefs/confidential.xml ./samples/sample_base.pdf
Converting Acrobat-selected text to Redax boxes
Redax Enterprise Server can convert Acrobat-highlighted, -underlined, and -crossed-out text to Redax boxes. The text should be selected in Acrobat beforehand, as described in Using Acrobat to select text for redaction. (You can also redact the Acrobat-selected text at the same time. See Redacting Documents for information).
You have several conversion options.
To convert all Acrobat-highlighted, -underlined, and -crossed-out text to Redax boxes, with no exemption codes, enter the following command:
$redaxserver -o <output> -cm [other options] <input.pdf>
Redax Enterprise Server searches through the document and draws a Redax box around all Acrobat-highlighted, -underlined, and -crossed-out text. Unless an exemption code is specified in the preferences file, exemption codes are not assigned to the Redax boxes, and the document is automatically marked to allow redaction without exemption. (Allow Redaction without Exemption does not have to be specified in the preferences file).
Example: Convert all Acrobat-highlighted, -underlined, and -crossed-out text in the sample_marked.pdf file, located in the samples directory, and save the output to mark_all_selected.pdf. Use a preferences file that specifies a blue Redax box and assigns John Jones as the author.
In Windows:
>redaxserver -o samples\mark_all_selected.pdf -cm -pref samples\prefs\blueJones.xml samples\sample_marked.pdf
In UNIX:
$redaxserver -o ./samples/mark_all_selected.pdf -cm -pref ./samples/prefs/blueJones.xml /samples/sample_marked.pdf
To convert one or more types of Acrobat-selected text to Redax markup without exemption codes, enter the following command:
$redaxserver -o <output> <conversion option(s)-no exemption code> [other options] <input.pdf>
Redax Enterprise Server searches through the document. Each time it finds the type of Acrobat-selected text specified by the conversion options, it draws a Redax box around the text. Unless an exemption code is specified in the preferences file, exemption codes are not assigned to the Redax boxes, and the document is automatically marked to allow redaction without exemption. (Allow Redaction without Exemption does not have to be specified in the preferences file.)
Example: Convert Acrobat-underlined and crossed-out text in the sample_marked.pdf file, located in the samples directory, and save the output to mark_undercross.pdf. Remove the underlines and crossouts, and use a preferences file (YellowDoe.xml) that specifies a yellow Redax box and assigns Jane Doe as the author.
In Windows:
>redaxserver -o samples\mark_undercross.pdf -cu -cs -crem -pref samples\prefs\yellowDoe.xml samples\sample_marked.pdf
In UNIX:
$redaxserver -o ./samples/mark_undercross.pdf -cu -cs -crem -pref ./samples/prefs/yellowDoe.xml ./samples/sample_marked.pdf
To convert one or more types of Acrobat-selected text to Redax markup without exemption codes, enter the following command:
$redaxserver -o <output> <conversion option(s)-exemption code> [other options] <input.pdf>
Redax Enterprise Server searches through the document. Each time it finds the type of Acrobat-selected text specified by the conversion options, it draws a Redax box around the text and overlays the box with the specified exemption code.
Note: If exemption codes are specified in the preferences file, they are ignored.
Example: Convert Acrobat-highlighted text in the sample_marked.pdf file, located in the samples directory, and save the output to mark_highlighted.pdf. Overlay the box with the Freedom of Information Act exemption code (b) (4).
In Windows:
>redaxserver -o samples\mark_highlight.pdf -ch -chc (b)(4) -crem -pref samples\prefs\yellowDoe.xml samples\sample_marked.pdf
In UNIX:
$redaxserver -o ./samples/mark_highlight.pdf -ch -chc (b)(4) -crem -pref ./samples/prefs/yellowDoe.xml ./samples/sample_marked.pdf
Creating category-based markup
If you redact different information in a document depending on how it is to be used, you can create a markup category for each intended use. Then, when you perform the redaction, you can specify which category or categories to redact.
Because the category is specified in the preferences file, you must run Redax Enterprise Server once for each category you want to apply. You can use a different list file or convert a different type of Acrobat markup for each category. If you use list files, the listed words and phrases in each must be mutually exclusive to ensure the integrity of the categories.
To convert all Acrobat-underlined text to Redax boxes with no exemption codes and assign a category defined in a preferences file, enter the following command:
$redaxserver -o <output> -cu -pref <preferences.xml> [other options] <input.pdf>
Example: Convert Acrobat-underlined text in the sample_marked.pdf file, located in the samples directory, and save the output to mark_categories1.pdf. Use the preferences file public.xml, which defines a category of Public. (The mark_categories.pdf example shows the results of this process).
In Windows:
>redaxserver -o samples\mark_categories1.pdf -cu -pref samples\prefs\public.xml samples\sample_marked.pdf
In UNIX:
$redaxserver -o ./samples/mark_categories1.pdf -cu -pref ./samples/prefs/public.xml ./samples/sample_marked.pdf
To convert all Acrobat-highlighted and crossed-out text to Redax boxes with no exemption codes and assign a category defined in a preferences file, enter the following command:
$redaxserver -o <output> -ch -cs -pref <preferences.xml> [other options] <input.pdf>
Example: Convert Acrobat-highlighted and crossed-out text in the mark_categories1.pdf file, created in the previous example, and save the output to mark_categories2.pdf. Use the preferences file government.xml, which defines a category of Government.
In Windows:
>redaxserver -o samples\mark_categories2.pdf -ch -cs -pref samples\prefs\government.xml samples\mark_categories1.pdf
In UNIX:
$redaxserver -o ./samples/mark_categories2.pdf -ch -cs -pref ./samples/prefs/government.xml ./samples/mark_categories1.pdf
Marking Text – Using Lists, Patterns, and Regular Expressions
NOTE: The quality and internal structure of PDF files can vary greatly. Consequently, no warranty is offered with respect to the accuracy with which lists, patterns or regular expression lists used with Redax Enterprise Server will locate and mark text. Appligent Document Solutions always recommends a visual review of marked-up documents prior to redaction and release.
Using a list file to mark text
To mark the text in a PDF document that matches the words and phrases in a list file, enter the following command:
$redaxserver -o <output> -flist <listfile.txt> [other options] <input.pdf>
Refer to Creating list files to learn how to create a list file.
Note: If you want the search to be case-insensitive, specify the -ignorecase option.
Redax Enterprise Server searches through the document. Each time it finds text specified for redaction in the list file, it draws a Redax box around the text and overlays the box with the corresponding exemption code from the list file.
Example: Mark text in sample_base.pdf that matches the words and phrases in sample_find_list.txt (both files are in the samples directory), and apply the exemption codes specified in sample_find_list.txt. Perform a case-insensitive search to find all matching text, regardless of capitalization.
In Windows:
>redaxserver -o samples\mark_listed.pdf -flist samples\sample_find_list.txt -ignorecase samples\sample_base.pdf
In UNIX:
$redaxserver -o ./samples/mark_listed.pdf -flist ./samples/sample_find_list.txt -ignorecase ./samples/sample_base.pdf
A segment of the output for this example is displayed in the figure below.

Using a pattern file to mark text
Pattern files are plain text files including items from the Available Patterns List. To develop your own patterns, use a regular expression list file.
To set an exemption code for a specific -fpattern operation, use a preferences file with your desired exemption code set as the default. See Appendix B: RedaxESconfig for more information on creating preferences files for Redax Enterprise Server.
To mark the text in a PDF document that matches the patterns in a pattern file, enter the following command:
$redaxserver -o <output> -fpattern <pattern_listfile.txt> [other options] <input.pdf>
Redax Enterprise Server searches through the document. Each time it finds text specified for redaction in the sample_pattern_list.txt, it draws a Redax box around the text and overlays the box with the exemption code defined in the preferences XML file for the current process. See Appendix B: RedaxESconfig for more information on creating preferences files.
Example: Mark text in sample_base.pdf that matches the patterns in sample_pattern_list.txt (both files are in the samples directory), and apply the exemption codes specified therein.
In Windows:
>redaxserver -o samples\mark_listed.pdf -fpattern samples\sample_pattern_list.txt -ignorecase samples\sample_base.pdf
In UNIX:
$redaxserver -o ./samples/mark_listed.pdf -fpattern ./samples/sample_pattern_list.txt -ignorecase ./samples/sample_base.pdf
A segment of the output for this example is displayed in the figure below. The pattern file is setup to find “Date”. If you wish to search on any other built-in pattern, remove the # sign in front of the pattern name in the sample_pattern_list.txt file.

Available patterns
The patterns provided with Redax Enterprise Server are:
- Credit Card
- Date
- Date numeric period-separated (12.08.2010)
- Date numeric space-separated (12 08 2010)
- EmailUserName
- Postal Code Australia
- Postal Code Brazil
- Postal Code Canada
- Postal Code Denmark
- Postal Code France
- Postal Code Germany
- Postal Code India
- Postal Code Netherlands
- Postal Code Russia
- Postal Code Spain
- Postal Code USA
- Postal Code United Kingdom
- Social Security number
- Telephone # Australia
- Telephone # NA – 7 digit (555-1212)
- Telephone # North American (888) 555-1212
- Telephone# United Kingdom
- URL
Note: To remove a pattern from the active pattern list, place a # at the beginning of the line.
Using a regular expression list file to mark text
If you are already comfortable with regular expressions, then simply refer to Creating list files to learn how to create a regular expression list file. Otherwise, review Appendix A: Regular Expressions.
To mark the text in a PDF document that matches a list of one or more regular expressions, enter the following command:
$redaxserver -o <output> -fregex <regex_listfile.txt> [other options] <input.pdf>
Redax Enterprise Server searches through the document. Each time it finds a match for the regular expressions defined in the sample_regex_list.txt file, it draws a Redax box around the text and overlays the box with the corresponding exemption code from the list file.
Example: Mark text in sample_base.pdf that matches the words and phrases in sample_regex_list.txt (both files are in the samples directory), and apply the exemption codes specified in sample_regex_list.txt. Perform a case-insensitive search to find all matching text, regardless of capitalization.
In Windows:
>redaxserver -o samples\mark_listed.pdf -fregex samples\sample__regex_list.txt -ignorecase samples\sample_base.pdf
In UNIX:
$redaxserver -o ./samples/mark_listed.pdf -fregex ./samples/sample__regex_list.txt -ignorecase ./samples/sample_base.pdf
A segment of the output for this example is displayed in the figure below.
![]()
Marking Text – Command Line Options
Introduction
This section describes the command-line options for marking text for redaction and explains how to use the options to accomplish specific tasks.
The examples provided use the sample files contained in the samples subdirectory where Redax Enterprise Server was installed. In Windows, the default installation directory is C:\Appligent\RedaxServer. In UNIX, it is wherever you installed it.
Command syntax
$redaxserver -o <output> [options] input1.pdf [input2.pdf ...]
Options for marking text — summary
| Type | Option | Parameter | Description |
|---|---|---|---|
| Preferences | -pref | <preferences.xml> | Read preferences from an XML file |
| Find and Mark | -fbracket | Find bracketed text | |
| -markpages | <pages> | Mark single page or list of pages for redaction | |
| -flist | <listfile.txt> | Find using list file | |
| -fpattern | <pattern_listfile.txt> | Find using list file of pattern names | |
| -fregex | <regular_expression_listfile.txt> | Find using list file of regular expressions | |
| -exemptpat | Use the matching pattern name as the exemption code | ||
| -ignorecase | Ignore case during -flist or -fregex operations | ||
| Convert Acrobat- Selected Text |
-cm | Convert all Acrobat-selected text without exemption codes | |
| -ch | Convert Acrobat highlights without an exemption code | ||
| -chc | <exemption> | Convert Acrobat highlights using specified exemption code | |
| -cs | Convert Acrobat crossouts without an exemption code | ||
| -csc | <exemption> | Convert Acrobat crossouts using specified exemption code | |
| -cu | Convert Acrobat underlines with an exemption code | ||
| -cuc | <exemption> | Convert Acrobat underlines using specified exemption code | |
| -cr | Convert Reader XI Rectangle annotation markups | ||
| -crc | <exemption> | Convert Reader XI Rectangle annotation markups using specified exemption code | |
| -crem | Remove Acrobat annotations when using any convert option |
Note: A related option, -rmarkup, enables you to redact Acrobat markups at conversion time.
Options for marking text — details
-pref <preferences.xml> — Read preferences from an XML file
Reads preferences for Redax boxes, redactions, and processing options from the XML file specified by preferences.xml (see example prefs.xml). Preferences are established in the RedaxESconfig utility, supplied with Redax Enterprise Server. If you do not specify a preferences file, Redax Enterprise Server applies the default Redax box and markup processing option preferences described in the table below.
Note: If you specify a preferences file and one or more deprecated options on the command line, the settings in the preferences file will override the deprecated options. The deprecated options are described in Deprecated Command Line Options.
| Type | Property | Description | Default |
|---|---|---|---|
| Redax Boxes | Author | The name of the author to be associated with Redax boxes and Full Page tags. | No author |
| Category | A redaction classification to be associated with Redax boxes and Full-Page tags. | No category | |
| Exemption | An exemption code assigned to Full-Page tags and Redax boxes. | No exemption code | |
| Note | A note to be associated with Redax boxes and Full-Page tags. | No note | |
| Box Color | The border color of Redax boxes. | Red | |
|
Note: This option applies to Redax boxes only; it does not apply to Full-Page tags. |
|||
| Markup Processing | Remove brackets when finding bracketed text | Indicates whether or not to mark the brackets for removal, along with the enclosed text, during a find bracketed text operation (-fbracket). | Do not mark brackets for removal |
-fbracket — Find bracketed text
Finds all text areas between brackets [ ] and draws Redax boxes around them. The brackets themselves are not marked unless you also specify a preferences file that indicates to Remove Brackets when Finding Bracketed Text.
-markpages <pages> — Mark single page or list of pages
Places a Full-page tag on each page specified in <pages> to mark the entire page for redaction. Either specify a single page or a list of pages. In a list, use a comma to separate pages and a dash to indicate a range of pages, as in the following examples. If you include spaces, enclose the list in quotes.
-markpages 6,14,17-20
-markpages “6, 14, 17-20”
-flist <listfile.txt> — Find using list file
Searches the document for all words and phrases in the redaction list file <listfile.txt>, marks them with Redax boxes, and applies the exemption code specified in the list. See Creating list files for more information about redaction list files.
-fpattern <pattern_listfile.txt> — Find using pre-defined patterns
Searches the document for patterns defined in a text file and marks them with Redax boxes. See the list of available patterns. To set an exemption code for an -fpattern process, use a preferences XML file with your desired exemption code set as the default.
-fregex <regex_listfile.txt> — Find using list file of regular expressions
Searches the document for words or phrases matching regular expressions as defined in a list file <regular_expressions_listfile.txt>, marks them with Redax boxes and applies the exemption code specified in the list. See creating list files for more information.
-exemptpat — Use the matching pattern name as the exemption code
Any Redax box created via -fpattern will have an exemption code that is the label of the pattern. For example, if you are looking for “Email” when Redax Enterprise Server finds the information in a file, the word “email” will be applied as the exemption code for these areas.
-ignorecase — Ignore case during find-using-list and find-using-a-regular-expression
Performs a case-insensitive search during the -flist and -fregex operations. By default, -flist and -fregex perform a case-sensitive search.
-cm — Convert all Acrobat highlights, underlines, and crossouts
Converts all Acrobat-highlighted, -underlined, and -crossed-out text to Redax markup but does not apply any exemption codes.
Note: If you specify the -ch, -cs, or -cu option with the -cm option, the -cm option is ignored.
-ch — Convert Acrobat highlights
Converts all Acrobat-highlighted text to Redax markup but does not apply an exemption code.
-chc <exemption> — Convert Acrobat highlights using exemption code
Converts all Acrobat-highlighted text to Redax markup and applies the specified exemption code.
-cs — Convert Acrobat crossouts
Converts all Acrobat-crossed-out text to Redax markup but does not apply an exemption code.
Note: Crossout in Acrobat 6 is the same as strikeout in Acrobat 5.
-csc <exemption> — Convert Acrobat crossouts using exemption code
Converts all Acrobat-crossed-out text to Redax markup and applies the specified exemption code.
-cu — convert Acrobat underlines
Converts all Acrobat-underlined text to Redax markup but does not apply an exemption code.
-cuc <exemption> — Convert Acrobat underlines using exemption code
Converts all Acrobat-underlined text to Redax markup and applies the specified exemption code.
-cr — Convert Adobe Reader XI Rectangle annotations
Converts all Reader XI Rectangle annotations to Redax markup but does not apply an exemption code.
-crc <exemption> — Convert Adobe Reader XI Rectangle annotations using exemption code
Converts all Reader XI Rectangle annotations to Redax markup and applies the specified exemption code.
-crem — Remove Acrobat annotations when using any convert option
Removes all Acrobat highlights, crossouts, and underlines—and any notes associated with them—following conversion to Redax boxes.
Note: You should always remove Acrobat annotations before releasing a document, because they might contain sensitive information. You can do this now with the -crem option or the -rmarkup option, or during redaction with the -remall option.
Marking Images for Redaction
Marking images
If you want to mark all of the bitmap images in a document, use the -fimage option, as described in Finding all bitmap images. If you want to mark all of the vector images, use the -fpath option, as described in Finding all paths in vector images. If you only want to mark some of the images, you can use Redax to draw Redax boxes around just those images.
Redacting Documents
Command-line options
This section describes the command-line options for redacting text.
Command syntax
$redaxserver -o <output> [options] input1.pdf [input2.pdf ...]
Options for redacting text — summary
| Type | Option | Parameter | Description |
|---|---|---|---|
| Preferences | -pref | <preferences.xml> | Read preferences from a XML file |
| Redact | -redact | Redact document | |
| -rmarkup | Redact Acrobat-selected text directly | ||
| -redaxcat | <categories> | Only redact categories in comma-separated list | |
| Finish | -rembox | Remove Redax boxes | |
| -remall | Remove all annotations |
Options for redacting text — details
-pref <preferences.xml> — Read preferences from an XML file
Reads preferences for Redax boxes, redactions, and processing options from the XML file specified by preferences.xml (see example prefs.xml). Preferences are established in the RedaxESconfig utility, supplied with Redax Enterprise Server. If you do not specify a preferences file, Redax Enterprise Server applies the default Redax box and markup processing option preferences described in the table below.
| Type | Property | Description | Default |
|---|---|---|---|
| Redax Boxes | Author | The name of the author to be associated with Redax boxes and Full Page tags. | No author |
| Category | A redaction classification to be associated with Redax boxes and Full-Page tags. | No category | |
| Exemption | An exemption code assigned to Full-Page tags and Redax boxes. | No exemption code | |
| Note | A note to be associated with Redax boxes and Full-Page tags. | No note | |
| Box Color | The border color of Redax boxes.
Note: This option applies to Redax boxes only; it does not apply to Full-Page tags. |
Red | |
| Markup Processing | Remove brackets when finding bracketed text | Indicates whether or not ot mark the brackets for removal, along with the enclosed text, during a find bracketed text operation (-fbracket). | Do not mark brackets for removal |
Note: If you specify a preferences file and one or more deprecated options on the command line, the settings in the preferences file will override the deprecated options. The deprecated options are described in Deprecated Command Line Options.
Note: If you are generating or editing Redax XML preference files, you may want to validate the file against the Redax preferences DTD (redaxserver.dtd) before using file with Redax Enterprise Server. Sample preference files are available in the samples/prefs folder. The DTD is referenced from within the XML file by adding the following line after the initial XML declaration, where /path/ is the location of the downloaded dtd file:
<!DOCTYPE redaxserver SYSTEM "/path/redaxserver.dtd">
-redact — Redact document
Redacts the document.
-rmarkup — Redact Acrobat-selected text directly
Redacts Acrobat-selected text directly. You must use one of the conversion options (-cm, -ch, -chc, -cs, -csc, -cu, -cuc) with the -rmarkup option. The conversion options are described in Marking Text for Redaction
-redaxcat <categories> — Only redact categories in comma-separated list
Redacts only that information which has been assigned to one or more categories. Use a comma-separated list to specify more than one category, as in the following examples. If the list contains spaces, enclose it in quotes.
Category1,Category2
"Category1, Category2"
-rembox — Remove Redax boxes
Removes Redax boxes. If you do not use either the -rembox or -remall option, Redax boxes will remain in the document. (Full-page tags are automatically removed during redaction.)
-remall — Remove all annotations
Removes all annotations, including Redax boxes. If you do not use the -remall option, annotations will remain in the document. (Full-page tags are automatically removed during redaction.)
Note: We strongly recommend that you remove all annotations before you release the redacted document, so that any identifying notes are not mistakenly released with the document.
Redacting a PDF document
After a PDF document has been marked up, it is ready for redaction. The following sections explain some of the different redaction options:
- Performing a simple redaction explains how to redact information marked with Redax boxes and Full-page tags.
- Logging the redaction process describes how to create a file that contains a log of the redaction process.
- Redacting Acrobat-selected text directly tells you how to simultaneously convert and redact Acrobat-selected text.
- Redacting by category explains how to redact information by categories assigned during markup.
Performing a simple redaction
To redact all information marked with Redax boxes and Full-page tags, enter the following command:
$redaxserver -o <output> -redact [other options] <input.pdf>
This command redacts the information in Redax box and Full-page tags, and saves the results to the specified output file or directory. The original input.pdf file remains unchanged.
Example: Redact text in sample_marked.pdf, located in the samples directory, and save the results to simple_redaction.pdf. Use a preferences file that specifies a 50% black fill and frame for redacted areas with the exemption code centered.
In Windows:
>redaxserver -o samples\simple_redaction.pdf -redact -pref samples\prefs\black50center.xml samples\sample_marked.pdf
In UNIX:
$redaxserver -o ./samples/simple_redaction.pdf -redact -pref ./samples/prefs/black50center.xml ./samples/sample_marked.pdf
The figure below shows an example of a redacted area following execution of this command.
Logging the redaction process
To create a log containing feedback about the redaction process, enter the following command:
$redaxserver -o <output> -redact -l <logfile.txt> -p [other options] <input.pdf>
This command writes progress and error messages to the screen and to the log file. The -o option must be followed by a file or directory name, and the -l option must be followed by a file name, or you won’t get the results you expect. The -l and -p options can be used separately or together in various combinations to produce different types of output (progress/error messages) in different places (screen/log file). See General Options – Redax Enterprise Server for more information.
Example: Redact text in sample_marked.pdf, located in the samples directory, and save the results to redact_and_log.pdf. Log progress and error messages to the screen and to redaction_log.txt. Use a preferences file that specifies a 50% black fill and frame for redacted areas with the exemption code centered.
In Windows:
>redaxserver -o samples\redact_and_log.pdf -redact -pref samples\prefs\black50center.xml -l samples\redaction_log.txt -p samples\sample_marked.pdf
In UNIX:
$redaxserver -o ./samples/redact_and_log.pdf -redact -pref ./samples/prefs/black50center.xml -l ./samples/redaction_log.txt -p ./samples/sample_marked.pdf
The example below shows a sample log file created after running this command.
Fri Aug 12 10:53:43 2011
c:\Appligent\RedaxServer\redaxserverapp -p -o .\samples\redax_and_log.pdf
-redact -pref .\Samples\prefs\black50center.xml -l .\Samples\redaction_log.txt .\samples\sample_marked.pdf
Version 3.1.2  Built with library version 9.1.0PlusP2c
Reading preference file: .\Samples\prefs\black50center.xml

Input file : .\samples\sample_marked.pdf
Output file : .\samples\redax_and_log.pdf
Processing: .\samples\sample_marked.pdf
Redacting document
Saving output PDF file
Saving : .\samples\redax_and_log.pdf
Done: .\samples\redax_and_log.pdf
Redax Enterprise Server completed successfully.
Redacting Acrobat-selected text directly
To convert Acrobat markup to Redax markup and then redact the marked-up text, use the -rmarkup option with one or more conversion options (-cm, -ch, -chc <string>, -cs, -csc <string>, -cu, -cuc <string>, -crem). The following scenarios are the same as those presented in Marking Text for Redaction but with the addition of the -rmarkup option.
To convert all Acrobat-highlighted, -underlined, and -crossed-out text to Redax boxes with no exemption codes and then redact the marked-up text, enter the following command:
$redaxserver -o <output> -cm -rmarkup [other options] <input.pdf>
Redax Enterprise Server searches through the document and draws a Redax box around all Acrobat-highlighted, -underlined, and -crossed-out text. If exemption codes are specified in the preferences file, they are ignored. The document is automatically marked to allow redaction without exemption codes. (Allow Redaction without Exemption does not have to be specified in the preferences file.)
Example: Convert and redact all Acrobat-highlighted, -underlined, and -crossed-out text in the sample_marked.pdf file, located in the samples directory, and save the output to mark_all_selected.pdf. Use a preferences file that specifies a blue Redax box and assigns John Jones as the author.
In Windows:
>redaxserver -o samples\mark_all_selected.pdf -cm -rmarkup -pref samples\prefs\blueJones.xml samples\sample_marked.pdf
In UNIX:
$redaxserver -o ./samples/mark_all_selected.pdf -cm -rmarkup -pref ./samples/prefs/blueJones.xml ./samples/sample_marked.pdf
To convert one or more types of Acrobat-selected text to Redax markup without exemption codes and then redact the marked-up text, enter the following command:
$redaxserver -o <output> <conversion option(s)> -rmarkup [other options] <input.pdf>
Redax Enterprise Server searches through the document. Each time it finds the type of Acrobat-selected text specified by the conversion options, it draws a Redax box around the text. If exemption codes are specified in the preferences file, they are ignored. The document is automatically marked to allow redaction without exemption. (Allow Redaction without Exemption does not have to be specified in the preferences file.)
Example: Convert and redact Acrobat-underlined and crossed-out text in the sample_marked.pdf file, located in the samples directory, and save the output to mark_undercross.pdf. Remove the underlines and crossouts, and use a preferences file that specifies a yellow Redax box.
In Windows:
>redaxserver -o samples\mark_undercross.pdf -cu -cs -crem -rmarkup -pref samples\prefs\yellowDoe.xml samples\sample_marked.pdf
In UNIX:
$redaxserver -o ./samples/mark_undercross.pdf -cu -cs -crem -rmarkup -pref ./samples/prefs/yellowDoe.xml ./samples/sample_marked.pdf
To convert one or more types of Acrobat-selected text to Redax markup with exemption codes and then redact the marked-up text, enter the following command:
$redaxserver -o <output> <conversion option(s)-exemption code> -rmarkup [other options] <input.pdf>
Redax Enterprise Server searches through the document. Each time it finds the type of Acrobat-selected text specified by the conversion options, it draws a Redax box around the text and overlays the box with the specified exemption code.
Note: If exemption codes are specified in the preferences file, they are ignored.
Example: Convert and redact Acrobat-highlighted text in the sample_marked.pdf file, located in the samples directory, and save the output to markredacted_highlighted.pdf.
Overlay the box with the Freedom of Information Act exemption code (b) (4).
In Windows:
>redaxserver -o samples\mark_highlighted.pdf -chc “(b)(4)” -rmarkup samples\sample_marked.pdf
In UNIX:
$redaxserver -o ./samples/mark_highlighted.pdf -chc “(b)(4)” -rmarkup ./samples/sample_marked.pdf
Redacting by category
When Redax boxes are assigned to categories during markup (see Creating category-based markup), you can redact the information by category with the following command:
$redaxserver -o <output> -redact -redaxcat <categories> [other options] <input.pdf>
This command redacts only the information in Redax boxes assigned to the listed categories and saves the results to the specified output file or directory. Information in other categories is not redacted.
Example: Redact text in Redax boxes assigned to the category “Government” in mark_categories.pdf, located in the samples directory, and save the results to redact_categories.pdf. Use the preferences file noexempt.xml, which allows redaction without exemption codes.
In Windows:
>redaxserver -o samples\redact_categories.pdf -redact -redaxcat Government -pref samples\prefs\noexempt.xml samples\mark_categories.pdf
In UNIX:
$redaxserver -o ./samples/redact_categories.pdf -redact -redaxcat Government -pref ./samples/prefs/noexempt.xml ./samples/mark_categories.pdf
Before Release
Reviewing the document
After you redact a document, you should review it. Open the document in Acrobat and check to make sure that all sensitive information has been redacted, as desired:
- Make sure that reviewers have marked all sensitive information accurately and completely.
Make sure that the Find Using List feature of Redax found all instances of specified text. See determining what can be redacted for help on what to look for.
Removing Redax boxes
To remove the Redax boxes from a redacted document, enter the following command:
$redaxserver -o <output> -rembox <input.pdf>
Example: Remove all Redax boxes from the redacted file sample_redacted.pdf, located in the samples directory, and save the results to remove_boxes.pdf.
In Windows:
>redaxserver -o samples\remove_boxes.pdf -rembox samples\sample_redacted.pdf
In UNIX:
$redaxserver -o ./samples/remove_boxes.pdf -rembox./samples/sample_redacted.pdf
The figure below shows an example of a redacted area following execution of this command.

Removing annotations
If you highlighted sensitive information in a document, that information might remain in an associated annotation following redaction. We recommend you remove all annotations before releasing your documents.
To remove all annotations from a redacted document, enter the following command:
$redaxserver -o <output> -remall <input.pdf>
Example: Remove all annotations from the file sample_redacted.pdf, located in the samples directory, and save the results to remove_annot.pdf.
In Windows:
>redaxserver -o samples\remove_annot.pdf -remall samples\sample_redacted.pdf
In UNIX:
$redaxserver -o ./samples/remove_annot.pdf -remall ./samples/sample_redacted.pdf
The figure below shows an example of a redacted area following execution of this command. Although the redacted area looks the same as the redacted area after running -rembox, all other annotations are removed from the document, as well. These annotations may not be immediately visible in the original document, but they pose a security risk if not removed, because they can be recovered by anyone with knowledge of PDF document structure.
.png?width=344&height=69&name=RedactArea2-50%20(1).png)
Generating Reports
About Redax box reports
A Redax box report is a text file that catalogs each Redax box in the document. The report file is tab delimited, so you can import it into a spreadsheet or other software for easier analysis or processing.
You can generate a Redax box report any time in the redaction process as long as the document contains Redax markup. The report indicates the total number of Redax boxes and Full-page tags and contains the following information for each one:
- Page number
- Type of markup (Redax box or Full-page tag)
- Modification date and time
- Redaction category
- Exemption code
- Author
- Note
- Top, left, bottom, and right coordinates, if the markup is a Redax box
About Text reports
A Text report is the PDF reading-order text output from the PDF file. There are several options in generating Text reports to suit a wide variety of integration options, including support for Natural Language Processing (NLP) systems and backend XML or other text-based presentational or search subsystems.
You can generate a Text report any time in the redaction process—before or after redacting a document as long as the Redax boxes are still present in the redacted file.
Command-line options
This section describes the command-line option for generating each type of report.
Command syntax
$redaxserver [options] -<report_option> <report.txt> input1.pdf [input2.pdf ...]
Options — summary
| Option | Parameter | Description |
|---|---|---|
| -sumfile | report.txt | write Redax box report to a file |
| -textfile | report.txt | exports plain text to a file |
| -textindex | report.txt | exports text with offsets to a file |
| -textxml | report.xml | exports text to an XML file |
Option — description
-sumfile <report.txt> — write Redax box report to file
Generates a Redax box report and writes it to the text file you specify. You cannot use the -redact or -rmarkup option with the -sumfile option. See RedaxReport.txt for an example report using this option.
-textfile <report.txt> — exports plain text to file
Each line of PDF text is written to a line in the output file. Blank lines are written at the end of each page. Additionally, the file begins with the original PDF name, and each page begins with a page number. The first page is page 1. See textfile_sample.txt for an example report using this option.
-textindex <report.txt> — exports text with offsets to a file
Each line of PDF text is written to a line in the output file. Each line, word, and character offset is relative to the beginning of the page, with the least offset being zero. The first page is page 1. The word and character offsets apply to the first word on the line. See textindex_sample.txt for an example report using this option.

-textxml <report.xml> — exports text to an XML file
Similar to the textfile report, -textxml reports out document text in an XML format. See textxml_sample.xml for an example report using this option.

Creating Reports
To create a redax box report, enter the following command:
$redaxserver -sumfile <report.txt> <input.pdf>
This command creates a report on the input.pdf file and saves it to the report.txt file.
Example: Create a Redax box report on sample_marked.pdf, located in the samples directory, and save the output to report_marked.txt.
In Windows:
>redaxserver -sumfile samples\report_marked.txt samples\sample_marked.p
In UNIX:
$redaxserver -sumfile ./samples/report_marked.txt ./samples/sample_marked.pdf
Import & Export Markup with RESxml
About RESxml
RESxml files are xml files containing complete details about the Redax boxes contained in a given PDF file (see RESxml.dtd in the samples folder).
These files are useful in the following scenarios:
- “Template” applications, in which the information to be redacted is always located in the same place on the page, and for which the page-size and orientation is always the same.
- Storing markup separately from the PDF document (for example, in a database or document management system).
- Cases in which you wish to alter existing Redax boxes programmatically (for example, to change exemption codes or set categories).
- Cases in which you wish to retrieve and analyze data about Redax boxes (for example, to compute redaction volumes, square-inches and other metrics).
- Cases in which you wish to add or remove Redax boxes based on category.
Export to Database or Document Management System
The -exemptpat option (see Markup Options) places the name of the pattern that found this specific Redax box into the Exemption field in the Redax box.
The -annotmatch option places the full text of the area into the Note field in the Redax box that was found when using Find Using Pattern or Find Using Regular Expressions.
In both cases, this information is included with the XML export options noted below, and thus may be saved to a database or document management system independent of the PDF file itself. This is useful for tracking information marked for redaction and the type of data that is marked for redaction.
Command-line options
This section describes the command-line options for creating RESxml and applying RESxml. Subsequent sections of this chapter explain how to use the options to accomplish these tasks.
Options for working with RESxml — summary
| Option | Parameter | Description |
|---|---|---|
| -expfile | filepath | Create (export) a RESxml file |
| -impfile | filepath | Apply (import) a RESxml file |
| -detfile | filepath | Write Redax Box detail report to file |
| -detdtd | Write DTD for redax detail report | |
| -detpage | integer | Page number for Redax detail report |
Options for working with RESxml — details
–expfile — create (export) a RESxml file
Creates a RESxml file based on the Redax box locations in a PDF file. The -expfile option must be followed by the desired file name for the RESxml file and then the file name of the PDF document.
$redaxserver -expfile <RESxml.xml> <input.pdf>
-impfile — apply (import) a RESxml file
Applies Redax boxes to a PDF document based on a RESxml file. The -impfile option must be followed by the RESxml file name and PDF output option (-o), and then the PDF input file name or directory:
$redaxserver -impfile <RESxml.xml> -o <output> <input>
-detfile <filename.xml> — Write Redax Box detail report to file
Contains additional information not present in the -expfile option. You cannot use the -redact or -rmarkup option with the -detfileoption.
$redaxserver -detfile <detfile.xml> <input>
-detpage <page> — Page number for Redax detail report
Limits a detail report to a specific page. You cannot use the -redact or -rmarkup option with the -detpage option.
$redaxserver -detpage -detfile <detfile.xml> <input>
-detdtd — Write DTD for redax detail report
Includes a DTD as part of the detail report file (as generated by -detfile). You cannot use the -redact or -rmarkup option with the -detdtd option
$redaxserver -detdtd -detfile <detfile.xml> <input>
Creating RESxml
To create RESxml from a PDF document, enter the following command:
$redaxserver -expfile <RESxml.xml> <input.pdf>
The input.pdf file should be marked up, as described in Marking Text for Redaction
A RESxml file is created.
Example: Use the marked-up sample_form.pdf file, located in the samples directory, as the source for a template called my_RESxml.xml to be created in the samples directory.
In Windows:
>redaxserver -expfile samples\my_RESxml.xml samples\sample_form.pdf
In UNIX:
$redaxserver -expfile ./samples/my_RESxml.xml ./samples/sample_form.pdf
Applying RESxml
You can apply a RESxml file to mark up or redact a document.
Using a RESxml file for markup
To mark up a PDF document based on a RESxml file, enter the following command:
$redaxserver -impfile <RESxml.xml> -o <output> <input.pdf>
The RESxml file is applied to the input.pdf file, and the results are saved to the specified output file or directory. The input.pdf file is not changed.
Example: Apply the sample_RESxml.xml file, located in the samples directory, to sample_multiple_forms.pdf, also in the samples directory. Save the output to template_markup_results.pdf in the samples directory.
In Windows:
>redaxserver -impfile samples\sample_RESxml.xml -o samples\template_markup_results.pdf samples\sample_multiple_forms.pdf
In UNIX:
$redaxserver -impfile ./samples/sample_RESxml.xml -o ./samples/template_markup_results.pdf ./samples/sample_multiple_forms.pdf
Using a RESxml file for redaction
To redact a PDF document based on a RESxml file, enter the following command:
$redaxserver -impfile <RESxml.xml> -redact -o <output> <input.pdf>
The RESxml file is applied to the input.pdf file, a redaction is performed, and the results are saved to the specified output file or directory. The input.pdf file is not changed.
Note: Active form fields must be flattened in the file. Redax Enterprise Server cannot redact text in active form fields. There are several ways to flatten form fields: use FDFMerge or FDFMerge Lite or if you have Redax Plug-in 5.0, select the option Remove All Form Fields from the Redax Menu.
Example: Apply the sample_RESxml.xml file to sample_multiple_forms.pdf (both in the samples directory), and redact the results. Save the output to template_redaction_results.pdf in the samples directory.
In Windows:
>redaxserver -impfile samples\sample_RESxml.xml -redact -o samples\template_redaction_results.pdf samples\sample_multiple_forms.pdf
In UNIX:
$redaxserver -impfile ./samples/sample_RESxml.xml -redact -o ./samples/template_redaction_results.pdf ./samples/sample_multiple_forms.pdf
Working with Watched Directories
About watch directories
A watch directory is a special directory, or folder, that resides on the server and is associated with a Redax Enterprise Server command. When a document is placed in a watch directory, it is processed according to the options on the command.
You can create as many watch directories as you like. Typically, you would create one for each Redax Enterprise Server function that is routinely performed at your organization. For example, you might want to create one watch directory to convert Acrobat-selected text to Redax markup, and another watch directory to redact the Redax-marked documents. Or, you might want to create different watch directories for different preferences files.
Once a watch directory is set up and running, users can use it to process multiple documents simultaneously without opening a terminal window or entering a single command. They simply place files into the watch directory for processing and retrieve the output.
Command-line options
This section describes the command-line option for creating watch directories. Subsequent sections of this chapter explain how to create and use watch directories.
Command syntax
$redaxserver -watch <watch directory> [watch options]
Option description
-watch — watch directory for input
Activates the watch directory and executes the specified processing options when a document is dropped into the directory. All of the options described in this manual can be used with the -watch option except the following: -sumfile, -expfile, -h, -help, and -v.
Creating watch directories
To create a watch directory:
- Make a new directory on the server and give it a meaningful name. For example, if you are creating a watch directory for redacting documents, you could create a directory named Redact.
- Open an instance of the server.
- Change your working directory to the Redax Enterprise Server directory. The default location for Redax Enterprise Server on Windows is C:\Appligent\RedaxServer\. On other platforms, it will be wherever you installed it.
- Enter the following command:
$redaxserver [options] -watch <watch directory>
The command activates the watch directory and runs continuously in the background, processing whatever options are specified. It also creates three subdirectories—in, original, and out—which are used during document processing (see Processing documents with watch directories below).
Example: Create a subdirectory called Redact in the Redax Enterprise Server samples directory. Then enter the following command to activate it as a watch directory for redacting documents.
In Windows:
>redaxserver -redact -watch samples\Redact
In UNIX:
$redaxserver -redact -watch ./samples/Redact
Following activation of the watch directory:
- Give users access to the server so that they can use the watch directory
- If you want to create multiple watch directories, repeat the steps using a new directory name and new server instance for each watch directory.
Processing documents with watch directories
To process documents using a watch directory:
- Open the file management application in your GUI (graphical user interface).
- Access the server where the watch directory is located.
- Place the documents to be processed in the watch directory’s “in” subdirectory.
- Retrieve the processed files from the watch directory’s “out” subdirectory.
Example: If a watch directory named Redact has been set up for redacting documents, drag, copy, or FTP your PDF documents to its “in” subdirectory.
When the documents have been processed, the original files are moved to a subdirectory called “original” and the processed files are placed in a subdirectory called “out”.
Applying Standard Security with Redax Enterprise Server
Acrobat Standard Security
Acrobat standard security allows you to control who can access your document and, by setting permissions, how much they can edit or print. Acrobat offers three levels of security:
- Low-level encryption (40-bit key length) — Compatible with Acrobat versions 3 and later.
- High-level encryption (128-bit key length) — Compatible with Acrobat versions 5 and later.
- AES encryption (128-bit key length) — Available only with Acrobat 8 and later.
- AES encryption (256-bit key length — available for SecurSign & APCrypt only) — Available only with Acrobat X, XI and DC.
High level encryption provides a higher level of security and finer control over security features. The minimum level of security that you can set is to allow any changes except extracting pages.
Once you set encryption on a document, it cannot be processed in other ways unless the password is available to the processing software. You can also change or remove encryption in Acrobat.
Owner and user passwords
All levels of security allow you to set passwords for the document:
- User password: controls who may view a document.
- Owner password (required): controls who may make changes to permissions and passwords securing a document.
You must set an Owner password to apply encryption. Do not use the same password for both User and Owner. If the same password is used for both, only the User password will be set.
Different versions of Acrobat use different terminology to refer to the same concepts. You’ll see more of this in High-level encryption password nomenclature as described in the following table for various versions of Adobe Acrobat:
| Type | Acrobat X, XI & DC |
|---|---|
| User | Document Open |
| Owner | Change Permissions |
Encryption Permissions
Acrobat allows you to set various permissions to limit access to the information in the document. Adobe changes the use of permissions when they moved from 40-bit key lengths to 128-bit key lengths. The sections below detail the different options and permissions based on using 40-bit or 128/256 bit key lengths.
The following is an example of the security options in Acrobat X, XI & DC:
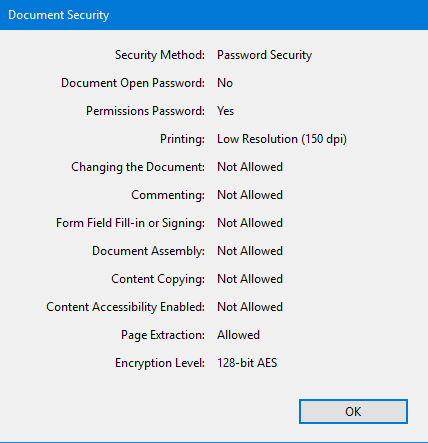
Refer to Verifying Security Features for instructions on displaying the security options.
Encryption options
The table below describes low-level encryption options.
High level encryption provides additional security options as are defined in the table below.
| Type | Option | Parameter | Description |
|---|---|---|---|
| Encryption | -encrypt | Encrypt using the RC4 stream cypher (same as -rc4) | |
| -aes | Encrypt using the Advanced Encryption Standard (AES) algorithm (SecurSign & APCrypt) | ||
| -rc4 | Encrypt using the RC4 stream cypher | ||
| -keylength | 128 | Key length. Valid options are 40, 128 or 256. Default is 128. (256 bit – SecurSign & APCrypt Only) | |
| -ownerpass | oPassword | New owner password (required) | |
| -userpass | uPassword | New user password | |
| -onlyattach | Encrypt document attachments only using AES; to use the PDFas a secure envelope for the attachments (requires -userpass) (SecurSign Only) | ||
| -remove | Remove all encryption from the PDF document. (Requires -ownerpass) | ||
| -d | Password | Old owner password – (Except AppendPDF & AppendPDF Pro) | |
| Permissions | -noaccess | Do not allow accessibility (128 & 256) – (256 bit – SecurSign & APCrypt Only) | |
| -nocopy | Do not allow copying text or graphics | ||
| -noprint | Do not allow printing | ||
| -nohighres | Do not allow high resolution printing (128 & 256) – (256 bit – SecurSign & APCrypt Only) | ||
| -nomodify | Do not allow modifying the document | ||
| -nonotes | Do not allow adding or changing notes or form fields | ||
| -nofill | Do not allow filling in form fields or signing (128 & 256) – (256 bit – SecurSign & APCrypt Only) | ||
| -noassembly | Do not allow document assembly (128 & 256) – (256 bit – SecurSign & APCrypt Only) |
The first four permissions can be used in any combination, except you can’t use -noprint and -nohighres together. Choose one or the other. The last four must be used in specific combinations that Acrobat accepts.
-encrypt — Encrypt output file (optional)
Specifies applying encryption to the output file using the RC4 stream cypher. This option is the same as -rc4.
-aes — Encrypt using the AES cryptography algorithm (optional) (SecurSign & APCrypt Only)
Encrypt the output file using the Advanced Encryption Standard (AES) cryptography algorithm.
-rc4 — Encrypt using the RC4 cryptography algorithm (optional)
Specifies applying encryption to the output file.
-keylength <int> — Encryption level (optional)
Specifies the encryption key length used to encrypt the document: either 40-bit, 128-bit or 256-bit. (256- bit SecurSign & APCrypt Only)
If you do not specify key length, the default is 128-bit.
-ownerpass <password> — New owner password (required)
Specifies a new Owner password to apply encryption. An Owner password restricts you from altering the security settings. You are not prompted for a password to open the document, only if you try to change the security settings. Passwords are case sensitive and are required when applying encryption.
Choose passwords carefully. They should not be able to be guessed easily but at the same time should not be too difficult for you to remember. If you forget a password, there is no way to recover it from the document. Therefore, it is a good idea to note passwords in another secure location.
-userpass <password> — Set user password (optional)
Specifies a User password for the document. Setting a User password prevents a document from being opened unless the correct password is supplied. Passwords are case sensitive.
Below is the Document Open Password dialog box.
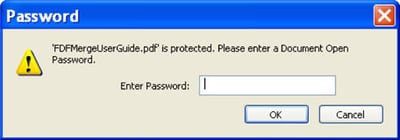
When someone tries to open the document in Acrobat they will be asked for the password.
User password is optional. If you do not specify a User password, anyone can open the document.
-onlyattach — Secure Envelope(optional) (SecurSign Only)
Utilize PDFs as secure envelopes; apply 256-bit AES security to PDF and non-PDF file attachments while leaving the PDF itself unencrypted.
-remove — Remove all encryption from the PDF document
Removing encryption from the PDF document requires the document owner password using -ownerpass.
-d <string> — Old owner password to decrypt the file (Not available for AppendPDF & AppendPDF Pro)
If a PDF file already has encryption set and you wish to change the settings or remove encryption (APCrypt/SecurSign only), you need to supply the owner password in order to make changes to the file.
Document Permissions
-noprint — Do not allow printing (optional)
Specifies that the document cannot be printed. When the document is opened, the print icon on the toolbar and the Print option under the file menu will be grayed out.
At the 128-bit and 256-bit encryption level there is also an option to allow low resolution printing only. See the section High-level encryption for more detail.
-nomodify — Do not allow modifying the document (optional)
Specifies that the document cannot be modified. You will not be able to modify text or pages in the document when this option is used. You can fill in form fields, or add notes or other annotations.
With -nomodify, the following tools are grayed out and cannot be used when the document is opened in Acrobat:
- Crop tool
- Movie tool
- Link tool
- Article tool
- Form tool
- Digital Signature tool
Text can be selected for copying but cannot be cut, pasted or cleared.
-nocopy — Do not allow copying text or graphics (optional)
Specifies text and graphics cannot be copied.
With -nocopy, the following tools are grayed out and cannot be used when the document is opened in Acrobat:
- Text Select tool
- Touch-Up Text tool
- Table/Formatted Text Select tool
-nonotes — Do not allow adding or changing notes or form fields (optional)
Specifies that annotations cannot be added or changed in the document. Annotations include notes, highlighted text, form fields and pencil marks. Annotations can be in text, graphic or audio format, or even attached external files.
With -nonotes, the following tools are grayed out and cannot be used when the document is opened in Acrobat:
- Notes tool
- Pencil tool
- Highlight Text tool
- Form tool
- Digital Signature tool
- Free Text tool
- Sound Attachment tool
- Stamp tool
- File Attachment
- Square tool
- Circle tool
- Line tool
-noaccess — Do not allow accessibility (optional)
Specifies content accessibility is not allowed. Content accessibility provides the vision and motion-challenged community with the tools and resources to make digital information more accessible. To learn more about content accessibility consult the Acrobat Help guide within Acrobat.
-nohighres — Do not allow high resolution printing (optional)
Specifies low resolution printing only. Acrobat prints each page as a low resolution (150 dpi) bitmap. The document cannot be recreated from these printouts.
-nofill — Do not allow filling form fields or signing fields
Specifies that no changes can be made to form fields or digital signature fields. This setting effectively prevents a filled-in form from being changed.
-noassembly — Do not allow document assembly
Specifies that no new pages can be added or removed from the PDF document. Also prevents rotating pages in the document. Effectively prevents pages being removed from the PDF document to be used elsewhere.
Permissions Allowed with 40-bit Encyption
The table below shows how the software application security options correspond to Acrobat’s security restrictions. The “Changes Allowed” column below lists the features still available after the document is secured.
| Option | Restrictions Set (Not Allowed) |
Changes Allowed |
|---|---|---|
| -nocopy | Content Copying or Extraction Content Accessibility |
|
| -noprint | Printing | |
| -nomodify -nonotes |
Changing the Document Document Assembly Authoring Comments and Form Fields Form Field Fill-in or Signing |
None |
| -nomodify | Changing the Document Document Assembly |
Commenting, filling in form fields, and signing |
| -nonotes | Authoring Comments and Form Fields | Page layout, filling in form fields, and signing |
| none | Any except extracting pages |
Permissions Allowed with 128-bit or 256-bit Encryption
Acrobat accepts certain combinations of the “Changes Allowed” options. The Changes Allowed options are:
- -nomodify — Do Not Allow Modifying the Document
- -noassembly — Do Not Allow Document Assembly
- -nonotes — Do Not Allow Adding or Changing Notes or Form Fields
- -nofill — Do Not Allow Filling In or Signing of Form Fields
The table below shows security options vs. restrictions set with high level encryption. These combinations are discussed below.
| Option | Restrictions Set (Not Allowed) |
|---|---|
| -noaccess | Content Accessibility |
| -nocopy | Content Copying or Extraction |
| -noprint | Printing |
| -nohighres | Only Low Resolution Printing is allowed |
| -nomodify -nonotes -nofill -noassembly |
Changing the Document Authoring Comments and Form Fields Form Field Fill-in or Signing Document Assembly |
| -nomodify -nonotes -nofill |
Changing the Document Authoring Comments and Form Fields Form Field Fill-in or Signing |
| -nomodify -nonotes -noassembly |
Changing the Document Authoring Comments and Form Fields Document Assembly |
| -nomodify -noassembly |
Changing the Document Document Assembly |
| none |
Allow no changes with -nomodify -noassembly -nonotes -nofill
Turning off all changes means: do not allow document modification (-nomodify), do not allow document assembly (-noassembly), do not allow the adding or changing of notes or form fields (-nonotes) and do not allow the fill-in or signing of form fields (-nofill). These options must all be used together for this setting to be made.
Allow inserting, deleting, and rotating pages with -nomodify -nonotes -nofill
This setting only allows document assembly.
These options specify: do not allow document modification (-nomodify), do not allow the adding or changing of notes or form fields (-nonotes) and do not allow the fill-in or signing of form fields (-nofill).
Allow filling in form fields, and signing with -nomodify -noassembly -nonotes
This setting only allows form field fill-in or signing.
These options specify: do not allow document modification (-nomodify), do not allow document assembly (-noassembly), and do not allow the adding or changing of notes or form fields (-nonotes).
Allow commenting, filling in form fields, and signing with -nomodify -noassembly
This setting allows the adding or changing of notes or form fields and the fill-in or signing of form fields.
These options specify: do not allow document modification (-nomodify), and do not allow document assembly (-noassembly).
Allow any except extracting pages with no options
If you don’t use any Changes Allowed options, Acrobat will allow any changes except extracting pages.
Verifying Security Features
To view the current security settings:
| Acrobat X, XI and DC | Select File > Properties. Click the Security tab, then click the Show Details… button. |
|---|
In the example shown below, both a User password and an Owner password are set, only low resolution printing is allowed, changing the document, content copying and extraction, authoring comments and form fields, and form field fill-in or signing are not allowed, content accessibility and document assembly are allowed and encryption is 128-bit.
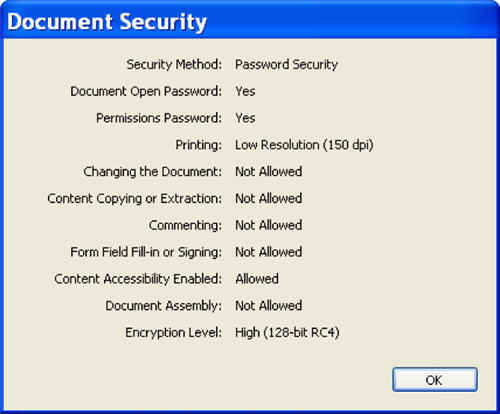
Explanation of Exemptions
Freedom of Information Act (50 U.S.C. 552)
The exemption designations specified under the Freedom of Information Act are described below.
(b)(1)
Applies to information which is currently and properly classified pursuant to an Executive Order in the interest of national defense or foreign policy (EO 12958 and DoD Reg 5200.1-R). Information may not be considered for classification unless it concerns:
- (1.5)(a) military plans, weapons systems, or operations,
- (1.5)(b) foreign government information,
- (1.5)(c) intelligence activities (including special activities), intelligence sources or methods, or cryptology,
- (1.5)(d) foreign relations or foreign activities of the United States, including confidential sources,
- (1.5)(e) scientific, technological, or economic matters relating to the national security,
- (1.5)(f) United States Government programs for safeguarding nuclear materials or facilities,
- (1.5)(g) vulnerabilities or capabilities of systems, installations, projects or plans relating to the national security.
(b)(2)
Applies to information which pertains solely to the internal rules and practices of the agency; this exemption has two profiles: “high” and “low.” The “high” profile permits withholding of a document which, if released, would allow circumvention of an organization rule, policy, or statute, thereby impeding the agency in the conduct of the mission. The “low” profile permits withholding if there is no public interest in the document and it would be an administrative burden to process the request.
(b)(3)
Applies to information specifically exempted by a statute establishing as particular criteria for withholding. The language of the statute must clearly state that the information will not be disclosed.
(b)(4)
Applies to information such as trade secrets and commercial or financial information obtained from a company on a privileged or confidential basis which, if released, would result in competitive harm to the company.
Applies to inter- and intra-agency memoranda which are deliberative in nature; this exemption is appropriate for internal documents which are part of the decision-making process and contain subjective evaluations, opinions and recommendations.
(b)(6)
Applies to information the release of which could reasonably be expected to constitute a clearly warranted invasion of the personal privacy of individuals.
(b)(7)
Applies to records or information compiled for law enforcement purposes that
- (1.5)(a) could reasonably be expected to interfere with law enforcement proceedings,
- (1.5)(b) would deprive a person of a right to a fair trial or impartial adjudication,
- (1.5)(c) would reasonably be expected to constitute an unwarranted invasion of the personal privacy of others,
- (1.5)(d) disclose the identity of a confidential source,
- (1.5)(e) disclose investigative techniques and procedures,
- (1.5)(f) could reasonably be expected to endanger the life or physical activity of an individual.
(b)(8)
Applies to matters that are contained in or related to examination, operating, or condition reports prepared by, on behalf of, or for use of any agency responsible for the regulation or supervision of financial institutions.
(b)(9)
Applies to geological and geophysical information and data, including maps, concerning wells.
Privacy Act (5 U.S.C. 552a)
Each exemption designation under the Privacy Act is described fully below.
(b)
Applies to information concerning other individuals which may not be released without their written consent.
(d)(5)
Information compiled in reasonable anticipation of a civil action proceeding.
(j)(1)
Applies to polygraph records; documents or segregate portions of documents, the release of which would disclose intelligence sources and methods, including names of certain agency employees and organizational components; and documents or information provided by foreign governments; (CIA exemption).
(j)(2)
Material reporting investigative efforts pertaining to the enforcement of criminal law including efforts to prevent, control, or reduce crime or apprehend criminals, except records of arrest.
(k)(1)
Applies to information and material property classified pursuant to an Executive Order in the interest of national defense or foreign policy.
(k)(3)
Material maintained in connection with providing protective services to the President of the United States or any other individual pursuant to the authority of Title 18, United States Code, Section 3056.
(k)(4)
Required by statute to be maintained and used solely as statistical records.
(k)(5)
Applies to investigatory material compiled solely for the purpose of determining suitability, eligibility, or qualifications for Federal civilian employment, or access to classified information, the release of which would disclose a confidential source.
(k)(6)
Testing or examination material used to determine individual qualifications for appointment or promotion in Federal government service, the release of which would compromise the testing or examination process.
(k)(7)
Material used to determine potential for promotion in the armed services, the disclosure of which would reveal the identity of the person who furnished the material pursuant to a promise that his identity would be held in confidence.
Deprecated Command Line Options
In this chapter…
…we describe some command-line options that have been deprecated. The deprecated options are still functional to preserve backward compatibility of existing code, but they should not be used in new code. Most of these options were used to establish preferences in prior versions of Redax Enterprise Server. They were deprecated in favor of the RedaxESconfig, which is described in Preparing for Redaction.
Important! If you are new to Redax Enterprise Server, do not use command-line options to establish preferences. Use RedaxESconfig instead.
Deprecated options — summary
| Type | Option | Parameter | Description |
|---|---|---|---|
| Redax Boxes | -author | <string> | Assign author name to Redax boxes |
| -blank | Replace marked text with blank space | ||
| -char | <c> | Use specified redaction character; default is ‘-“ | |
| -color | <string> | Assign border color to Redax boxes | |
| -exemption | <string> | Redax box exemption code for “find” operation | |
| Redactions | -exemptioncode | <value> | Placement of exemption code after redaction |
| -fillrectangle | <transparency> | Fill rectangle with transparent color | |
| -showrectangle | Display rectangle where content has been redacted | ||
| Options | -b | Preserve bookmarks in redacted document | |
| -noexempt | Allow redaction without exemption | ||
| -rembracket | Mark brackets for removal with -fbracket option | ||
| Other | -debugpref | Write preferences values to log file | |
| -markpage | <pagenumber> | Mark entire page for redaction |
Deprecated options — detail
-author <string> — assign author name to Redax boxes
Specifies an author name to be associated with the Redax boxes. If the name contains one or more spaces, enclose it in quotes.
-blank — fill Redax boxes with blank space
Replaces text marked for redaction with blank space (white space) instead of a redaction character.
-char <c> — use specified redaction character; default is “-”
Specifies a redaction character to replace the text in Redax boxes. Choose a character that is already present in the document (in other words, part of the embedded font subset). If the character is not embedded, white space might be used in its place, and the line spacing in the redacted document could shift to the left.
-color <string> — assign border color to Redax boxes
Designates a border color for the Redax boxes (default=red). Options are:
red, orange, yellow, lemon, green, clover, olive, blue, violet, orchid
-exemption <code> — Redax box exemption code for “find” operations
A default exemption code assigned to Full-Page tags and to Redax boxes that are manually drawn or applied to any of the following: all bracketed text, all text areas, all image areas, and all path areas. Leave this field blank if you do not want to use a default exemption code.
-exemptioncode <value> — handling of exemption code after redaction
Determines the placement of exemption codes following redaction. Possible values are:
- present (default) — exemption code is stamped over the redacted area, but is not clipped or wrapped. Long exemption codes may run outside the redacted area or obscure unredacted text
- clip — exemption code is stamped over the redaction area, but is clipped so that the code does not run outside the redacted area and obscure unredacted text.
- wrap — exemption code is stamped over the redaction area, but is wrapped so that the code does not run outside the redacted area and obscure unredacted text.
- remove — no exemption codes are placed in the document.
- atbottom — all exemption codes for the page are stamped on the bottom left of the page.
-fillrectangle <transparency> — fill rectangle with transparent color
Fills the redacted area with the color assigned to Redax boxes at the specified transparency level. The minimum transparency level is 50 (midway between completely opaque and completely transparent) and the maximum value is 100 (completely transparent).
-showrectangle — display rectangle where content has been redacted
Permanently stamps a black rectangle around the redacted area.
-b — preserve bookmarks in redacted document
Keeps the bookmarks that were in the document. If -b is not specified, the bookmarks are removed.
-noexempt — allow redaction without exemption
Allows the contents of Redax boxes to be redacted, even if they do not have exemption codes. If you do not include this option, the text in Redax boxes without exemption codes is not redacted.
-rembracket — mark brackets for removal with -fbracket option
Extends Redax boxes to cover brackets, as well as the enclosed text, during the -fbracket operation. If you do not specify -rembracket, the Redax boxes cover only the text enclosed within brackets, not the brackets themselves.
-debugpref — write preferences values to log file
Adds the values of preference settings to the log file. A log file is created with the -l option.
-markpage — mark entire page for redaction
Mark a full page for redaction.
For example:
redaxserver -o outfile.pdf -markpage “2” input.pdf
marks page 2 for redaction. By default, no exemption code is applied. Use -exemption to assign an exemption code, or use -noexempt when redacting to allow redaction without exemption codes.
Note: Although -markpage is deprecated, -markpages is not. Use -markpages to mark a single page or a list of pages for redaction. See Marking one or more pages.
Redax Enterprise Server Command Line Introduction
Introduction
Redax Enterprise Server is a command-line application. If you are used to the Microsoft Windows operating system, you may not be familiar with running command-line tools. This appendix shows you all you need to get started.
Note: You can refer to the Getting Started With Command Line Applications for additional information on using command-line applications.
Windows
To run Redax Enterprise Server in Windows, you need to open a Command Prompt window.
In Windows 7 & higher:
- Click Start>Programs>Accessories>Command Prompt
The Command Prompt window opens.
Some basic commands
At the command prompt, you type each command, and press the Enter key to execute it. You can use the mouse to select text to copy or cut to the clipboard, but you cannot position the cursor with it. The command line is completely keyboard driven. Navigation keys are shown below:
| Key | Action |
|---|---|
| Backspace | Delete previous character |
| right arrow | Move right one character |
| left arrow | Move left one character |
| up arrow | Recall previous command |
| Tab | File or directory name autocomplete (Win XP only) |
| Enter | Execute command |
In addition to running programs, you have many commands to navigate and maintain the system. Two important ones are cd and dir.
Changing directories
Use the cd command to change directories. For example, to change to the directory that Redax Enterprise Server is located in, type:
cd “\Appligent\RedaxServer\”
The command prompt changes to:
C:\Appligent\RedaxServer>
to show you where you are. Note the quotation marks. They are only necessary if you have spaces in your path or file names. We use them here for illustration.
To move back one subdirectory level, use the shortcut of two periods (..)
C:\Appligent\RedaxServer>cd ..
Don’t forget to press the Enter key after every command. You will now be in this directory:
C:\Appligent>
Move back to RedaxServer:
C:\Appligent>cd RedaxServer
Listing the contents of a directory
Use the dir command to list the contents of a directory:
C:\Appligent\RedaxServer>dir
The computer responds with a listing of all the contents of the RedaxServer directory. If the directory contents fly by too fast to read, do this:
C:\Appligent\RedaxServer>dir /p
The /p switch tells DOS to display one page at a time. Press the Enter key to see the next page. To see the contents of all the subdirectories at the same time, type:
C:\Appligent\RedaxServer>dir /s
This displays the contents of RedaxServer and all the subdirectories under it.
Running Redax Enterprise Server
To run Redax Enterprise Server, type the commands on the command line as shown in other sections of this manual and press Enter. In the next example, we’ve truncated the command prompt path for clarity. A simple command would be:
C:\path\>redaxserver -redact -o \files\output.pdf Samples\input.pdf
This processes the sample file and replaces it. Note we provide the relative path to the input and output files so that Redax Enterprise Server knows where to find them. The safest way to specify files is to use the full path:
C:\path\>redaxserver -redact -o c:\Appligent\RedaxServer\files\output.pdf c:\Appligent\RedaxServer\Samples\input.pdf
Type (or copy and paste) the entire command on one line, even though we had to break it up to fit on this page. If you do not specify the correct path, you will get a “file not found” error.
Now, refer to the rest of this User Guide for details about using Redax Enterprise Server.
Troubleshooting
In this chapter…
…we describe what you can do if you do not get the results you expect when you run Redax Enterprise Server:
- Review the troubleshooting checklist.
- Clean suspect PDF files. If you cannot solve the problem, refer to Support to find out how to contact customer support.
Reviewing the troubleshooting checklist
The following sections answer common questions about problems you may have with the following:
- Installation
- Files
- Redaction
- Printing
Installation
Instead of exemption codes, why do I see the word Demo over the redactions?
Demo appears in the redacted area if you are using an evaluation copy. Once you purchase the product, Demo will no longer be visible. For information about purchasing this product or downloading a demo version, go to the Appligent website.
Files
Why am I having problems with my PDF files?
Check that they are well-formed and not corrupt, “clean” them if necessary.
I edited my redaction list file. Why do I now get an error when I try to use it?
The redaction list file is a plain text file. To be safe, always edit it with a text editor (for example, Notepad or BBEdit). If you edit it with a tool that supports different file formats (for example, Microsoft Word), make sure to save the file as Text Only (.txt).
Why do I get an error message saying “This operation is not permitted”?
Your document is secured with an Owner password (also called a Permissions password). You must supply the password using the -d option. See General Options.
Other file problems:
- When using the log file option, -l, be sure to give a log file name. If a log file name is not included, Redax Enterprise Server will produce unexpected results or not process at all, and an error message may be added to the default log file (redaxserver.log).
- Make sure all file and path names are correct. If you are working in one directory and Redax Enterprise Server is in another directory, you must account for that in your command line. It is always best to use absolute path names.
- No spaces in path names! Even if you have a forgiving operating system that lets you use spaces in path names most of the time, this may not work consistently with Redax Enterprise Server. If you are using Windows, placing double quotes around the full path name corrects the problem.
- Corrupt PDF file in watch directory! If an instance of Redax Enterprise Server crashes while processing a corrupt or malformed PDF file in a watch directory, remove the offending file from the “in” subdirectory before restarting Redax Enterprise Server for that watch directory.
Redaction
Why does some text not redact?
Check to see if you assigned an exemption code to the Redax box. If not, either:
- Assign a code to the box, or
- Specify Allow redaction without exemption in your preferences file. Refer to Establishing Preferences.
Why did I get the following message: “The PDF file name.pdf contains form fields”?
Redax Enterprise Server cannot redact documents that contain active form fields. Before redacting the document, flatten the form fields using Acrobat or a tool such as Appligent’s FDFMerge, FDFMerge Lite or Redax Plug-in 5.0 which has a menu option “Remove All Form Fields”.
I used a redaction list file. Why did Redax find some occurrences of the words, but not others?
Possible problems are:
- List File Construction: The words and phrases in your list file must be specified correctly.
- Inline Character Images: If your document is scanned, the OCR software might have replaced all or part of a word in your list with character images. Since the Find Using List feature only finds text, it would miss any words that include character images. These words must be marked up with the Draw Box tool in the Redax plug-in product.
Why is there still sensitive information in the comments pane of my redacted document?
Before releasing a document, be sure to remove all annotations using the -remall command.
Why can’t I redact my scanned TIFF document?
Redax only supports PDF documents. To redact any other type of document, convert it to a PDF file first.
Why did my bookmarks disappear from my redacted document?
Your processing option preferences determine whether bookmarks in the original document are preserved or removed following redaction. You set processing option preferences in RedaxESconfig, which is supplied with Redax Enterprise Server. For information about setting preferences, see Appendix B: RedaxESconfig.
Printing
Why won’t my Redax boxes print?
You must specify an option to print the document with markups (also called comments). Under the Print dialog, look for “Comments and Forms” and select “Document and Markups”.
What can I do to use less ink/toner when I print a redacted document?
You can conserve ink by filling redacted areas with blank (white) space or increasing the transparency level of the fill color. You set preferences for the appearance of redacted areas in RedaxESconfig, which is supplied with Redax Enterprise Server. For information about setting preferences, see Appendix B: RedaxESconfig.
Cleaning Up PDF Documents
Not all PDF files are created equal. The way in which a PDF document is generated makes a difference, and PDFs generated by third party tools in particular can vary in quality. PDF documents can also become corrupted.
To check how the file was created:
- In Acrobat X, XI and DC select File > Properties… and click Description. Under Advanced, look at PDF Producer.
If the PDF Producer field is blank, consider the file suspect.
Making a Clean PDF
If you are having problems with a specific PDF, try to create “clean” version of your document. There are two ways of doing this using Adobe Acrobat. If you use other PDF manipulation software, check the documentation for functions that may be equivalent to those found in Adobe Acrobat.
Method 1: “Optimize” your PDF
- In Acrobat X, XI and DC > File Menu > Save As > Optimized PDF
If saving as optimized does not work, distill the document by following the steps below.
Method 2: Distilling PDF Documents
Distilling a document will remove all comments and form-fields from the PDF. If the PDF contains these items and you wish to preserve them, you must save them before Distilling.
To save existing comments
- In Acrobat X, XI and DC select Comments > Comments List > click the Options icon > Export All to Data File… In the Export Comments dialog box, select a name and location for the Forms Data File (.fdf), and click Save.
See the additional step below for saving form fields (if any):
Delete all comments:
- In Acrobat X, XI and DC select all the comments in the Comments List pane and press the Delete key.
To save form fields (if any):
- Save a copy of the original file. You will copy and paste the form fields from the original file into the new file after the distilling procedure.
Distilling the document
To distill a PDF document do the following:
- In Acrobat X and XI select File > Save As > More Options > PostScript. Choose a name and location for the file and click Save.
- In Acrobat DC select File > Export to > PostScript. Choose a name and location for the file and click Save
- Open Acrobat Distiller > select File > Open… In the Open PostScript File dialog, locate the PostScript file created in the previous step and click Open.
The distiller will create a new PDF file with the same name and location as the PostScript file.
Restoring comments
To restore the comments:
- In Acrobat X and XI, select Comments > Comments List > click the Options icon > Import Data File… In the Import Comments dialog box, locate the Forms Data File (.fdf) previously saved and click Select. In the next pop-up box, click Yes. The comments are restored.
- In Acrobat DC, select Tools > Comments > Comments List > click the Options icon > Import Data File…In the Import Comments dialog box, locate the Forms Data File (.fdf) previously saved and click Select. In the next pop-up box, click yes. The comments are restored
Restoring form fields
To restore form fields:
- Open the original PDF file that includes form fields.
- In Acrobat X and XI select Tools > Forms > Edit Form)
- In Acrobat DC > select Tools > Prepare Form > Form fields will automatically appear
- The form fields will appear, do a Control-A to select all the form fields.
- Open the new distilled PDF file which has no form fields.
- Do a Control-V to paste all the form fields onto the page.
You may need to reposition the fields by selecting them again with the Select Object Tool and moving them to the correct position. For multi-page forms you must do this for each page separately.
Support
Telephone & Fax
- Telephone: +1 610 284 4006
- Fax: +1 610 284 4233
A member of our friendly, knowledgeable support staff will reply as soon as possible, generally within one business day.
International Support
Customers from locations outside the United States, including Germany, United Kingdom, Canada and Australia can contact us directly or connect with one of our many resellers.
When contacting support please provide the following information:
- Name of the Product
- Product Version Number
- Operating System
- Your Name
- Company Name
- Your Email Address
- Your Phone Number
- Product Registration Number
- Any files to help us reproduce your problem (if needed)
Appendix A: Regular Expressions
Introduction
Redax Enterprise Server includes the ability to search PDF documents for matches to regular expressions. A regular expression is a flexible pattern used to match (describe) a set of characters.
Simple Examples
A period matches any character.
.at
matches any three-character string ending with “at”, including “hat”, “cat” and “bat”.
Brackets are used for a set of available characters, called a character class. A dash can indicate a range of numbers or characters.
[hc]at
matches “hat” and “cat”.
[c-h]at
matches “cat”, “eat”, “fat” and “hat”.
a pipe “|” symbol is used for “or”. Parentheses are used to show grouping.
(19|20)th
matches “19th” and “20th”: the numbers 19 or 20 followed by “th”.
A question mark makes the previous item optional.
Mrs?\.
matches “Mr.” and “Mrs.” The backslash is added to escape the period special character, that is, to make the period match an ordinary period instead of having the special “match-any-style-character” property described above.
Braces indicate a repeat of the previous item.
a{2,4}
matches “aa”, “aaa” and “aaaa”.
An asterisk matches the previous item zero or more times.
a*
matches “a”, “aa” and “aaa” . . ., and the empty string
A plus matches the previous item 1 or more times.
a+
matches “a”, “aa”, “aaa” and “aaaa” . . .
Sample Regular Expression
From the sample file sample_regex_list.txt, the following two regular expressions (together) will find dates from 1900 to 2049.
19[0-9]{2}
matches 1900-1999: the number 19 followed by a digit from 0 to 9 twice
20[0-4][0-9]
matches 2000-2049: the number 20 followed by a digit from 0 to 4 and a digit from 0 to 9
Regular Expression Basic Syntax Reference
| Character | Description | Example |
|---|---|---|
| Any character except [ \ ^ $ . | ? * + ( ) |
All characters except the listed special characters match a single instance of themselves. { and } are literal characters, unless they’re part of a valid regular expression token (e.g., the {n} quantifier). | a matches a |
| \ (backslash) followed by any of [ \ ^ $ . | ? * + ( ) { } |
A backslash escapes special characters to suppress their special meaning. | \+ matches + |
| \xFF where FF are two hexadecimal digits | Matches the character with the specified ASCII/ANSI value, which depends on the code page used. Can be used in character classes. | \xA9 matches © when using the Latin-1 code page. |
| \t | Match a tab character. Can be used in character classes. | |
| [ (opening square bracket) | Starts a character class. A character class matches a single character out of all the possibilities offered by the character class. Inside a character class, different rules apply. The rules in this section are only valid inside character classes. The rules outside this section are not valid in character classes, except for a few character escapes that are indicated with “can be used inside character classes”. | |
| Any character except ^ – ] \ add that character to the possible matches for the character class. | All characters except the listed special characters. | [abc] matches a, b or c |
| \ (backslash) followed by any of ^ – ] \ |
A backslash escapes special characters to suppress their special meaning. | [\^\]] matches ^ or ] |
| – (hyphen) except immediately after the opening [ | Specifies a range of characters. (Specifies a hyphen if placed immediately after the opening square bracket.) | [a-zA-Z0-9] matches any letter or digit |
| ^ (caret) immediately after the opening [ | Negates the character class, causing it to match a single character not listed in the character class. (Specifies a caret if placed anywhere except after the opening square bracket.) | [^a-d] matches x (any character except a, b, c or d) |
| \d, \w and \s | Shorthand character classes matching digits, word characters (letters, digits, and underscores), and whitespace (spaces, tabs, and line breaks). Can be used inside and outside character classes. | [\d\s] matches a character that is a digit or whitespace |
| \D, \W and \S | Negated versions of the above. Should be used only outside character classes. (Can be used inside, but that is confusing.) | \D matches a character that is not a digit |
| [\b] | Inside a character class, \b is a backspace character. | [\b\t] matches a backspace or tab character |
| . (dot) | Matches any single character except line break characters \r and \n. Most regex flavors have an option to make the dot match line break characters too. | . matches x or (almost) any other character |
| \Z | Matches at the end of the string the regex pattern is applied to. Matches a position rather than a character. Never matches before line breaks, except for the very last line break if the string ends with a line break. | .\Z matches f in abc\ndef |
| \z | Matches at the end of the string the regex pattern is applied to. Matches a position rather than a character. Never matches before line breaks. | .\z matches f in abc\ndef |
| \b | Matches at the position between a word character (anything matched by \w) and a non-word character (anything matched by [^\w] or \W) as well as at the start and/or end of the string if the first and/or last characters in the string are word characters. | .\b matches c in abc |
| \B | Matches at the position between two word characters (i.e., the position between \w\w) as well as at the position between two non-word characters (i.e., \W\W). | \B.\B matches b in abc |
| | (pipe) | Causes the regex engine to match either the part on the left side, or the part on the right side. Can be strung together into a series of options. | abc|def|xyz matches abc, def or xyz |
| | (pipe) | The pipe has the lowest precedence of all operators. It instructs the engine to alternate part of the regular expression. | abc(def|xyz) matches abcdef or abcxyz |
| ? (question mark) | Makes the preceding item optional. Greedy, so the optional item is included in the match if possible. | abc? matches abc or ab |
| ?? | Makes the preceding item optional. Lazy, so the optional item is excluded from the match if possible. This construct is often excluded from documentation because of its limited use. | abc?? matches ab or abc |
| * (star) | Repeats the previous item zero or more times. Greedy, so as many items as possible will be matched before trying permutations with less matches of the preceding item, up to the point where the preceding item is not matched at all. | “.*” matches “def” “ghi” in abc “def” “ghi” jkl |
| *? (lazy star) | Repeats the previous item zero or more times. Lazy, so the engine first attempts to skip the previous item, before trying permutations with ever increasing matches of the preceding item. | “.*?” matches “def” in abc “def” “ghi” jkl |
| + (plus) | Repeats the previous item once or more. Greedy, so as many items as possible will be matched before trying permutations with less matches of the preceding item, up to the point where the preceding item is matched only once. | “.+” matches “def” “ghi” in abc “def” “ghi” jkl |
| +? (lazy plus) | Repeats the previous item once or more. Lazy, so the engine first matches the previous item only once, before trying permutations with ever increasing matches of the preceding item. | “.+?” matches “def” in abc “def” “ghi” jkl |
| {n} where n is an integer >= 1 | Repeats the previous item exactly n times. | a{3} matches aaa |
| {n,m} where n >= 0 and m >= n | Repeats the previous item between n and m times. Greedy, so repeating m times is tried before reducing the repetition to n times. | a{2,4} matches aaaa, aaa or aa |
| {n,m}? where n >= 0 and m >= n | Repeats the previous item between n and m times. Lazy, so repeating n times is tried before increasing the repetition to m times. | a{2,4}? matches aa, aaa or aaaa |
| {n,} where n >= 0 | Repeats the previous item at least n times. Greedy, so as many items as possible will be matched before trying permutations with less matches of the preceding item, up to the point where the preceding item is matched only n times. | a{2,} matches aaaaa in aaaaa |
| {n,}? where n >= 0 | Repeats the previous item n or more times. Lazy, so the engine first matches the previous item n times, before trying permutations with ever increasing matches of the preceding item. | a{2,}? matches aa in aaaaa |
Other Resources
Learn more about regular expressions from Wikipedia.
http://en.wikipedia.org/wiki/Regular_expression
The International Components for Unicode (ICU) provides an excellent User Guide for regular expressions.
http://userguide.icu-project.org/strings/regexp
RegExLib is a regular expressions catalog.
RegexBuddy is a Windows utility that makes it easy for non-technical users to develop Regular Expressions.
Appendix B: RedaxESconfig
RedaxESconfig Introduction
Redax Enterprise Server includes RedaxESconfig, a graphical user interface for creating XML preferences files to be used with Redax Enterprise Server. The utility runs on Windows.
Note: In previous releases, RedaxESconfig was called “APConfig for Redax”.
With RedaxESconfig, you can create as many preferences files as needed for the different markup and redaction scenarios in your organization. When you run Redax Enterprise Server, you designate your preferences via the -pref command-line option and designated preferences file. The process is easier and less error prone than typing a separate option for each preference in your command, and ensures consistent usage and policies.
Creating and Modifying Redax Preferences
RedaxESconfig allows you to create and modify Redax preferences files for use in workgroup redaction settings.
The typical workflow:
- Click the New button to clear the interface.
- Enter your preferences on each tab. You can complete the tabs in any order.
- Click the Save button to save the file.
If your situation changes, you can always modify the preferences file or make a copy of it to use as a starting point for another Redax preferences file.
Creating a Redax Preferences File
When you create a new Redax preferences file, you can either start from scratch or copy an existing Redax preferences file as a starting point. You must save the preferences in a file before you can use it to specify preferences in Redax Enterprise Server.
To create a copy of a Redax preferences file to use as a starting point:
- If the preferences file you want to copy is not open (the open Redax preferences file name appears above the tabs), select File > Open.
- In the Select Redax Preferences File dialog box that appears, select the Redax preferences file you want to copy and then click the Open button.
Note: Redax preferences files are XML files and end with an .xml extension. The selected Redax preferences file opens, and its name is displayed above the tabs.
- Select File > Save As. The Save Redax Preferences File dialog box is displayed.
- In the Save In box, specify a location for the copy of the Redax preferences file.
- In the File Name box, specify a new name for the copy of the Redax preferences file. It must have an .xml extension.
- Click Save. The copy is saved under the new name, which appears above the tabs.
To start from scratch with a new Redax preferences file:
- If a preferences file is open, click the New button.
Note: When a preferences file is open, its name is displayed above the tabs. The tabs are restored to their default settings.
- Select File > Save. The Save Redax Preferences File dialog box is displayed.
- In the Save In box, specify a location for the new Redax preferences file.
- In the File Name box, specify a name for the new Redax preferences file. It must have an .xml extension.
- Click Save. The file is saved. Its name appears above the tabs.
Once you’re ready with a preferences file, it’s time to define Redax preferences.
Setting Redax Preferences
To define Redax box preferences, complete the options on the three tabs.
Box Tab
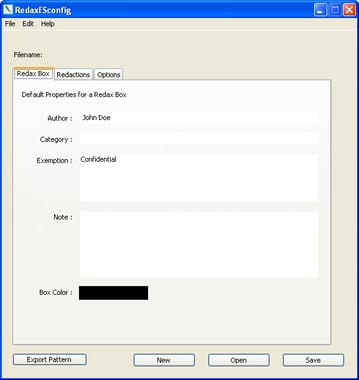
Use the Redax Box tab to define preferences for Redax boxes and Full-Page tags. The Redax Box tab contains the following options:
Author — The name of the author to be associated with Redax boxes and Full-Page tags.
Category — A redaction classification to be associated with Redax boxes and Full-Page tags. For example, you might have one category of markup to be used when redacting for local law enforcement agencies and another category to be used when redacting for the general public.
Exemption — A default exemption code assigned to Full-Page tags and to Redax boxes that are manually drawn or applied to any of the following: all bracketed text, all text areas, all image areas, and all path areas. Leave this field blank if you do not want to use a default exemption code.
Note — A note to be associated with Redax boxes and Full-Page tags. This is useful in workgroup environments.
Box Color — The border color of Redax boxes. If more than one person is working on the document, using different box colors is a useful way to keep track of each individual’s markup. To select another color, click in the colored box. In the Color selector that appears, select a color and then click OK.
Note: This option applies to Redax boxes only; it does not apply to Full-Page tags.
New Button — Clears the RedaxESconfig Redax tabs so that you can create entries for a new Redax Preferences file.
Open Button — Opens an existing Redax Preferences file.
Save Button — Saves the entries on the RedaxESconfig tabs in a Redax Preferences file.
Redactions Tab
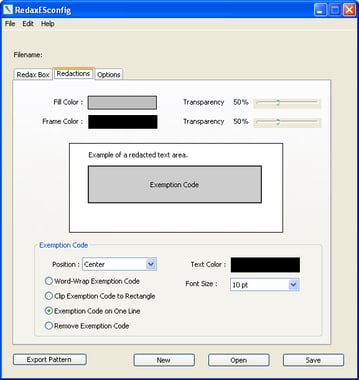
Use the Redactions tab to define the appearance of redacted areas in the final redacted document. The Redactions tab contains the following options:
Fill Color — The interior color of redacted areas. To select another color, click in the colored box. In the Color selector that appears, select a color and then click OK.
Transparency (Fill Color) — The degree of transparency of the fill color. To decrease transparency, move the slider left. To increase transparency, move the slider right. The minimum transparency level is 25% (midway between completely opaque and completely transparent), and the maximum transparency level is 100% (completely transparent).
Frame Color — The border color of redacted areas. To select another color, click in the colored box. In the Color selector that appears, select a color and then click OK.
Transparency (Frame Color) — The degree of transparency of the frame color. To decrease transparency, move the slider left. To increase transparency, move the slider right. The minimum transparency level is 25% (midway between completely opaque and completely transparent), and the maximum transparency level is 100% (completely transparent).
Position — The location of the exemption code: at the top-left of the redacted area, centered in the redacted area, at the bottom-left of the redacted area, or at the bottom of the page.
Note: On fully redacted pages, the exemption code is placed on the top-left of the page.
Word-Wrap Exemption Code — Select this option to word-wrap the exemption code string if it exceeds the width of the redacted area.
Note: On fully redacted pages, exemption codes strings that exceed the page margins will wrap.
Clip Exemption Code to Rectangle — Select this option to truncate the exemption code string if it exceeds the width of the redacted area.
Exemption Code on One Line — Select this option to place the entire exemption code string on one line, even if it exceeds the width of the redacted area.
Remove Exemption Code — Select this option if you wish to remove the exemption code during the time of redaction. The redacted areas will not have an exemption code present.
Text Color — The color of the exemption code text in the redacted area. To select another color, click in the colored box. In the Color dialog box that appears, select a color and then click OK.
Note: On fully redacted pages, the text color is black.
Font Size — The size of the exemption code text in the redacted area.
Note: This option applies to fully redacted pages, as well as redacted image and text areas.
Options Tab
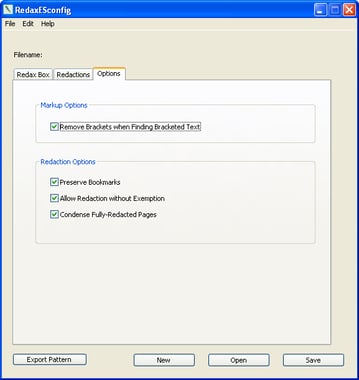
Use the Options tab to customize the way Redax Enterprise Server processes information during markup and redaction operations. The Options tab contains the following options:
Remove Brackets when Finding Bracketed Text — Check to remove brackets when redacting bracketed text. Clear the check mark to keep the brackets.
Preserve Bookmarks — Check to keep all bookmarks from the original file following redaction. Clear the check mark to remove all bookmarks.
Allow Redaction without Exemption — Check to allow redaction of information in Redax boxes that do not have any exemption codes. Clear the check mark to prevent redaction of information in Redax boxes that do not have any exemption codes.
Condense Fully-Redacted Pages — Check to collapse consecutive, fully redacted pages into a single page. Clear the check mark to retain each fully redacted page as a separate page.
RES Readme
New Features
Please refer to the Redax Enterprise Server User Guide for additional information.
Redax Enterprise Server 3.3
You can now use the Rectangle tool in Adobe Reader XI (11) to mark up areas for redaction. There are two new command line options for the Rectangle annotations added in Reader:
-cr : convert rectangle markups
-crc : convert rectangle markups using exemption code
Redax Enterprise Server 3.0
New options for finding information in PDF files that contain text. These options will not work with scanned PDF documents that have not been OCRed. Users should note that OCR errors will result in reduced accuracy in finding matches.
-fregex <filename> — Find using list of regular expressions
-fpattern <filename> — Find using list of pattern names
Document Optimization (-optimize)
For document optimization, use -optimize. This flag will do the following:
- encode any non-encoded streams using Flate compression
- remove ASCII85 filters from all streams
- replace LZW encoded streams with Flate encoding,
- merge identical XObjects and images,
- optimize common sequences in page content
- merge identical font descriptors and encodings.
This option will usually result in a smaller file size.
ISO 32000 compliance (-iso32000)
To create a document that is ISO 32000 compliant, use -iso32000. This flag will do the following: Set file for ISO 32000 compliance, resulting in a document that is PDF version 1.7.
CommandCollections (-cmds)
To process multiple commands quickly and efficiently, use the -cmds <filename> option. The file specified by -cmds, the commands file, should contain one or more single line commands. Each command is just like an ordinary Redax Enterprise Server command-line without the executable name. The commands file does not support wildcards in filenames.
When you use the -cmds option, many Redax Enterprise Server options should be set in the -cmds file instead of on the command line. The following options are supported on the command line when using the -cmds option:
-r, -l, -n, -p
If the same option is set on the command line and in the a record of the -cmds file, the option value from the -cmds file record will be used.
For more information on the -cmds option, see Command Collections.
Redax Enterprise Server 1.5
Streamlined definition of preferences
Define all of your preferences in an XML file using the RedaxESconfig (formerly called ApConfig for Redax) utility, and then specify the file following the -pref option when you run Redax Enterprise Server. The command-line options that were used in former versions to specify preferences are still functional but have been deprecated. If you specify a preferences file and one or more deprecated preference options on a command, the options in the preferences file overwrite the deprecated preferences. For information about using RedaxESconfig (formerly ApConfig for Redax), see the online help supplied with the utility. For information about specifying a preferences file in your command, see the Redax Enterprise Server User Guide.
Case-insensitive search option with list files
When searching for and applying Redax boxes to text based on the words and phrases in a list file, you can have Redax Enterprise Server perform a case-insensitive search by specifying the -ignorecase option. When the -ignorecase option is specified, Redax boxes are drawn around all words and phrases in the document that match the words and phrases in the list file, regardless of capitalization. For example, if the list file contains the word govern, but does not contain Govern or GOVERN, Redax boxes will be drawn around govern, Govern, and GOVERN. Without the -ignorecase option, Redax boxes would only be drawn around govern.
Redaction by category
Classify information that you mark up for redaction by category, and redact as many of the categories as needed.
You define each category in a separate preferences files using the RedaxESconfig (formerly called ApConfig for Redax) utility supplied with Redax Enterprise Server. For example, you might define the category Internal in one preferences file and the category External in another preferences file.
Then you run Redax Enterprise Server once for each markup category you want to include in the PDF document. For example, you might apply one list file and specify the preferences file containing the Internal category, and then apply another list file and specify the preferences file containing the External category:
redaxserver -o outfile.pdf -flist internal.txt -pref internal.xml input.pdf
and then . . .
redaxserver -o outfile.pdf -flist external.txt -pref external.xml input.pdf
When you redact the document, you specify whichever categories you want to include in the redaction, as in the following examples:
redaxserver -o outfile_redacted.pdf -redact -redaxcat Internal outfile.pdf
or . . .
redaxserver -o outfile_redacted.pdf -redact -redaxcat External outfile.pdf
or . . .
redaxserver -o outfile_redacted.pdf -redact -redaxcat Internal, External outfile.pdf
For information about defining a category in a preferences file, see the online help supplied with RedaxESconfig (formerly called ApConfig for Redax). For information about applying categories during markup and redacting based on category, see the Redax Enterprise Server User Guide.
Appearance of redacted areas
Define the appearance of redacted areas in your preferences file. Select any printable character or a blank space to replace redacted text. Choose a color and transparency level for the interior of the redacted area (Fill) and for the border around it (Frame).
For information about using RedaxESconfig (formerly called ApConfig for Redax) to define preferences for the appearance of redacted areas, see the online help supplied with the utility. For information about specifying a preferences file in your command, see the Redax Enterprise Server User Guide.
Redaction of encrypted files
You can now mark up and redact an encrypted PDF document with Redax Enterprise Server. On your command line, supply the Owner password following the -d option. For more information about the -d option, see the Redax Enterprise Server User Guide.
Option to condense fully redacted pages
If you mark up and redact complete pages with the -markpages option, you can have Redax Enterprise Server condense all of the redacted pages in a range into one page. You check the option to condense fully redacted pages in a preferences file that you create using RedaxESconfig (formerly called ApConfig for Redax), and then specify the preferences file on the command line following the -pref option.
For information about defining the option to condense fully redacted pages in a preferences file, see the online help supplied with RedxESconfig (formerly called ApConfig for Redax). For information about using the -pref option, see the Redax Enterprise Server User Guide.
Additional report detail
Redax reports now include more detail. Each report indicates the total number of Redax boxes and Full-page tags and contains the following information for each one:
- Page number
- Type of markup (Redax box or Full-page tag)
- Creation date and time
- Redaction category
- Box color
- Exemption code
- Author
- Note
- Top, left, bottom, and right coordinates, if the markup is a Redax box
Redax Enterprise Server 1.1.2
Full page redaction
Mark one or more full pages for redaction, using the command-line option -markpage <“pagelist”>, where pagelist is a comma separated list of pages and/or page ranges.
For example:
redaxserver -o outfile.pdf -markpage "2,23-48,300" input.pdf
marks pages 2, 23 through 48, and 300 for redaction. By default, no exemption code is applied. Use -exemption, below, to assign an exemption code, or use -noexempt when redacting to allow redaction without exemption codes.
The command-line option -markpages is a synonym for -markpage.
Note: The -markpage option has been deprecated, effective with release 1.5. Use the -markpages option instead.
Assign exemption codes when finding text
Assign exemption codes when finding text using the command-line option -exemption <“code”>, where code is the exemption code to assign. -exemption works with the following options:
- -markpage
- -markpages
- -fbracket
- -fimage
- -ftext
For example:
redaxserver -o outfile.pdf -markpage "2,23-48,300" -exemption "b3" input.pdf
marks pages 2, 23 through 48, and 300 for redaction, and assigns the exemption code b3 to the Redax boxes.
Note: The -exemption option has been deprecated, effective with release 1.5. Use RedaxESconfig (formally called ApConfig for Redax) to create a preferences file that assigns an exemption code (Exemption on the Redax Box tab), and then specify the preferences file on your command following the -pref option.
Exemption code handling
Specify how exemption codes are handled with the command-line option -exemptioncode <“option”>, where option can be:
- present (default) – exemption code is stamped over the redacted area.
- clip – exemption code is stamped over the redaction area, but is clipped so that the code does not run outside the redacted area and obscure unredacted text.
- wrap – exemption code is wrapped if it exceeds the length of the redacted area.
- atbottom – all exemption codes for the page are stamped on the bottom of the page.
- remove – no exemption codes are placed in the document.
Note: The -exemptioncode option has been deprecated, effective with release 1.5. Use RedaxESconfig (formerly called ApConfig for Redax) to create a preferences file that specifies how exemption codes are to be handled (Redactions tab), and then specify the preferences file on your command following the -pref option.
Detailed reporting
You can get more detailed reporting than -sumfile provides using the command-line option -detfile <filename.xml>. This option outputs an XML file containing a detailed report of the redaction. The following options are available with -detfile:
- -detpage <pagenumber> – restricts the output file to just one page specified by pagenumber.
- -detdtd – includes a DTD in the output XML file.
These options must be used with -detfile.
For example:
redaxserver -o outfile.pdf -detfile "log.xml" -detdtd input.pdf
redacts input.pdf, creates a detailed report, and includes the DTD in the XML file so that the information can be repurposed.
Note: The detailed reporting options have been deprecated, effective with release 1.5. The -sumfile option now generates a more detailed report, as described in the New Features section for version 2.0.
Preserving the Redax boxes
You can stamp a box around the redacted area using the command-line option -showrectangle. This option permanently stamps black boxes around the redacted area.
Note: The -showrectangle option has been deprecated, effective with release 1.5. Use RedaxESconfig (formerly called ApConfig for Redax) to apply a black fill and frame to the redacted area (Fill Color and Frame Color on the Redactions tab), and then specify the preferences file on your command following the -pref option.
Known Issues
Version 1.5
Bookmarks are not preserved with full-page redaction
The Preserve Bookmarks preference is not supported when you use the -markpages command-line option. Bookmarks may be copied to the redacted file, but they will not be active.
Exemption codes might not be clearly visible in converted markup
When you convert Acrobat markup to Redax markup (-cm, -ch, -cu, and -cs options), exemption codes might not be clearly visible in boxes.
Workaround
Change one or both of the following in your preferences file:
- Decrease the Font Size.
- Select an option other than Clip Exemption Code to Rectangle.
Note: These preference settings are defined on the Redactions tab in RedaxESconfig (formerly called ApConfig for Redax).
Exemption codes are not always placed correctly on rotated pages
If your preferences file specifies an Exemption Code Position of Top Left, Center, or Bottom Left, the exemption might not be placed correctly on rotated pages.
Workaround
In your preferences, specify the Bottom of Page Exemption Code Position on the Redactions tab. Positioning and word wrapping of exemption codes do not always work together correctly
- If your preferences file specifies an Exemption Code Position of Center or Bottom Left and the Word Wrap Exemption Code option, the exemption code will be placed in the top left position.
- If your preferences file specifies an Exemption Code Position of Bottom of Page and the Word Wrap Exemption Code option, the exemption code will be placed at the bottom of the page but it will not wrap.
Note: These preference settings are defined on the Redactions tab in RedaxESconfig (formerly called ApConfig for Redax).
Acrobat 7 might not print files containing Redax markup as expected
- The file might take a long time to process.
- At times, the boxes print but the page content does not.
Note: This is an issue with the Acrobat 7 product. It occurs with files that contain any type of annotation, not just with Redax markup.
Workaround
Try printing from Reader 7.
Redacted bitmap images are sometimes replaced with black space instead of white space
When bitmap images are redacted, the redacted portion of the image is replaced with white space. Occasionally in some files, black space is used instead.
Redax boxes drawn using Redax plug-in version 3.7 or earlier do not appear
When you open a PDF file that contain Redax boxes drawn in version 3.7 or earlier of the Redax plug-in product, the boxes do not appear, even though they are in the file.
Workaround
Click in the boxed area to make the box appear.
“Find Using List File preferences.xml cannot be opened for reading” error message appears
This is the error message that’s reported when the wrong path to the preferences file is given on the command line.
Version 1.1.2
-fillrectangle option not yet supported
The -fillrectangle option that appears in the usage is not currently supported but is there for a future release.
Note: This option has been deprecated effective with release 1.5. Use RedaxESconfig (formerly called ApConfig for Redax) to set the fill color of redacted areas, and specify the preferences file on the command line following the -pref option.
Version 1.1.1
Type 3 fonts not supported
The current version of Redax Enterprise Server does not support Type 3 fonts. You can use Appligent’s APGetInfo utility to find out whether a PDF file contains Type 3 fonts.
Some special characters cause problems importing XML templates (-impfile)
If a field in a Redax box contains the less than symbol (<), ampersand (&), double quotation mark (“), single quotation mark (‘), or an ASCII character higher than 127, an XML template can be exported (created), but it cannot be imported (applied to another document).
Error message
For a double quote, the error message is as follows:
XML Parse error at line n
Error = 4
not well-formed (invalid token)
Workarounds
- Avoid using the problem characters in Redax boxes.
- Edit the XML template.
Operating system may cause problems with special redaction characters (-char)
- If you want to use a space or any of the following as the redaction character, you must enclose it in double quotes under Windows (for example, “*”) or single quotes under Unix or Macintosh (for example, ‘*’):
@ ^ & * ‘ | < > / . ” ? - If you want to use a percent sign as the redaction character under Windows, enclose two percent signs in double quotes:
“%%” - Do not use any of the following as the redaction character. Errors may result.
– ( ) - Do not use the following character combination. The command will not be executed.
-/ - If a percent sign (%) or double quotation marks are specified (“”) when the Redax box is created, the selected text is replaced by the default redaction character, a dash (-). This applies to Redax boxes created with the -char option, as well as Redax boxes created using other methods (for example, drawn using Redax plug-in).
Images redacted with black may result in invisible exemption codes (-blank)
If an image is redacted with black, exemption codes will not be visible.
Workaround
Avoid using the -blank command-line option.
Markup may not be completely removed (-cm, -rmarkup, -crem)
When -cm, -rmarkup, and -crem are used together, some markup might remain, although the areas underneath are redacted.
Workaround
Use -remall to remove all markup, including Redax boxes.
Invalid command-line option may be interpreted as file name
If a word on the command line begins with a hyphen, but is not a valid option, Redax Enterprise Server assumes that the word is file name.
To Get Help
Contact technical support by:
emailing support@appligent.com, or calling 610-284-4006
Please provide the following:
Product name and version number
Operating system
Your name, company name, email address, and phone number
Description of your question or problem
Responses are typically emailed within one business day.