Introduction
What is StampPDF?
StampPDF® is a plug-in for Adobe® Acrobat® that can stamp pages of a PDF document with any kind of text — watermarks, page numbers, dates, disclaimers, etc. — in the style and positioning that you require. The stamped text becomes a permanent part of the PDF document.
StampPDF lets you customize the appearance and position of stamped text to comply with your organization’s corporate standards or to create a consistent look for PDF documents. You can specify any of the following for stamped text:
- Text attributes such as font, style, size, and color
- Position — top, bottom, diagonal or vertical center
- Justification — left, right, or center
- Layer — on top of or underneath the original content of a page
- Pages to stamp — stamp every page, every other page, every 5th, 10th, etc.
- Page margins — position your stamp exactly where you want it
- Bates numbering — specialized page numbering for legal documents
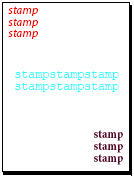
Below are illustrated examples of some of these different features.
Font sizes
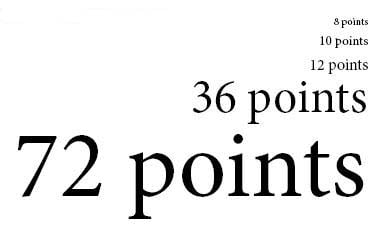
With StampPDF you choose the point size for your text. Most text you read ranges in size from 10 to 12 points. Newspaper text for example, is usually 10 points. To create a watermark that fills a whole page, use a large point size. Confidential stamped in 128 points, for example, fills an 8.5 x11 inch page diagonally.
Doing the points-to-inches conversion
When setting margins, you may be more used to using inches than points. There are 72 points to one inch. The following table may help with conversions:
Points
Inches
| 8 | 0.11 |
| 12 | 0.167 |
| 36 | 0.5 |
| 54 | 0.75 |
| 72 | 1.0 |
| 108 | 1.5 |
| 144 | 2.0 |
An 8.5 x 11 inch page is 612 x 792 points.
Fonts
The following fonts are available for use in stamps:
Courier
Courier Bold
Courier Oblique
Courier Bold-Oblique
Helvetica
Helvetica Bold
Helvetica Oblique
Helvetica Bold-Oblique
Times Roman
Times Bold
Times Italic
Times Bold-Italic
Symbol — αβχδεφγηιϕκλμ
ZapfDingbats — ❁❂❃❅❆❈❉❊❋●❍
If available on your system, you may also use Adobe PostScript Type 1 fonts when you use the Set Font Directory menu item (StampPDF Menu > Set Font Directory).
Text mode
Text that you stamp with the StampPDF plug-in can be Solid, Outline or Invisible.
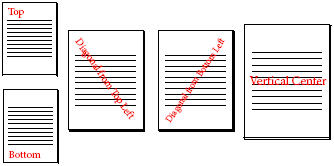
Position
There are five options for setting the position of a text stamp: Top, Bottom, Diagonal from Top Left, Diagonal from Bottom Left and Vertical Center.
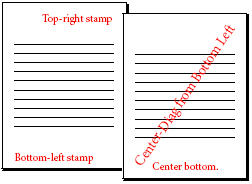
Justification
Combine the position with a justification to complete the location of the stamp. Justification options are Center, Left, and Right.
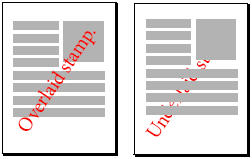
Layer
Stamps can be made either under or over the existing PDF content of a document.
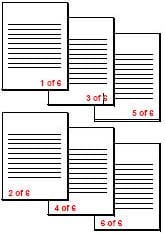
Page numbering
StampPDF can number pages sequentially. In the illustration, separate stamps are used for even and odd pages: odd page stamps are right-justified, and even page stamps are left justified.
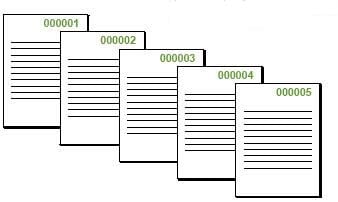
Bates numbering
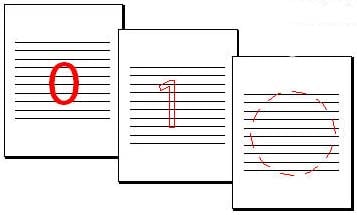
Bates numbering is a type of page numbering often found in legal documents. Each page number is represented by six digits from 000001 to 999999. An example showing the first five pages numbered in Bates notation is shown:
StampPDF is a registered trademark of Appligent Inc.
Using StampPDF Plug-in
What is a Stamp?
A stamp on a PDF document is usually text that is used to further identify a document. In addition to any text that you add, variables are available to enter local date and time at the time the stamp is made, page numbers, day of the week, etc.
There are several ways to use StampPDF.
Stamping with Single Stamp…
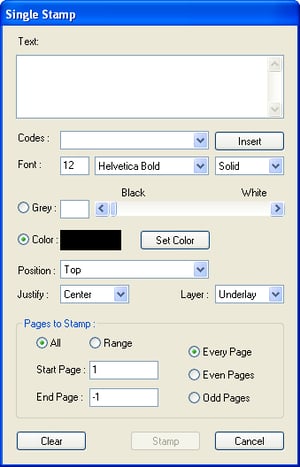
When you stamp a document using the Single Stamp… option the following settings are available to you:
- Set the content of the stamp text.
- Add any “Codes” you would like to use — codes are the variables mentioned above that add dynamic data such as time and page number to documents. See Including text variables in stamps.
- Font — fonts that are available for use. See Fonts for more information.
- Font size — the point size you want the stamped text to be.
- Font mode — text mode can be solid, outline or invisible.
- Color — the stamp may be a shade of gray (including black or white) or any RGB color that you choose with the Set Color feature of the dialog box.
- Position — there are five options for positioning a stamp:
— Top
— Bottom
— Diagonal from Top Left
— Diagonal from Bottom Left
— Vertical Center - Justification — there are three options for justifying a stamp:
— Center
— Left
— Right - Layer — a stamp may be laid under or over the original content of the PDF document that is being stamped.
- Pages to Stamp — this can be all pages or a page range. If you choose a page range, select the first and last page to be stamped. You may use -1 to stamp to the end of the document, instead of specifying the exact last page number.
- Page increments — you may choose to have your stamp appear on all pages or just odd pages or just even pages.
Stamping with New Stamp File…/Edit Stamp File…
Using the stamp file dialog boxes gives you additional flexibility with stamps. When using a stamp file, you can control the margins that bound the page that is being stamped, and you can apply more than one stamp to a document at one time. The extra features available in the New Stamp File… and Edit Stamp File… dialog boxes are:
- Multiple stamps — stamping with a stamp file means you can apply more than one stamp at a time. You can give each stamp you make a name, and that name appears in a list.
- Word-wrapping — a check box allows you to turn on word-wrapping for stamp text.
- Margins — set the margins for the page as you would like them to appear.
Example: Stamping a Document with Single Stamp
Now you’re ready to start stamping documents. The first task is to decide what you want the stamp to look like. Refer back to the previous section, “Stamping with Single Stamp…”, and remember that there are a lot of options to consider: font, stamp placement, pages to stamp, etc.
Note: It’s a good idea to do a test stamp with a sample document before stamping your own PDF documents to get a feel for how the product works.
Deciding what to stamp
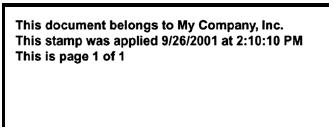
For this example, you will stamp a three-line identification stamp in the top-left corner of the document, that includes your company name, the date and the page number. Something like this:
This document belongs to My Company, Inc.
This stamp was applied 9/26/2001 at 2:10:10 PM
This is page 1 of 1
Step-by-step applying a stamp
In Adobe Acrobat, open the sample.pdf that is in your samples directory (the default location is C:\Appligent\StampPDF\samples).-
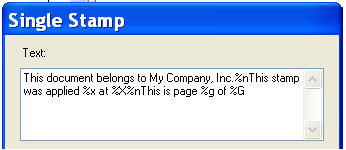
- Go to the StampPDF Menu > Single Stamp… to bring up the StampPDF Single Stamp dialog box:
- Go to the StampPDF Menu > Single Stamp… to bring up the StampPDF Single Stamp dialog box:
Enter the first line of the text of the stamp. This document belongs to My Company, Inc.
-
- To make a new line use the newline variable — %n.The %n code is a variable for a new line and is listed in the Codes drop-down list. The full list of codes is shown in Including text variables in stamps. Codes can be entered either from the drop-down list or by typing. Once you get familiar with the codes it may be easier to key them in instead of selecting them from the drop-down list. Other codes that are used in this example stamp are:
- %x — Date (format m/dd/yyyy)
- %X — Time (format h:mm:ss AM/PM)
- %g — Page Number
- %G — Number of Page
Note: To copy and paste text to/from the text box, right click on the text box and choose the appropriate option.
- To enter codes from the drop-down list, select the item to insert and click the Insert button when you have made your selection. See StampPDF Variables for the full list of codes along with examples of how to use selected codes.
- You should see the following text:
Once the text of the stamp is entered with your text and any codes that you choose, you may move on to styling and positioning your stamp. - Choose your font — choose the point size and font type that you want to use. The default font size for applying a single stamp is 12 points. See Fonts for the list of available fonts.Stamps can be applied in Solid, Outline, or Invisible text.
- Solid text is normal printed text.
- Outline text looks like this:

- Invisible text is useful for adding hidden but searchable text to a document.
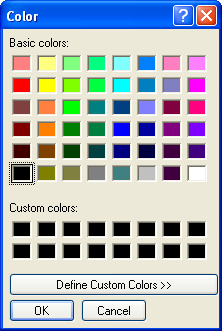
- Choose your color — stamps that you create can be grayscale (black, white, or somewhere in between) or a color. The default color is black.To make gray stamps, make sure the Gray radio button is selected and use the slider or enter an integer in the text box for the degree of gray that you would like. Black is 0 and white is 100, so a high value will give a light gray and a low value will give a dark gray.To make color stamps, select the Color radio button and click the Set Color button. Clicking Set Color brings up the Color window:
- To make a new line use the newline variable — %n.The %n code is a variable for a new line and is listed in the Codes drop-down list. The full list of codes is shown in Including text variables in stamps. Codes can be entered either from the drop-down list or by typing. Once you get familiar with the codes it may be easier to key them in instead of selecting them from the drop-down list. Other codes that are used in this example stamp are:
- You may choose one of the “Basic Colors” or click on Define Custom Colors.This option expands the Color window to include an area to design your own colors either by setting values for Red, Green and Blue, or by adjusting the cursor in the color panel.You may save colors that you like by adding them to Custom Colors. In the illustration, three colors have been added to custom colors. The crosshairs in the color panel show where in the panel the most recent color added is located.
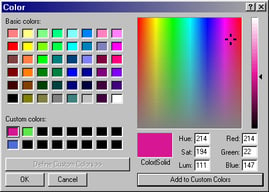
You may already have a specific color that you need to use. In this case, setting Red, Green and Blue separately is probably the most accurate method.A useful website including color tables is Visibone Webmaster’s Color Lab.
In the sample stamp that you are creating, keep the default as black.
- Choose the stamp position — There are five choices for position available from a drop-down list. They are: Top, Bottom, Diagonal from Top Left, Diagonal from Bottom Left, and Vertical Center. The Top and Bottom positions are generally used for headers and footers, respectively, and the diagonal positions are good for watermarks. This sample stamp is a header, so choose Top for the position.
- Choose justification — There are three choices for justifying your stamp: Left, Right, and Center. If you are using a diagonal stamp, you will probably want to have it also centered on the page, so be sure that Center is selected. For your sample stamp, set the justification to Left.
- Choose your layer — For Layer there are two choices: Underlay and Overlay.
Underlay places the stamp underneath the current PDF content. This is useful for watermarks or other stamps that should not obstruct the body of the document. Underlaid stamps are not visible under images or otherwise opaque pages.
Overlay is best for stamping on documents that have images and/or the text page has been scanned in so that it is effectively an image.Since your sample stamp is not a watermark, choose to overlay the stamp. The stamp will appear on an area of the page where there is no need to worry about it obstructing other text. Overlaying the stamp also ensures that it is not covered up by any hidden text or images. See other considerations for using layers below. - Choose which pages to stamp — The default for StampPDF is for a stamp to be placed on every page (note that the All radio button is selected).Click on the Range radio button and choose a start page and an end page. A page number of -1 can be used to specify the last page of the file. Options are provided for stamping odd or even pages of your page range.For your sample stamp, choose to place the stamp on every page. In some cases, if you have a cover, for example, that you would not like stamped, you can choose to stamp from pages 2 to -1. Or if you would like the stamp to be left-justified on even pages and right-justified on odd pages you can apply the stamp twice, making changes only to the Position and Pages settings.When you are done with your sample stamp set up and have clicked the Stamp button, the first page of the document will have a stamp like this
:
Considerations for using layers
- Setting Layer to underlay is useful for preventing obstruction of the original PDF content. However, also consider using outline text with overlaid text which will also significantly reduce obscuring effects.
- Text you stamp under PDF text will obscure PDF text if it is the same color as the stamp text. Choose a color to make the stamp stand out from the overlaid text.
- Underlaid text stamped on PDF documents that are scanned as image files (rather than OCR text files) will not be visible. For these types of documents use an overlaid stamp.
- Some PDF files contain hidden text and images. Underlaid text will not be visible under hidden images. Overlay stamped text to avoid this problem.
- Under some circumstances, the combination of the printer driver and the application used to create the PDF document will create a white rectangle behind the PDF text. An underlaid stamp will be hidden by the body of the PDF text and images. If you encounter this situation, create an overlay stamp at the top or bottom of the document, or use overlaid outlined text.
Stamp Files
Working with Stamp Files
Because you can use a stamp file over and over again, it’s an easy way to achieve a consistent look for all the documents you stamp. Now that you have seen how a single stamp works you can move on to using stamp files.
A stamp file is simply a text file that contains commands that place stamps on your document. Stamp files offer more flexibility and control in stamping in the following ways:
- Share and re-use stamps. If there is a particular stamp that you will need to apply over and over to documents as they come in, you will not want to have to re-enter the stamp by typing it each time.
- One stamp file can be used to apply an unlimited number of stamps. If you need to create a header, a footer, and a watermark, all of those stamps can be contained in one file.
- Stamp files allow changes to the margin of the stamping area. You may change the margins so that the stamping area is smaller than the page.
Before going further into stamp files, be sure that you are acquainted with the process for applying a single stamp.
Example: Edit Stamp File
The StampPDF installation comes with a sample stamp file for you to use. The default installation directory on Windows for samples is C:\Appligent\StampPDF\samples and the sample stamp file is called items.txt.
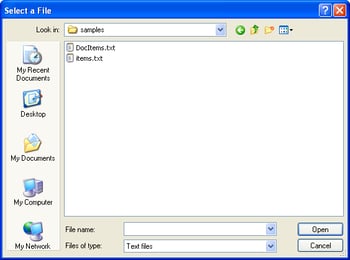
To begin work with items.txt and editing a stamp file, make sure you have a PDF document open in Adobe Acrobat (use the sample provided, sample.pdf, or another test file), go to the StampPDF menu and select Edit Stamp File…. This will bring up the Select a File dialog box:
When you select your file, in this case items.txt, the Edit Stamp File window appears:
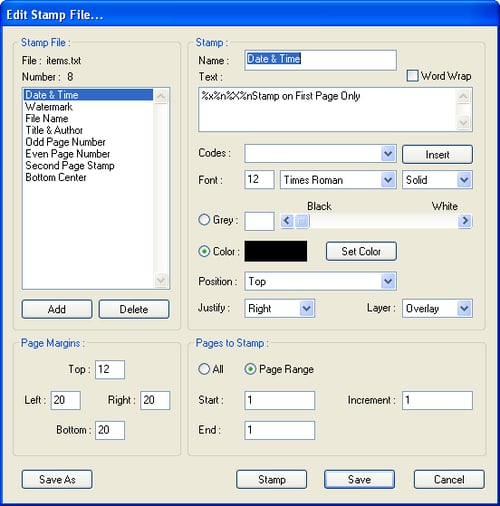
All of the data from the stamp file is loaded into the Edit Stamp File window. On the left side of the window is shown the name of the file, items.txt, and the eight different stamps contained in the stamp file. They are named as follows:
- Date & Time
- Watermark
- File Name
- Title & Author
- Odd Page Number
- Even Page Number
- Second Page Stamp
- Bottom Center
Editing stamps
You may go through the list of stamps to see how each is constructed. When a stamp name is highlighted, the details on that stamp appear on the right side of the Edit Stamp File window in the Stamp Information area.
If you’d like to make changes to any of the stamps, select the stamp to be changed in the list at the left of the window and make changes on the right. The Stamp Information area is nearly identical to the Single Stamp window except for the addition of the Word Wrap check box.
Note: If you leave Word Wrap unchecked and the line of text for the stamp is too long, the stamp will run off the page.
Pages to stamp
The default for StampPDF is for a stamp to be placed on every page. To select a different option, click on the Page Range radio button and choose a start page and an end page. A page number of -1 in the Start field will stamp only the last page of the file. Use the Increment text box to set an incremental number of pages to be stamped. Setting the value to 1 stamps every page, 2 stamps every second page, 5 stamps every fifth page, and so on.
Adding and/or removing stamps
When a stamp is selected (you see its title in the Name field) you may remove it from the list of stamps, and therefore the stamp file, by clicking the Delete button. You may also add new stamps. If you click the Add button, the Stamp Information area will revert to the defaults and the name will be New Item. To make your new stamp, first change the name to something more descriptive, then change the settings for text, position, etc. as you would like them for your new stamp.
Setting margins
Each stamp file has top, bottom, left and right margins defined for the entire page, and used by all stamps. The margin is the amount of space between the edge of the page and the stamping area.
Margins are measured in points, where 72 points is equal in length to one inch. See Doing the points-to-inches conversion. Therefore, if you would like a half-inch margin all around the page, set each margin for 36 points. Look for the margins in the Page Margins area of the Edit Stamp File window, under the listing of the names of stamps.
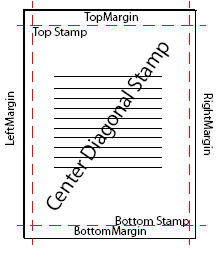
In the illustration, the top and bottom margins are 36 points (one half inch) and the left and right margins are 12 points (0.167 inches). The centered, diagonal stamp is centered between all four margins. The top stamp begins at the left margin and the bottom stamp ends at the right margin.
The margins for items.txt are the same as the ones used in the illustration. The top and bottom margins are set to 36 points, the left and right margins are set to 12 points.
Completing your work
When you are done making changes, you have four choices:
- Stamp the edited file. This option saves the changes you made and stamps the document.
- Save the file. If you choose the Save option, the changes made to the file will be saved and the Edit Stamp File window will close. No stamp will be applied.
- Cancel the operation. If you don’t like the changes you made or you want to start over from the beginning, click the Cancel button.
- Save As. When you choose the Save As option the changes made to the file can be saved in a new stamp file. The Edit Stamp File window stays open for you to use the stamp file.
Example: New Stamp File
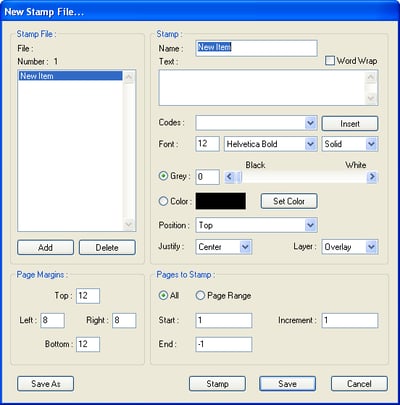
Creating a new stamp file is nearly the same as editing an existing stamp file except that you are starting from scratch. When you select the New Stamp File… option from the StampPDF menu the New Stamp File dialog appears.
From this window you may enter new stamp items in the same way that you would make a new stamp item while editing a stamp file: give the stamp a name, enter the stamp text, including codes if desired, then choose font and position formatting and other options to complete the stamp.
When you are finished designing one stamp, click the Add button. After adding a stamp, the New Stamp File window settings revert to their defaults and you may begin building another stamp. If you decide you do not want a stamp you may select the stamp and click the Delete button to remove it from the stamp file.
When you are ready to apply your new stamp file to the document, click the Stamp button. You will first be asked to save the file. The default file name is StmpItms.txt. You may keep this name or choose another. If you don’t want to use the stamp file right away, choose the Save option to save the file but not apply stamps.
Stamp Using File
If you know which stamp file you want to use and there are no changes that need to be made to it, the Stamp Using File option is the quickest way to apply stamps.
When you select the Stamp Using File option from the StampPDF menu, you are requested to select a stamp file. Once this file is selected, no window will come up to confirm your choice. The file will be read by StampPDF and applied directly to your document. If you choose the wrong file and apply it you may Undo Last Stamp or close the document without saving and start over.
Removing Stamped Text from a Document
Once a stamp is applied to a document and the document is saved, the stamp is part of the PDF document.
Before the document is saved you can remove stamps by either:
- Choosing Undo Last Stamp from the StampPDF menu — this will remove only the last stamp made (or last stamp file applied).
- Closing the document in Adobe Acrobat without saving changes — if you need to start over completely this is your best option.
StampPDF Variables
Including Text Variables in Stamps
When you are working with documents, there is a lot of information that varies from document to document — dates, times, filenames, etc. Even within a document there are things that change from page to page, such as page numbers or headers and footers. StampPDF provides a series of variables that access this dynamic information and stamp it into your document.
Each variable is case sensitive and has a specific output. For example, the date stamp %a %b %d will be formatted as:
Wed Oct 07
If you would like punctuation to appear around the variable text, you may type it in around the variables. For example, if you change the above date stamp to %a., %b. %d the stamp appear as:
Wed., Oct. 07
-
Note: All variables must be preceded by the percent (%character is missing, the variable name will appear in the stamped text (for example, “a” instead of “Wed”). If you want to use the%.
Below is a table of all variables available showing the variable name, what it does, and an example. Following the table are some examples using the variables.
| Variable | Drop-Down List | Description | Example Output |
|---|---|---|---|
| %A | Weekday Name | full weekday name | Friday |
| %a | Short Weekday Name | abbreviated weekday name | Fri |
| %B | Month Name | full month name | October |
| %b | Short Month Name | abbreviated month | Oct |
| %c | Local Date & Time | local date and time | Friday, October 01, 1998 7:36:24 PM |
| %d | Day of Month | day of month | 15 |
| %D | Ordinal Day of Month | adds an ordinal suffice to day of month (“th”, “st” etc) | 20th |
| %G | Number of Pages | total number of pages | 20 |
| %<number>g | Page Number | number to use for the start of page numbering | 2 |
| %H | Hours (24 Hour Clock) | hours, 00-23 | 13 |
| %I | Hours (12 Hour Clock) | hours, 01-12 | 01 |
| %i(<info field name >) | Title Author Subject |
PDF Document Properties values: Author, Title, Subject, Keywords |
Sample.pdf (Title) Jane Smith (Author) Security (Keywords) |
| %<page number>J | Bates Number | Bates page numbering up to 999999 | 000001 |
| %j | Day of Year | day of the year, 001-366 | 099 |
| %M | Minutes | minutes, 00-59 | 25 |
| %m | Numeric Month | month, 1-12 | 10 |
| %N | File Name | document filename | file.pdf |
| %n | Newline | Use for multi-line stamps | sample stamp, line 1 sample stamp, line 2 sample stamp, line 3 |
| %P | File path | full document pathname | c:\My Documents\Stamp1.pdf |
| %p | AM/PM | local equivalent of AM or PM | PM |
| %r | Roman Numerals | lowercase roman numerals for page numbers | xii |
| %R | Roman Numerals (caps) | uppercase roman numerals for page numbers | XII |
| %S | Seconds | seconds, 00-61 | 10 |
| %U | Week of the Year (Sun 1st) | week of the year, 01-53 where Sunday is the first day of the week | 36 |
| %W | Week of the Year (Mon 1st) | numeric week of the year, 00-53 where Monday is the first day of the week | 36 |
| %w | Numeric Weekday | numeric weekday, 0-6 where Sunday is 0 | 5 |
| %X | Time | local time representation | 05:35:10 |
| %x | Date | local date representation | 10/02/98 |
| %Y | Year with Century | year with century | 1998 |
| %y | Year without Century | year without century, 00-99 | 98 |
| %% | Percent Sign | % (use when stamp must include a percent symbol) | % |
Note: Entries that do not have a drop-down list name need to be entered by typing in the Text pane of a StampPDF window. The %i(<info field name>) variable supports Keywords as well as Author, Title, and Subject, though it is not available in the drop-down list.
Stamping Page Numbers
The variable %<page number>g is the one you will need to use to stamp page numbers. On the first page that you stamp using %g StampPDF will stamp a 1. If you do not want to start stamping at page 1, you may modify the page stamp variable by placing a number in front of the g, the number of the page at which you want stamping to begin.
For example, if you would like page numbering stamps to begin on the 5th page with a page-number of 7, you need to tell StampPDF two things:
- The first page to get the stamp — enter 5 in the Start Page field.
- The number to use when stamping that page — enter %7g in the Text area.
In the event that you would like pages to start numbering at 5 from the first page, simply change the Start Page field to 1 and set the Text parameter as %5g.
Using a number with %g is not required. To start stamping with the number 1, use %g with no numeral before the g.
Using Bates Notation for Page Numbering
With Bates notation six digits are used for each page number. Any number less than six digits is filled with leading zeros. For example, page 2 will be written as 000002 and page 4145 will be written as 004145.
Bates numbering works similarly to regular page numbering as described in the above section. The variable used for Bates numbering is %J. If you would like to start numbering at a number other than 000001, place the number in between the % and J characters. For example, to start numbering at page 000501 use %501J in the Text field. StampPDF will insert the leading zeros.
Adding a Prefix to Bates Numbers
You may add a prefix to Bates numbers by including the prefix before the variable. For example, CaseABCD%J will stamp the StartPage with CaseABCD000001, the next page with CaseABCD000002, and so on.
Prefixes may be combined with custom start pages. CaseABCD%501J will begin stamping with CaseABCD000501.
Creating Multi-line Stamps
StampPDF uses the %n variable to create a new line (or carriage return) wherever you would like to have one. For example, if you would like to stamp a company address as a header, enter the text of the stamp in your Text parameter, including a %n wherever you wish a line break:
(Appligent, Inc.%n22 East Baltimore Avenue%nLansdowne, PA 19050 USA)
The stamp, depending on what font and point size you choose, will look like:
Appligent, Inc.
22 East Baltimore Avenue
Lansdowne, PA 19050 USA
There is no limit to the amount of text or number of lines you may use. You are limited only by the size of the page in which you are stamping.
Note: If you will be stamping footers at the bottom of the page be aware that StampPDF begins stamping the first line of your footer at the bottom margin. To prevent your stamp from running off the page increase the bottom margin.
Stamping Information from Document Description Fields
The document description information is viewable in Adobe Acrobat. Select Document > Properties. A pop-up window will appear: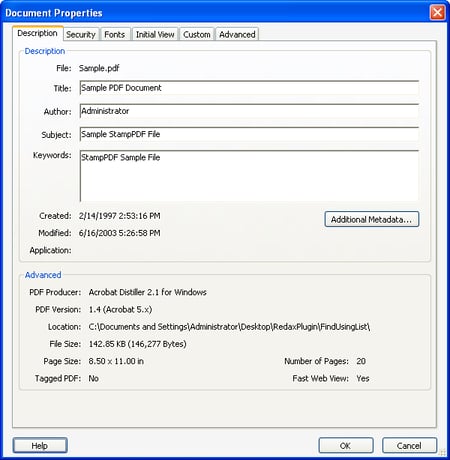
StampPDF can access the information here and stamp it into your PDF file. Take care to specify the variables exactly as they appear in the Description tab of Acrobat’s Document Properties dialog (i.e., exact capitalization and spelling):
- %i(Title)
- %i(Author)
- %i(Subject)
- %i(Keywords)
Important! For these variables to stamp correctly they must be present in the document’s description fields. If you attempt to stamp the Author field and the Author field is blank in the document description dialog StampPDF will stamp a blank space.
Note: Parentheses must be included in the Text parameter before and after the document description field name, as shown above for StampPDF plug-in to process these variables correctly.
Support
You can contact support directly by sending an e-mail to support@appligent.com. Support e-mails are answered within one business day during the normal business hours listed below.
Telephone & Fax
- Telephone: +1 610 284 4006
- Fax: +1 610 284 4233
To better serve you, please call us during our normal business hours, Monday - Friday, 8:00 am - 5:00 pm U.S. EST/EDT.
A member of our friendly, knowledgeable support staff will reply as soon as possible, generally within one business day.
International Support
Customers from locations outside the United States, including Germany, United Kingdom, Canada and Australia can contact us directly or connect with one of our many resellers.
When contacting support please provide the following information:
- Name of the Product
- Product Version Number
- Operating System
- Your Name
- Company Name
- Your Email Address
- Your Phone Number
- Product Registration Number
- Any files to help us reproduce your problem (if needed)
StampPDF Plug-in Readme
Introduction
StampPDF® is a plug-in for Adobe® Acrobat® XI, 2015, 2017 and DC on Windows operating systems. The software allows the user to add new text to the pages of a PDF document. This new content may be added in any position, such as diagonally across a document or as headers and footers. Text stamps may be made in a variety of fonts and text styles, including color.
Documentation and Sample Files
Within the StampPDF directory are directories for documentation and sample files. The documentation directory contains the User Guide for StampPDF as well as the readme file (this document). The samples directory contains sample PDF documents and stamp files to use for evaluating StampPDF.
New Features Version 5.8
In addition to any Base 14 or Adobe Postscript Type 1 fonts, version 5.8 now supports True Type and Open Type fonts. You can use the “Set Font Directory” menu option to select the directory where your additional fonts reside. Once you select the font directory, the fonts will appear in the Font drop down list in the Single Stamp and New Stamp File dialog window.
Changes In Behavior Version 5.8
To stamp even pages only, follow the steps below:
- Single Stamp dialog: Under “Pages to Stamp”, you must select “Range”, Start Page must be 2 and click on the Even Pages button.
- New Stamp File dialog: Under “Pages to Stamp”, you must select “Page Range”, Start Page must be 2, Increment must be 2.
To stamp odd pages only, follow the steps below:
- Single Stamp dialog: Under “Pages to Stamp”, you must select “Range”, Start Page must be 1 and click on the Odd Pages button.
- New Stamp File dialog: Under “Pages to Stamp”, you must select “Page Range”, Start Page must be 1, Increment must be 2.
Stamp Item Margin Settings
The margin settings in the Stamp Item overrides the margin settings in the Options section (Begin_Options/End_Options) of the stamp file.
Example:
Begin_Options
Version ( 2 )
TopMargin ( 12 )
BottomMargin ( 25 )
LeftMargin ( 40 )
RightMargin ( 40 )
End_Options
# — Stamp Item —
Begin_Message
Name ( Sample )
Top (0.00)
Bottom (0.00)
Left (0.00)
Right (0.00)
PageIncrement ( 1 )
StartPage ( 1 )
EndPage ( -1 )
Type ( Text )
TextMode ( 1 )
Underlay ( no )
End_Message
If your stamp file has Top, Bottom, Left and Right margins set to 0 in the stamp item, these are the margins that will be used for text placement. Your stamp will be placed at the very bottom of the page and may appear cut off. The margins in the Begin_Options / End_Options section will be ignored. If you remove the Top, Left, Bottom & Right from the stamp item, then the margins set in Begin_Options / End_Options will be used for placement. Or you can make adjustments to the margin settings in the Stamp Item.
Known Issues
- Symbol and Zapf Dingbat fonts do not always draw properly.
- Image stamping is not supported in the interface. If you need assistance, please contact support@appligent.com. If your requirement is to stamp multiple documents, please visit our website www.appligent.com for information on our StampPDF Desktop Edition.
- The word wrapping feature is currently only available with the “New Stamp File” option. Support for word wrap with the “Single Stamp” option will be included in a future release.
- Stamps will not be applied to encrypted or password-protected documents. Documents must have full write permissions to be stamped with StampPDF.
Product Support
We offer telephone and email support for StampPDF. For information on contacting our support department, please visit the Support page on our website.
We usually answer questions within one day of receiving them. Please keep in mind that e-mail delivery can be unpredictable at times and receiving our response may take longer than you anticipate.
You will need to provide us with the following information. It will help us to resolve your problem more efficiently.
- State that you are using the StampPDF plug-in and give its version number (find the version number in the About box; access the About box under the Help > About Third-Party Plug-Ins > StampPDF menu.
- What is your operating system and its version?
- Attach the document you are trying to stamp, along with the stamp file, if possible.
- What are the steps you took that led to the problem? Are you able to reproduce them or do you not know what caused the fault?
- Include any relevant messages that appeared on your screen.
- Let us know the best way and time for us to contact you if we require additional information.
StampPDF is a registered trademark of Appligent Inc.