Quick Reference
# fdfmerge - merge FDF data with PDF form files.
Usage: fdfmerge [options] inPDFFile [inFDFFile]

 -x                  : Input is an xfdf file, not a fdf file
 -s                  : Replace all fields with stamps
 -stampnewvalues     : Stamp fields with new values
 -reverse            : Make fdf file come first followed by 1+ pdf files
 -norebuild          : Don't rebuild appearances
 -mergeflags         : Merge F and Ff flags along with the field Values in the FDF
 -f <string>         : Field information file for partial field replacement

                               -- Command List File --
 -cmds <string>      : Path to the file of commands -cmds only compatible with General Options

                               -- Encryption Options --
 -encrypt            : Encrypt out file
 -keylength <int>    : Key Length.  Valid options are 40 and 128.  Default is 128.
 -ownerpass <string> : New Owner Password (Required)
 -userpass <string>  : New User Password
 -noprint            : Do Not Allow Printing
 -nomodify           : Do Not Allow Modifying the Document
 -nocopy             : Do Not Allow Copying text or graphics
 -nonotes            : Do Not Allow Adding or changing notes or form fields
 -nofill             : Do Not Allow Fill or Sign of Form Fields
 -noaccess           : Do Not Allow Accessibility
 -noassembly         : Do Not Allow Document Assembly
 -nohighres          : Do Not Allow High Resolution Printing

                               -- Save Options --
 -i                  : Save using an incremental save
 -w                  : Linearize to support byte serving across the web.  Forces full save
 -optimize           : Optimize the output file to try to reduce file size
 -iso32000           : Set file for ISO 32000 compliance (PDF 1.7)
 -nowarning          : Do not issue warnings about unused fields
 -o <string>         : save to a new output PDF file

 -d <string>         : Owner password to open this document

                               -- General Options --
 -listfonts          : Print list of available fonts in the appligent_home fonts folder
 -l <string>         : Write progress info to a given file
 -p                  : Write progress information to diagnostics
 -n                  : Do not write information to screen
 -v                  : Version information
 -help               : Show help
 -h                  : Show help
 -r <string>         : Registration number
Introduction
Overview
FDFMerge Lite and FDFMerge fill data into PDF forms automatically or on the fly. You can deliver live forms or “flattened” forms so field data cannot be changed. Filled in forms can be opened in Adobe® Reader®. You can also fill in high volumes of PDF forms on your server.
Note: This documentation provides instructions for both FDFMerge Lite and FDFMerge. Content that is specific to FDFMerge is followed by the notation: (FDFMerge only).
What Do FDFMerge Lite and FDFMerge Do?
FDFMerge Lite and FDFMerge are server-based, command-line applications that reliably combine PDF forms with form data to create a new populated PDF form.
In addition to combining forms and data, FDFMerge Lite and FDFMerge can:
- Flatten forms — remove the active field and stamp the field contents directly onto the PDF document
- Encrypt files — apply standard Acrobat security settings at 40- or 128-bit strength
- Process XML — use XFDF in addition to FDF files
- Process multiple forms using one FDF file
Addition features in FDFMerge only; a FormInfo file can be used to provide for:
- Partial form flattening — you can flatten the entire form, or specify individual fields to flatten
- Additional support for fonts — specify font information for form fields
- Image stamping — you can stamp an image onto a form field
- Format text fields — set font, point size, alignment, color, and more
- Advanced typography – manage character spacing, word spacing and line leading
- RGB and CMYK Color
FDFMerge Lite and FDFMerge can be used within a world wide web interface with CGI scripts. For your reference we have included a sample CGI script in Sample Perl CGI Script. CGI scripts are discussed in more detail in Automating FDFMerge Lite or Automating FDFMerge.
FDFMerge Lite and FDFMerge Components
FDFMerge Lite and FDFMerge use the following components:
- PDF forms — PDF documents with form fields
- FDF files — Text files which contain form data
- XFDF files — XML files which contain form data
- FormInfo files — Text files which contain information about customizing form fields (FDFMerge only)
PDF forms
PDF forms are interactive documents you create by inserting form fields into existing PDF documents. FDFMerge Lite and FDFMerge support the following form fields:
- Buttons
- Radio buttons
- Check boxes
- Combo boxes
- Text boxes
- List boxes
- Multi-line text boxes
Note: FDFMerge Lite and FDFMerge do not support Signature fields.
FDFMerge Lite and FDFMerge identify the form fields by the names you assign to each. Refer to Acrobat’s on-line help for information on creating and using forms.
FDF files
An FDF file is a text file that contains data for a PDF Form. Data is associated with each form field by the name you assigned. FDFMerge Lite and FDFMerge can combine this data with a PDF form to fill in the form fields with the FDF data.
An FDF file or set of files may be generated from information contained in a database or gathered from data submitted on a web page. This kind of conversion requires user written scripts (for example, using Perl, Visual Basic, or JavaScript) to transform the raw data into one or more FDF files.
XFDF files
An XFDF file is an XML version of an FDF file. Data and form field names are embedded in XML tags.
FormInfo files (FDFMerge only)
FormInfo files allow you to specify individual fields to flatten, and to customize the properties of those fields.
Preliminary Concepts
Merging
When FDFMerge Lite or FDFMerge merges a PDF form with an FDF file, it places the data from the FDF file into the form fields on the PDF form. Each form field on the form has an associated value in the FDF file, identified by the name of the field. The form fields remain “live” fields, their values can be changed, and form actions taken.
Flattening
When FDFMerge Lite or FDFMerge flattens a form field, it removes the field and places the value of the field directly into the document. This is called stamping the information into the document. The information becomes a static part of the document.
How FDFMerge Lite and FDFMerge process a document
FDFMerge Lite and FDFMerge can merge and/or flatten a document in several ways. FDFMerge Lite and FDFMerge can:
- Merge a form with an FDF file, leaving it a live form
- Merge a form with an FDF file, and flatten the entire form at the same time
- Flatten an already filled-out form. You do not need to use an FDF file for this
- Merge a form with an FDF file, and flatten and customize some or all of the fields, using a FormInfo file to specify which fields (FDFMerge only)
- Flatten and customize some or all of the fields of an already filled-out form, using a FormInfo file. You do not need to use an FDF file for this (FDFMerge only)
User Guide Conventions
This User Guide uses certain styles of text to indicate different information throughout the documentation. The following is a description of these styles:
- Command Line user input:
$fdfmergeliteapp -p -l <logfile.txt>
$fdfmergeapp -p -l <logfile.txt>
- Cross Reference to other locations in the documentation: Introduction to FDFMerge. Click the colored text to go to the referenced link.
- References to web sites for information: www.appligent.com. Click the colored text to open a browser to the website.
- Code snippets: #!/usr/local/bin
- Content that is specific to FDFMerge is followed by the notation: (FDFMerge only).
Note: You may see some paragraphs that start with “Note:”. These paragraphs are special notes relating to the subject matter where they are located.
Installation
Introduction
FDFMerge is a server based, command-line driven application that merges FDF (Forms Data Format) file information into a PDF (Portable Document Format) Form file.
Memory Requirements
Minimum free memory available to run the application: 512 MBytes
Windows Installation
Windows installation is handled by the installer and does not require any special handling.
Unix Installation
Setting environmental variables (All Unix Platforms)
In this release, there are two additional environmental variables that need to be set for FDFMerge on all UNIX platforms. If you run FDFMerge from the fdfmerge script created during installation, these environmental variables will be set by the script. If you run fdfmergeapp directly, you will need to set these environmental variables to run FDFMerge. Once FDFMerge is installed, you can view the variables needed by looking at the fdfmergeapp script created by the installer.
Setting the Appligent home directory (All Unix Platforms)
The environmental variable that stores the location of the Appligent home directory is APPLIGENT_HOME. The default location for the Appligent home directory is /usr/local/appligent. The Appligent home directory contains the library files and resources needed to run FDFMerge.
It also contains license information for FDFMerge.
Example:
export APPLIGENT_HOME=/usr/local/appligent
Setting the APDFL library path (All Unix except AIX)
The APDFL library path must be added to the LD_LIBRARY_PATH variable. The APDFL library path is located in a subdirectory of the APPLIGENT_HOME directory.
The path should be set to ${APPLIGENT_HOME}/APDFLX.X.X/Libs
Example:
export LD_LIBRARY_PATH=${LD_LIBRARY_PATH}:${APPLIGENT_HOME}/APDFLX.X.X/Libs
Setting the APDFL library path ( AIX Only )
The APDFL library path for AIX must be added to the LIBPATH variable. The APDFL library path is located in a subdirectory of the APPLIGENT_HOME directory.
The path should be set to ${APPLIGENT_HOME}/APDFLX.X.X/Libs
Example:
export LIBPATH=${LIBPATH}:${APPLIGENT_HOME}/APDFLX.X.X/Libs
Registration numbers for FDFMerge
In previous versions of FDFMerge, the FDFMerge registration number was required as a command line option with the -r flag each time fdfmergeapp was run. An FDFMerge script was provided that automatically added -r and the registration number to the fdfmergeapp command line when the script was run.
In the current release, in addition to getting the registration number from the command line, FDFMerge can get the registration number from a license file in the Appligent home directory. On UNIX systems, license files are created by the installation script and stored in the ${APPLIGENT_HOME}/license directory. For Windows, the license file is created by the installer and stored in the /All Users/Application Data/Appligent/License directory. With a valid license file, the -r is no longer required on the command line. The -r option can still be used as in previous versions, and will override the value in the license file.
Supported Platforms
Windows: 7 & above
Linux: 32 bit & 64 bit
Solaris: 10 & above
Form Data Format, FDF & XFDF
Creating an FDF File
An FDF file is a plain text file that contains a list of form fields and their values. Although we’ll show you how to create one by hand, most often FDF files are software generated. These are some of the more common methods to create FDF files:
- Use Adobe Acrobat to export forms data directly to a file.
- Use a Submit Form action in Acrobat’s Field Properties pop-up to export FDF data to a web server.
- Export data from a database and save it as an FDF file, using a script that you create.
- Write a program that will build an FDF file as a plain text file, using a script that you create.
- Use Adobe’s FDF Toolkit, see FDF resources for more information.
The FDF file format
An FDF file has the following format:
- An FDF file must begin with (Percent)FDF and end with (PercentPercent)EOF
%EOF - The data is given as name-value pairs, enclosed in double angle brackets: << >>:
/T indicates form field name
/V indicates form field value
In this section we’ll use the sample file: samples/testfiles/testfile.fdf as an example. Within it are six name-value pairs. The lines before and after these pairs are identification and formatting information.
%FDF-1.2
%âãÏÓ
1 0 obj
<<
/FDF << /Fields [
<< /T (CheckBox1) /V /Yes>>
<< /T (CheckBox2) /V /Off>>
<< /T (ComboBox) /V (6)>>
<< /T (ListBox) /V (fontsize)>>
<< /T (Basefont)
/V (This is a Multi-line text box. Note that the text wraps around to the next line!)>>
] >>
/ID[<B5B9EA85E3E2A7372D233185314E367E><7CA8657022DA815A340A57D516E030DC>
] >>
>>
endobj
trailer
<<
/Root 1 0 R
>>
%%EOF
Note: If you double-click on an FDF file, Acrobat will try to find its accompanying PDF file. If you want to see the contents of an FDF file open it in a text editor.
Line breaks and new lines in FDF files
When long character strings are used in text fields, you may need to manually insert line breaks, so that the text wraps in the form field the way you would like it to. If you put a line break in a field value, you need to adjust the spaces between words.
Inserting line breaks in FDF files, \r and \n
In order to make a multi-line text field format the way you want it to, you may have to add newline characters, using \r or \n. They both work the same way. A single new line results from any of the following: \r, \n, or \r\n. For example, if your text is:
Among these are time management
and you would like it to look like:
Among these are
time management
enter this into the FDF value for the form field:
Among these are\rtime management
Using the line continuation character \
The value of a name-value pair should be on a single line. If you need to break a value onto the next line, use the \ line continuation character.
Entering the following into the FDF value for the form field:
Among these \
are time man\
agement
Will look like this in the output PDF:
Among these are time management
Using special characters
Special characters can be entered directly into the FDF file, or they can be represented by octal characters. An octal character is represented by a \ followed by a three digit octal code. FDFMerge Lite and FDFMerge use octal codes with PDF encoding. A list of octal codes can be found in Appendix D of the PDF Reference manual on Adobe’s website.
Entering the following into the FDF value for the form field:
\200 Among these are time management
Will look like:
• Among these are time management
FDF resources
For more information about FDF, refer to Adobe for the following resources:
- The FDF Toolkit. Adobe provides this free API (Application Program Interface) for writing a server application that generates FDF data, or to parse FDF data from a form.
- The PDF Reference Manual provides useful FDF documentation.
- Be sure to check the FDFMerge Lite or FDFMerge pages of the Appligent website.
Creating an XFDF File
XFDF is an XML version of an FDF file. You can create XFDF files the following ways:
- Use Adobe Acrobat to export forms data directly to a file.
- Export data from a database and save it as an XFDF file, via a script that you create.
- Write a program that will build an XFDF file as a plain text file, via a script that you create.
- Use the Submit Form action in Acrobat’s Field Properties pop-up to export XFDF data to a web server.
You cannot use the FDF Toolkit to create XFDF files.
XML is a structured language that begins with the XML file itself as the topmost object. XFDF files have an element called fields that contain field and value.
Basic XFDF file structure
The table below shows the basic XFDF file structure.
| Element | Attribute | Content |
|---|---|---|
| <XFDF> | Topmost element | |
| <fields> | All the field values for this template | |
| <field (T)> | name | Field name |
| <value (V)> | value | Field value |
Refer to the XML Forms Data Format Specification on the Adobe website for more information about XFDF files. You can go to https://www.immagic.com/eLibrary/ARCHIVES/TECH/ADOBE/A070914X.pdf to download the specification.
An example of an XFDF file which shows this simple structure follows. The sample FDF form data would look like this in XFDF:
<?xml version="1.0" encoding="UTF-8"?>
<xfdf xmlns="http://ns.adobe.com/xfdf/" xml:space="preserve">
   <fields>
      <field name="CheckBox1">
      <value>A</value>
      </field>
      <field name="CheckBox2">
      <value>Off</value>
      </field>
      <field name="CheckBox3">
      <value>Off</value>
      </field>
      <field name="ComboBox1">
      <value>Option 1</value>
      </field>
      <field name="ListBox1">
      <value>Item2</value>
      </field>
      <field name="MultiLineText1">
      <value>This is a Multi-line text box. Note that the text wraps around to the next line!</value>
      </field>
      <field name="RadioGroup1">
      <value>Yes</value>
      </field>
      <field name="TextBox1">
      <value>Sample Text</value>
      </field>
   </fields>
</xfdf>
Line breaks and new lines in XFDF files
To manually insert a line break in form field text, type a carriage return directly into the value in the XFDF file. You do not need to use /r or /n characters. Make sure to check Multi-line on the Options tab of the Text Field Properties dialog in Acrobat.
Using Unicode
FDFMerge Lite and FDFMerge can use Unicode to place Asian language characters in a text form field. The only place double-byte characters can be used is in the value parameter of a text form field.
Note: You must use an XFDF file to use Unicode. FDFMerge Lite and FDFMerge do not support Unicode in FDF files.
Prerequisites for Acrobat full version
In order to use Acrobat to view and print Asian text, you must have Asian language support files installed for both the Operating System (OS) and Acrobat. The table below shows whether Asian font support is automatically installed for your combination of OS and Acrobat, or whether you have to manually install it.
Unicode font support
| OS | Font Support | |||
|---|---|---|---|---|
| Version | Automatic | Manual | ||
| OS | Windows | 7 & higher | ||
| Mac | OS X | |||
| Acrobat | Windows | X and higher | ||
| Mac OS X | 10.0 and higher | |||
Operating system
Asian font support is automatically installed for all OS platforms except Windows 2000/NT. To install Asian font support, open Regional Options in the Control Panel, and add the fonts you want. You may need your original installation disk. Refer to the Windows on-line help for more information. You can also install keyboard support.
Acrobat
Asian font support is automatically installed only in Acrobat 6 under Mac OS X. For all other versions, you will need to do a custom installation, and choose to install Asian font support. Refer to the Acrobat on-line help for more information.
Prerequisites for Acrobat Reader
In order to use Acrobat Reader to view and print Asian text, you must install the Asian Font Pack from Adobe.
Windows/UNIX
Download and install the Asian Font Pack.
Reader components can be updated in a variety of ways. Some updates are available when you open a PDF that triggers the updating process automatically. For example, if you open a form that uses Asian language fonts, Reader asks whether you want to download the fonts. Other updates are available only from the Help menu, and you must install them manually. Some updates are available both automatically and manually.
Mac OS X
You cannot download the Asian Font Pack for Mac OS X. You must choose to install it when you install Acrobat Reader. If you did not, you must reinstall Reader.
Available fonts
There are standard Adobe fonts that are available when using Unicode characters. The table below lists the seven fonts that are available for double-byte character stamping:
Double-byte character fonts
| Font Name in FDFMerge and FDFMerge Lite |
Font name in Adobe Acrobat |
|---|---|
| HeiseiKakuGo-W5 | Heisei Kakugo |
| HeiseiMin-W3 | Heisei Mincho |
| HYGoThic-Medium | HYGoThic Medium |
| HYSMyeongJo-Medium | HYSMyeongJo Medium |
| MHei-Medium | MHei-Medium |
| MSung-Light | MSung Light |
| STSong-Light | STSong Light |
Use the font name in the left-hand column above in the Font parameter in your FDF, XFDF or FormInfo file.
Character encodings
Create UTF encoded XFDF files with a text editor that supports UTF-8.
UTF-8
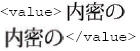
Type double-byte Unicode characters directly into the XFDF file using any text editor which supports UTF-8. Your system must have the appropriate fonts installed. For example:
![]()
Only the value field can have Asian fonts or any other higher level Unicode character. All other fields must use only the Latin character set (the first 128 characters, equivalent to “ASCII”).
Note: UTF-8 encoded characters are converted to UTF-16 before being placed into the form field. UTF-16 characters are placed directly into the document with no intervention by FDFMerge Lite or FDFMerge. If you want to make sure your characters are placed directly with no conversion, use UTF-16.
UTF-16
UTF-16 requires the double-byte characters in big-endian hexadecimal. Each character is represented by &#x and the four digit code for the character, followed by a semi-colon (;). Enter the entire Text parameter as a string of hex codes with no breaks. For example:
For example, to enter the three characters 5185 5BC6 306E, enter:
![]()
Refer to Unicode resources for help finding codes.
Multi-line UTF-8/UTF-16 stamps
In order to get multi-line text fields, you must make sure to check “Multi-line” in the Options tab of the Text Field Properties dialog. Then, either:
- For UTF8, enter a newline character directly by typing a carriage return. For example:
- For UTF16, place the newline character (below) directly into the text string.

For example:
![]()
Both values result in this field value:

Text containing double-byte characters will not automatically wrap.
Unicode resources
- The Unicode Consortium has the complete Unicode specification, providing a wealth of information on Unicode, character sets, and conversions.
- SC UniPad provides a free trial of UniPad, a Windows-based Unicode text editor.
- IT and communication provides an extensive tutorial on character sets, including Unicode.
Notes on JavaScript and Formatting Fields
Using JavaScript in PDF forms
FDFMerge Lite and FDFMerge do not have the capability to calculate form fields. If you use JavaScript in your PDF forms to calculate fields, the value in the FDF file is what will appear in the flattened output PDF file. Therefore, you need to have the correct field value present in the form or in the FDF file prior to merging.
If you will be merging and not flattening your form fields you can add a JavaScript to your form that will perform all calculations when the file is opened. However, you will get a warning from Adobe Acrobat to save the file when it is closed.
Formatting form fields
If you are flattening your form fields and you have set one or more fields as formatted, for example, as currency, then you will need to include the formatting for that value in the FDF file. For example, if you wish the value of a field to be $1,234.00 in the output PDF file, then the value in your FDF file needs to be /V ($1,234.00). If you put the value into the FDF as “1234” it will appear in the flattened PDF document as “1234.”
This behavior will sometimes also be true for non-flattened forms, when the form fields are still active. After merging the formatting settings may not appear to have “taken.” However, if the value in the field is modified (by adding and/or removing a character), formatting settings will take effect and format the value correctly to the settings. Therefore, whether merging and flattening or only merging, it is good practice to format the field as you would like it to appear directly within the FDF file.
Note: If you choose not to flatten form fields but just merge them, you can run with the -norebuild option and allow Acrobat to build the appearances for you. Running with the -norebuild flag would allow Acrobat to perform the calculations setup in form fields.
Using PDF images in button fields
Using an FDF file, FDFMerge Lite or FDFMerge can merge the first page of a PDF document onto a button field. You must specify the value of a button to be a PDF filename in the FDF file. The button will remain active after merging with FDFMerge Lite or FDFMerge. For example:
/T (ThisButton) /V (C:\FDFMerge\ThisPDFfile.pdf)
This technique may also be used to stamp the first page of a PDF document onto a button if -s is specified.
Merging a PDF onto a button is different from stamping a PDF, JPEG or TIF onto a form field. When an image is stamped onto a button, the action of the button is lost in the form flattening. Active buttons appear on flattened documents if:
- A PDF file path is set in the FDF file for the fieldname,
- The button has had an icon set.
Buttons which contain nothing but text (Label only) will not be stamped. This feature only works on buttons containing PDF Images.
Form Data Format Files
Form Data Format files
A Form Data Format file is a text file that contains a list of form fields and their values. FDFMerge Pro uses the data in FDF files to assemble and fill out forms. There are two kinds of FDF files:
- Classic—supplies data to fill out an existing form.
- Template-based—directs the construction of a new PDF document based on the templates found inside specified PDF files, and supplies the data to fill out the form(s) in the new document.
If you have used Appligent’s FDFMerge, you are familiar with classic FDF files. The FDFMerge Pro User Guide takes you through building one by hand. Template-based FDF files are more complex, and although we will be showing examples below, we do not recommend that you try to build them by hand. Use Adobe’s FDF Toolkit, available free on their website. See The FDF Toolkit for more information.
Note: Since XFDF does not support templates, you cannot use XFDF with FDFMerge Pro.
Form Data Format structure
The FDF file specification structures FDF files in terms of objects. Objects are enclosed in double angle brackets: << >>. The objects of importance to us are:
- Array objects—collections of other objects, including dictionaries and other arrays. The content of the array object is enclosed in square brackets: <</array [contents]>>.
- Dictionary objects—collections of key/value pairs. Values can be any kind of object, including an array or another dictionary. The dictionary contents are enclosed in double angle brackets: <</dictionary << /key /value >> >>.
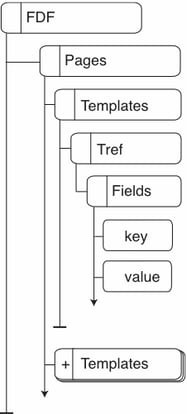
The following table shows the basic FDF file structure:
| Object | Type | Content |
|---|---|---|
| FDF | dictionary | Topmost object |
| Pages | array | Descriptions of every page of the new file |
| Template | array | Starts a new page |
| Tref | dictionary | Reference to a template for the page |
| Fields | array | All the field values for this template |
| key (T) | Name | Field name |
| value (V) | Value | Field value |
| Additional Templates structured as above |
array | Starts the next page |
| Object | Type | Content | ||
|---|---|---|---|---|
| FDF | dictionary | Topmost object | ||
| Pages | array | Descriptions of every page of the new file | ||
| Templates | array | Starts a new page | ||
| Tref | dictionary | Reference to a template for the page | ||
| Fields | array | All the field values for this template | ||
| key (T) | Name | Field name | ||
| value (V) | Value | Field value | ||
| Templates | array | Starts the next page | ||
Notes
The page/template relationship
Each page uses one template. Each template creates a new page.
Spawning new pages
If there is more data than can fit on one page, create a new page using the same template, and continue to populate the fields on the new page.
Comments
You can add comments to the FDF file using the percent sign (%).
Example
The following example shows the FDF template file, template.txt, in the samples folder. You can create a simple FDF file by copying the sections marked to add pages and fields.
| %FDF-1.2 | FDF file |
| 1 0 obj | FDF Object |
| << /FDF | FDF dictionary |
| << /Pages [ | Pages array |
| %page – copy to end_page to add pages | Copy this section to add pages |
| << /Templates [ | Templates array object – start of page |
| << /TRef | TRef dictionary – first template |
| << /F (/path/PDFFormName.pdf) | template file – PDFFormName.pdf |
| /Name (TemplateName) | Template page name – TemplateName |
| /Rename /false >> | Do not rename fields – FDFMerge Pro will do it |
| /Fields [ | Fields array |
| %fields – copy to end_field to add fields | Copy this section to add fields |
| << /T (FieldName)/V (FieldValue)>> | First field dictionary with Name and Value |
| %end_field | |
| ] >> | End TRef dictionary |
| ] >> | End Templates object – end of page |
| %end_page | |
| ] >> | End Pages object |
| >> | End FDF dictionary |
| endobj | End FDF Object |
| trailer | |
| << /Root 1 0 R >> | |
| %%EOF | End of File |
The FDF Toolkit
The FDF Toolkit is an API that allows you to write server side applications to generate FDF files. The FDF Toolkit has support for COM on Windows, C and Perl for Windows, Solaris, AIX or Linux, or Java for all 1.2 or higher compatible Virtual Machines.
To get the FDF Toolkit, visit http://www.adobe.com and search for “FDF Toolkit.”
Generating a template-based FDF file
The actual process to generate an FDF file varies depending on which platform and coding language you are using, but the general process goes like this:
- Initialize the FDF Toolkit library.
Only required explicitly under Unix with C/C++. - Create the FDF Data.
FDFCreate (“new” in Perl). - Add a template to the file.
FDFAddTemplate (“AddTemplate” in Perl). - Set the values for the fields in the template.
Loop through Step 4 until you have all the values set for the page. - Loop through Step 3 to 4 until you have built your entire file.
- Save the FDF Data
- Close the FDF Data buffers and free any resources used.
Refer to the FDF Toolkit Overview and Reference for detailed information on each step, and Examples below for using the FDFToolkit.
Notes
FDFAddTemplate
Always set bNewPage to true. FDFMerge Pro will not accept more than one template per page.
FDFMerge Pro ignores the value of bRename. It is always assumed false. FDFMerge Pro will rename the fields itself.
FDFMerge Pro can merge a PDF document page onto a button field. Use the Appearance Reference (APRef) object as the value of the field. Buttons with PDF pages merged onto them remain active buttons.
Using the APRef object
The APRef object takes one parameter, /N (Normal) which specifies the file and page to use. It looks like this:
/APRef << /N <</F (file name) /Name (page name)>> >>
/Name (page name) is optional. If you do not specify it, FDFMerge Pro will merge the first page of the file onto the button.
Note: FDFMerge Pro does not support the /R (rollover) and /D (down) switches for APRef.
To merge the first page of the file ButtonFile.pdf onto a button called Submit, place this field specification in the Fields array of your FDF file:
<<
/T (Submit)
/APRef
<</N
<</F (ButtonFile.pdf) >>
>>
>>
Using FDFToolkit
To merge a PDF file onto a button using the FDFToolkit, use the FDFSetAPRef call (SetAPRef in Perl) to create an APRef object.
Notes
Always set whichFace to FDFNormalAP. FDFMerge Pro will not set Rollover or Down values.
Examples
Address labels sample
Important! This example script is designed to clearly show how to use the FDFToolkit to create an FDF file. It does not contain adequate error checking. Do not use this script in a production environment.
We’ve included a sample application that fills out address labels from the names and addresses in a database. In the samples/labels directory, you’ll find:
- addresses.txt — a tab-delimited text file “database” of 60 sample names and addresses.
- labels.pl — a perl script using the FDFToolkit to generate an FDF file.
- labels.fdf — an FDF file produces by the labels.pl perl script.
- labels.pdf — a PDF file with one template page of 30 labels, designed to match commercially available mailing labels.
In this chapter you’ll use the labels.pl script to create mylabels.fdf.
The script
The script labels.pl does the following:
- Creates a new FDF stream.
- Reads the address data from addresses.txt.
- Splits the tab-delimited address data.
- Adds a page for the first 30 names.
- Sets values for the first 30 names.
- Repeats steps 4 and 5 until it reaches the end of the data.
- Writes the output FDF file.
Here is the Perl script:
#!/usr/bin/perl
use Acrobat::FDF;
# Create a new FDF Stream
$outFDF = new Acrobat::FDF;
# Read the address data
open (ADDRESSES,’./samples/labels/addresses.txt’);
@Addresses = <ADDRESSES>;
close (ADDRESSES);
# Set up for pagination: 30 labels per page
$page = -1;
$i = 1;
# Split the tab-delimited text file
foreach $Addresses (@Addresses) {
chomp($Addresses);
($FirstName,$LastName,$Street,$City,$ST,$Zip) =
split(/\t/,$Addresses);
# test whether to start a new page
if ($i % 30 == 1) {
$outFDF -> AddTemplate
(true,”./samples/labels/labels.pdf”,”Addresses”,false);
$page++ }
# Normalize the data: Field names are always 1-30
$I = $i – 30 * $page;
# Set the values for this page
$outFDF -> SetValue (“Name_$I”, “$FirstName $LastName”, false);
$outFDF -> SetValue (“Address_$I”, “$Street”, false);
$outFDF -> SetValue (“CityState_$I”, “$City, $ST $Zip”, false);
$i++
}
#When finished, write FDF file
$filename = “./samples/labels/mylabels.fdf”;
$outFDF -> Save ($filename);
Running the script
To run the script manually:
- Make sure you have Perl 5.6 and Adobe’s FDFToolkit for Perl installed.
- Change the working directory to the FDFMerge Pro /samples directory.
The default location for the FDFMerge Pro samples directory in Windows is
C:\Appligent\FDFMergePro\samples\.
On other platforms, it will be wherever you installed FDFMerge Pro. - Enter the following command
$Perl labels.pl
and press Return (or Enter). - Examine mylabels.fdf and compare to the sample shown below.
The output
The resulting FDF file looks like this. This sample only shows one address per page for clarity.
%FDF-1.2
%‚„oe”
1 0 obj<</Version/1.3/FDF<</Pages 2 0 R>>>>
endobj
2 0 obj[<</Templates 3 0 R>><</Templates 5 0 R>>]
endobj
3 0 obj[<</Fields 4 0 R/Rename
false/TRef<</F<</F(./samples/labels/labels.pdf)/V
true>>/Name(Addresses)>>>>]
endobj
4 0 obj[<</T(Name_1)/V(Sara Adams)>><</T(Address_1)/V(9150
Kiefer St.)>><</T(CityState_1)/V(Aberdeen, SD 57401)>>...]
endobj
5 0 obj[<</Fields 6 0 R/Rename
false/TRef<</F<</F(./samples/labels/labels.pdf)/V
true>>/Name(Addresses)>>>>]
endobj
6 0 obj[<</T(Name_1)/V(Dorothy Hughes)>><</T(Address_1)/V(2500
Coakley Court)>><</T(CityState_1)/V(Washington, DC 20001)>>...]
endobj
trailer
<</Root 1 0 R>>
%%EOF
Note: The FDF file produced by FDFToolkit uses indirect objects to group form data. An explanation of this is beyond the scope of this manual. For more information, refer to the PDF Reference at www.adobe.com.
FormInfo Files
In this chapter…
…we describe how to use a FormInfo file to flatten and customize form fields. When to use FormInfo files and how to build them is explained in detail. We also describe how to stamp PDF pages and images into form fields using the FormInfo file.
Note: The functionality described on this page is available for FDFMerge only.
When To Use FormInfo Files
Use a FormInfo file with FDFMerge when you want to do one or more of the following:
- Flatten only selected form fields
- Change the original formatting in some or all of the fields being flattened
- Stamp PDF pages and images into form fields
If you want to flatten all of the fields and retain the original formatting, you do not need a FormInfo file. Instead, merge the file with data using an FDF or XFDF file and use the -s command-line option to flatten all of the fields. See -s — Replace All Fields With Stamps for more information.
Constructing a FormInfo File
A FormInfo file allows you to specify the properties of some or all of the form fields in a PDF document. By setting default properties, you can specify properties for all fields at once, and fine tune individual fields as needed. You can specify the format of the text in a field, the border and background of the field, and an image or PDF file to stamp onto a field.
A FormInfo file can consist of three components:
- Comments — for making notes
- A Header Block — for setting default properties of all fields
- Field Entries — for specifying fields to be flattened and/or modified
The following sections explain how to create these components.
Adding comments
Comments in your FormInfo file are lines of text that you don’t want to be read by FDFMerge. They have several useful functions:
- Making notes, to describe the file and its components, and create reminders for further action
- Testing and debugging, to deactivate or “comment out” parameters that may be causing problems
Comments start with the hash or number symbol (#) and must be placed at the beginning of a line:
#This is a comment in my parameter file.
The Header Block
The FormInfo file always begins with the Header Block.
Specifying default properties with the Header Block
The Header Block specifies the default properties for all the form fields in the document. For example, if you specify a point size and font name in the Header Block, they will apply to all form fields. You can override those values for individual fields with separate Field Entries; for more information, refer to Field Entry Parameters. The Header Block must begin with BeginHeader and needs to be placed before any Field Entries. EndHeader needs to be placed after the default parameters at the end of the Header Block.
The table Header Block Parameters lists all the Header Block parameters. They have the same syntax and meaning as the corresponding Field Entry parameters, except they specify default properties for all fields and begin with the word “Default.” For detailed parameter descriptions, refer to Field Entry Parameters.
To see how FDFMerge resolves conflicts when field attributes are specified in the PDF source file, as well as the Header Block and a Field Entry, see Which Settings FDFMerge Listens to First.
Header Block Parameters
The table below lists all of the Header Block parameters that are used in the FormInfo file.
| Type | Parameter | Content |
|---|---|---|
| Begin | BeginHeader | Beginning of header block |
| Text | DefaultFontName | Name of font |
| DefaultFontFile | Location of font file, if necessary | |
| DefaultFontSize | Size of font, in points | |
| DefaultGray | Grayscale color value for text color (0–100) | |
| DefaultRed DefaultGreen DefaultBlue |
RGB color values for text color (0–255) | |
| DefaultCyan DefaultMagenta DefaultYellow DefaultBlack |
CMYK color values for text color (0–1) | |
| DefaultJustification | Text justification (Left, Center, or Right) | |
| DefaultFontXScale | Scale text characters horizontally (0–100) | |
| DefaultFontYScale | Scale text characters vertically (0–100) | |
| DefaultCharSpace | Adjust character spacing | |
| DefaultWordSpace | Adjust word spacing | |
| DefaultTextLineSpace | Adjust line spacing | |
| DefaultCropToField | Crop text to fit form field (Default: No) | |
| Format | DefaultBorderVisible | Apply border |
| DefaultBorderGray | Grayscale color value for border color (0–100) | |
| DefaultBorderRed DefaultBorderGreen DefaultBorderBlue |
RGB color values for border color | |
| DefaultBorderCyan DefaultBorderMagenta DefaultBorderYellow DefaultBorderBlack |
CMYK color values for border color | |
| DefaultBorderWidth | Width of border in points (1, 2, or 3) | |
| DefaultBackgroundVisible | Apply background color | |
| DefaultBackgroundGray | Grayscale color value for background color (0–100) | |
| DefaultBackgroundRed DefaultBackgroundGreen DefaultBackgroundBlue |
RGB color values for form field background (0–255) | |
| DefaultBackgroundCyan DefaultBackgroundMagenta DefaultBackgroundYellow DefaultBackgroundBlack |
CMYK color values for form field background (0–1) | |
| End | EndHeader | End of header block |
Sample Header Block
Enter parameters as follows:
parameter (value)
There must be at least one space between the parameter and the value.
A sample header, using the Type 1 font New Century Schoolbook, looks like this:
BeginHeader
DefaultFontName (NewCenturySchlbk-Roman)
DefaultFontFile (C:\Fonts\NewCenSchRom.pfb)
DefaultFontSize (12)
DefaultRed (255)
DefaultGreen (0)
DefaultBlue (0)
DefaultJustification (left)
DefaultBorderVisible (Yes)
DefaultBorderRed (127)
DefaultBorderGreen (233)
DefaultBorderBlue (55)
DefaultBackgroundVisible (Yes)
DefaultBackgroundRed (60)
DefaultBackgroundGreen (200)
DefaultBackgroundBlue (0)
DefaultCropToField (Yes)
EndHeader
It is not necessary to provide default values for every parameter. If you only want to ensure that all type is of the same point size (for example, 10 points) your header would look like this:
BeginHeader
DefaultFontSize (10)
EndHeader
Another example of a simple header is one that crops the text in all text fields, list boxes, and combo boxes:
BeginHeader
DefaultCropToField (Yes)
EndHeader
Field Entry Parameters
Each Field Entry specifies a field to be flattened and optionally applies customized formatting to the field, overriding all other settings in the Header Block and in the PDF file. Each Field Entry in a FormInfo file must begin with the keyword BeginField, end with the keyword EndField, and specify the name of the field it references. The table below lists all Field Entry parameters.
| Type | Parameter | Required | Content |
|---|---|---|---|
| Begin | BeginField |
|
Beginning of field entry |
| Name | FieldName | Name of the form field | |
| Text | FontName | Name of font | |
| FontFile | Location of font file, if necessary | ||
| FontSize | Size of font, in points | ||
| ColorGray | Grayscale color value for text color (0–100) | ||
| ColorRed ColorGreen ColorBlue |
RGB color values for text color (0–255) | ||
| ColorCyan ColorMagenta ColorYellow ColorBlack |
CMYK color values for text color (0–1) | ||
| Justification | Text justification (Left, Center, Right) | ||
| FontXScale | Scale text characters horizontally (0–100) | ||
| FontYScale | Scale text characters vertically (0–100) | ||
| CharSpace | Adjust character spacing | ||
| WordSpace | Adjust word spacing | ||
| TextLineSpace | Adjust line spacing | ||
| CropToField | Crop text to fit form field (Default: No) | ||
| Format | BorderVisible | Apply border | |
| BorderGray | Grayscale color value for border color (0–100) | ||
| BorderRed BorderGreen BorderBlue |
RGB color values for border color (0–255) | ||
| BorderCyan BorderMagenta BorderYellow BorderBlack |
CMYK color values for border color (0–1) | ||
| BorderWidth | Width of border in points (1, 2, or 3) | ||
| BackgroundVisible | Apply background color | ||
| BackgroundGray | Grayscale color value for background color (0–100) | ||
| BackgroundRed BackgroundGreen BackgroundBlue |
RGB color values for form field background if BackgroundVisible set to Yes (0–255) | ||
| BackgroundCyan BackgroundMagenta BackgroundYellow BackgroundBlack |
CMYK color values for form field background if BackgroundVisible set to Yes. (0–1) | ||
| Image | Type | Text, Image, or PDF (Default: Text) | |
| ImageFileName | Name of the image to use | ||
| PageNumber | Page number, if Type is PDF | ||
| End | EndField | End of field entry |
Simplest Field Entry
Enter parameters as follows:
parameter (value)
There must be at least one space between the parameter and the value.
The following shows the simplest Field Entry, one for flattening a field named Message:
BeginField
FieldName (Message)
EndField
A Field Entry that flattens and applies a border to the Message field looks like this:
BeginField
FieldName (Message)
BorderVisible (Yes)
EndField
Field Entry parameters defined
FieldName (required)
The name you gave to the field when creating your form, or the name of the field in an FDF document.
FontName (required as of version 7.0.2)
The name of the font to use.
Earlier versions of FDFMerge only supported Base 14 and Type 1 fonts. FDFMerge 7.0.2 supports PostScript Type 1 fonts, True Type, Open Type and Base 14 fonts.
When specifying a font for FontName, be sure to use the correct spelling, capitalization, and hyphenation. You can get a list of all the fonts that FDFMerge has access to by running fdfmerge -listfonts. You need to enter the name of the font in the FontName parameter exactly how it appears in the list after running -listfonts.
FontFile (deprecated as of version 7.0.2)
This parameter was required in earlier versions of FDFMerge when specifying PostScript Type 1 fonts. With version 7.0.2, if the FontFile parameter is present in the FormInfo file, it will be ignored.
In earlier versions, if you specified a Type 1 PostScript font, you had to supply the path and name of the font file:
- Fonts use two files, a .pfb and a .pfm file. Both files need to be in the same directory, but you specify the .pfb file.
- If there was a conflict between FontName and FontFile, the information in the font file overrides the font name. Since FontFile is not longer being used, the name of the font must appear in the FontName parameter as displayed after running -listfonts.
FontSize (optional)
Specifies the point size of the font that you are stamping into the form field. Fractional point sizes are allowed (for example, 11.5).
ColorGray (optional)
Use ColorGray if your color space is Grayscale. ColorGray specifies a shade of gray; use a value between 0 and 100, where 0 is black and 100 is white. A ColorGray of 15 would be a dark gray, and a ColorGray of 95 would be a very light gray.
ColorRed, ColorGreen, ColorBlue (optional)
Use ColorRed, ColorGreen, and ColorBlue if your color space is RGB. The values for these colors can be in the range of 0–255, where 0 represents none of the color and 255 represents 100% of the color. You can combine varying amounts of the three color components to generate virtually any color. Here are some examples:
To create purple text enter the following values for the color components:
ColorRed (102)
ColorGreen (51)
ColorBlue (204)
To create green text enter:
ColorRed (0)
ColorGreen (150)
ColorBlue (0)
Specifying a value of 150 for green will generate a medium shade. See Notes on color below for help choosing color values.
Note: You must include values for each color: ColorRed, ColorGreen, and ColorBlue. Use a setting of 0 for colors you do not want.
ColorCyan, ColorMagenta, ColorYellow, and ColorBlack (optional)
Use ColorCyan, ColorMagenta, ColorYellow, and ColorBlack if your color space is CMYK. The values for these colors can be in the range of 0–1, where 0 represents none of the color and 1 represents 100% of the color. You can combine varying amounts of the four color components to generate virtually any color. Here are some basic examples:
To create the same color purple text used in the RGB example, enter the following values for the color components:
ColorCyan (0.63)
ColorMagenta (0.76)
ColorYellow (0)
ColorBlack (0)
To create yellow text enter:
ColorCyan (0)
ColorMagenta (0)
ColorYellow (0.5)
ColorBlack (0)
Specifying a value of 0.5 for ColorYellow will generate a medium shade. See the Notes on Color below for help choosing color values.
Note: You must include values for each color: ColorCyan, ColorMagenta, ColorYellow, and ColorBlack. Use a setting of 0 for colors you do not want.
Notes on color
The color space used is determined by the parameters you use to specify the color: Gray; or Red, Green, Blue; or Cyan, Magenta, Yellow, Black. If you specify a color for a stamp in more than one color space, FDFMerge will use the last color specification.
Note: Use the same color space throughout the entire PDF document. Specifying different color spaces can yield unexpected results.
RGB vs. CMYK
If you’re not familiar with color spaces, you may be confused by the differences in the way colors are specified in RGB or CMYK.
RGB is a color space for televisions and computer monitors. Color is created by mixing Red, Green, and Blue light. The maximum values result in white light. Since computer monitors are digital, RGB levels are specified in a four-bit word, from 0 to 255.
CMYK is a color space for printing. Color is created by mixing Cyan, Magenta, Yellow, and Black inks. The maximum values result in black ink. Ink levels are specified in percentages, from 0 to 1.
How to select colors using RGB or CMYK components
Visibone Webmaster’s Color Lab has tools to help you select a color. When you select a color that you like, the code for that color is given in RGB (Red, Green, Blue), CMYK (Cyan, Magenta, Yellow, and Black), and/or hexadecimal (used in HTML for web pages). Copy the RGB or CMYK values given and enter them into the corresponding parameters in the form info file. You may also have software already installed on your computer that will help you design colors by accepting different values for color and displaying the results.
-
Note: The values for RGB must be integers in the range 0–255. If you find colors defined as percentages, convert them to the 0–255 range. For example, 25 Cyan is 0.52.
Justification (optional)
Text alignment in the field. Possible values are:
- Left, aligns text with the left margin of the form field
- Right, aligns text with the right margin of the form field
- Center, horizontally centers text between the left and right margins
FontXScale (optional)
Scale text characters horizontally (0–100). A value between 0.00 and 1.00 (0–100%) will scale down, numbers greater than 1.00 (>100%) will scale up.
FontYScale (optional)
Scale text characters vertically (0–100). A value between 0.00 and 1.00 (0–100%) will scale down, numbers greater than 1.00 (>100%) will scale up.
CharSpace (optional)
Adjust spacing in between characters. Positive values will increase the spacing, negative values will decrease the spacing. There is no “valid range”. Values less than -2 will start overlapping letters; values greater than 6 become hard to read.
WordSpace (optional)
Adjust spacing in between words. Positive values will increase the spacing, negative values will decrease the spacing. There is no “valid range”. Values less than -2 will start overlapping letters; values greater than 6 become hard to read
TextLineSpace (optional)
Adjust spacing in between lines. A value between 0.00 and 1.00 will decrease the line spacing, values greater than 1.00 will increase the line spacing. A line spacing of 0 will overlay lines on top of one another.
CropToField (optional)
Specifies whether to trim field text to fit the form field’s rectangle. CropToField applies to text fields, list boxes and combo boxes. If you will be using borders around your form fields, you will probably want to set CropToField to Yes.
BorderVisible (optional)
Specify Yes to create a border around a form field. Specifying No will create an invisible border. Specify the color as described below.
BorderGray (optional)
Use BorderGray if your color space is Grayscale. BorderGray specifies a shade of gray; use a value between 0 and 100, where 0 is black and 100 is white. A BorderGray of 15 would be a dark gray, and a BorderGray of 95 would be a very light gray.
BorderRed, BorderGreen, BorderBlue (optional)
Use BorderRed, BorderGreen, and BorderBlue to specify the border color if your colorspace is RGB. The values for these colors can be in the range of 0–255, where 0 represents none of the color and 255 represents 100% of the color. To specify a green border:
BorderRed (0)
BorderGreen (255)
BorderBlue (0)
Note: You must include values for each border color: BorderRed, BorderGreen, and BorderBlue. Use a setting of 0 for colors you do not want. Refer to ColorRed, ColorGreen, ColorBlue and Notes on color for more information about choosing colors.
BorderCyan, BorderMagenta, BorderYellow, And BorderBlack (optional)
Use BorderCyan, BorderMagenta, BorderYellow, and BorderBlack to specify the border color if your colorspace is CMYK. The values for these colors can be in the range of 0–1, where 0 represents none of the color and 1 represents 100% of the color. You can combine varying amounts of the four color components to generate virtually any color.
Note: You must include values for each border color: BorderCyan, BorderMagenta, BorderYellow and BorderBlack. Use a setting of 0 for colors you do not want. Refer to ColorCyan, ColorMagenta, ColorYellow, and ColorBlack and Notes on color for more information about choosing colors.
BorderWidth (optional)
BorderWidth is the width of the border you have defined, in points. The width of the border can be 1, 2, or 3 points. BorderWidth (1) is the narrowest, and BorderWidth (3) is the widest.
BackgroundVisible (optional)
Specify Yes to set a visible background for the form field. No will set an invisible background. Specify the color as described below.
BackgroundGray (optional)
Use BackgroundGray if your color space is Grayscale. BackgroundGray specifies a shade of gray; use a value between 0 and 100, where 0 is black and 100 is white. A BackgroundGray of 15 would be a dark gray, and a BackgroundGray of 95 would be a very light gray.
BackgroundRed, BackgroundGreen, BackgroundBlue (optional)
Use BackgroundRed, BackgroundGreen, and BackgroundBlue to specify the background color if your colorspace is RGB. The values for these colors can be in the range of 0–255, where 0 represents none of the color and 255 represents 100% of the color. To specify a green background:
BackgroundRed (0)
BackgroundGreen (255)
BackgroundBlue (0)
Note: You must include values for each background color: BackgroundRed, BackgroundGreen, and BackgroundBlue. Use a setting of 0 for colors you do not want. Refer to ColorRed, ColorGreen, ColorBlue and Notes on color for more information about choosing colors.
BackgroundCyan, BackgroundMagenta, BackgroundYellow, and BackgroundBlack (optional)
Use BackgroundCyan, BackgroundMagenta, BackgroundYellow, and BackgroundBlack to specify the background color if your colorspace is CMYK. The values for these colors can be in the range of 0–1, where 0 represents none of the color and 1 represents 100% of the color. You can combine varying amounts of the four color components to generate virtually any color.
Note: You must include values for each background color: BackgroundCyan, BackgroundMagenta, BackgroundYellow, and BackgroundBlack. Use a setting of 0 for colors you do not want. Refer to ColorCyan, ColorMagenta, ColorYellow, and ColorBlack and Notes on color for more information about choosing colors.
Type (required if stamping an Image or PDF)
Specifies the type of stamp for the form field: Text, Image, or PDF. Required if a JPEG, TIF or PDF file is specified for stamping into a form field. Use the keyword Image for a JPEG or TIF image; for a PDF document, use keyword PDF.
ImageFileName (required with Type Image or PDF)
Specifies the name of the JPEG, TIF or PDF file for stamping images into the specified form field. This name should be the full path name to the file.
The ImageFileName parameter is ignored when Type is set to Text.
PageNumber (optional with Type PDF)
Specifies which page from the PDF file to stamp into the form field. For example, to stamp the second page of a document into a button field, you would specify PageNumber (2).
The PageNumber parameter is ignored when Type is not set to PDF.
Which Settings FDFMerge Listens to First
There are three ways for FDFMerge to get information about a form field to stamp information into a new file:
- From a Field Entry in the FormInfo file
- From the Header Block in the FormInfo file
- From the original PDF form; whatever settings are there for font style, size, etc. can be used for stamping by FDFMerge
But what if the FontName, for example, is listed in two or more places for one form field, which value will FDFMerge take? The precedence order in FDFMerge is as follows:
- Form Field Entry in FormInfo file. Whatever is specified here is the final word. If FontName is Times here but Helvetica everywhere else, the text will be printed as Times.
- Header Block in FormInfo file. These attributes override values in the source PDF form, but field entries take precedence over header information.
- Source PDF form field attributes. If a form field does not have attributes specified in either a Field Entry or the Header Block of a FormInfo file, FDFMerge uses the attributes in the original PDF form file. If only some of the attributes are listed in a field entry or header, the remaining attributes are taken from the PDF source.
General Options
Introduction
Common command-line options are used in all Appligent server applications. These options deal with product information, progress messages, and file maintenance. Information that is specific to FDFMerge is distinguished by green text.
General options — summary
The following table provides a summary of the general command-line options:
| Option | Parameter | Description |
|---|---|---|
| -r | <RegNum> | Pass registration number to FDFMerge Lite or FDFMerge. |
| -l | <logfile> | Write progress information or errors to log file. |
| -p | Display progress messages to the console or screen. | |
| -n | Do not write anything to the console or screen. | |
| -v | Display version information. | |
| -h or -help | Display usage information. | |
| -i | Perform incremental save. | |
| -w | Linearize the file upon save. | |
| -optimize | Optimize the output file to try to reduce file size. | |
| -iso32000 | Set file for ISO 32000 compliance (PDF 1.7). | |
| -nowarning | Do not issue warnings about unused fields | |
| -d | <string> | Owner password to open this document |
| -o | <outfile.pdf> | Save output to a new file or directory. |
General options — detailed
The following sections provide details on using the general command-line options.
-r <RegNum> — Pass registration number to FDFMerge Lite or FDFMerge
This option can be used to supply your registration number to FDFMerge Lite or FDFMerge from a script or another application:
$fdfmergeliteapp -r XXXX-XXXX-XXXX-XXXX-XXXX-XXXX [other options]
$fdfmergeapp -r XXXX-XXXX-XXXX-XXXX-XXXX-XXXX [other options]
This option is typically not necessary and is available for use in cases where the Appligent License File can not be located by the application because of runtime environment restrictions.
-l <logfile> — Create a log file (optional)
Specify a text file for any errors and progress messages. This option is helpful for debugging. The -l <logfile> option must be followed by a file name. If there are no errors, no file is written. If a log file is not specified, errors are written to the default log file fdfmergelite.log or fdfmerge.log. Make sure that your log file is write enabled.
-p — Show progress (optional)
Write progress messages to the screen STDOUT, the standard output of your system and to the default log file fdfmergelite.log or fdfmerge.log. This option is helpful for debugging and for understanding how FDFMerge Lite or FDFMerge works.
A note on using -p and -l <logfile> together
As outlined in the above sections, the -p option gives you progress messages on your screen and the -l <logfile> option writes error messages to a file if errors occur. The table below provides more detail on using these options alone or together.
| -l | -p | Errors Found | Result |
|---|---|---|---|
|
Nothing will be written to the screen or to the log file you specify. | ||
| Progress messages will be written to the screen and fdfmergelite.log or fdfmerge.log. | |||
| Progress messages will be written to the screen and to the log file you specify. | |||
| A fdfmergelite.log or fdfmerge.log file will be created with the errors in your working directory. | |||
| Errors will be written to the log file you specify. | |||
| Errors will be written to fdfmergelite.log or fdfmerge.log and your screen. | |||
| Both progress and error message will be written to the screen and to the log file you specify. |
Therefore, -l <logfile> used on its own will only go into action if there are errors. With -p and -l <logfile> combined, you will get a text file with full details on FDFMerge Lite or FDFMerge operations whether there are errors or not.
-n — Do not write anything to the screen (optional)
Do not write anything to the screen (or STDOUT). If you are running batch mode, this prevents progress message from building up.
-v — Display version information (optional)
Display the version of FDFMerge Lite or FDFMerge you are running. This is important when corresponding with support@Appligent.com. In order to better understand your problem, we must know what version of the software you have. FDFMerge Lite or FDFMerge will not do anything else if you use this option.
-h or -help — Show usage (optional)
Display all available command-line options. FDFMerge Lite or FDFMerge will not do anything else when you use these options.
-i — Perform incremental save (optional)
An incremental save appends changed information to the end of the file. This is faster than a full save, but may result in a larger file. A full save is similar to using the “Save As..” command in Adobe Acrobat. It is a save that attempts to clean up a PDF file, often reducing its size.
-w — Linearize the file upon save (optional)
Save the output file as a linearized document, also known as optimized. Linearization reorganizes the file to make it more efficient for web delivery. Individual pages can be rendered before the entire document has downloaded, so the user can start reading the document sooner.
-optimize — Optimize the file (optional)
This flag will do the following: 1) encode any non-encoded streams using Flate compression, 2) remove ASCII85 filters from all streams, 3) replace LZW encoded streams with Flate encoding, 4) merge identical XObjects and images, 5) optimize common sequences in page content, and 6) merge identical font descriptors and encodings. This option will usually result in a smaller file size.
-iso32000 — Set file for ISO32000 compliance (optional)
This flag will set the file for ISO 32000 compliance, resulting in a document that is PDF version 1.7.
-nowarning – Do not issue warnings about unused fields
This flag will suppress messages to STDOUT when form fields appear in the FDF file but not in the PDF form.
-d <string> — Owner password to open the document (optional)
If the PDF document you wish to stamp has been encrypted, you must pass the owner password with the -d <string> option in order to stamp the file. If you are processing more than one input file at a time, the owner password must be the same for all files.
-o — Create a new output file or directory
Save the modified file as a new PDF.
Command Collections
The -cmds option allows you to process a collection of files at one time
To process multiple commands quickly and efficiently, use the -cmds <filename> option. The file specified by -cmds, the commands file, should contain one or more single line commands. Each command is just like an ordinary FDFMerge Lite or FDFMerge command-line without the executable name. The commands file does not support wildcards in filenames. Below are examples of command line syntax when running with -cmds:
$ ./fdfmergeliteapp -p -l logfile.txt -cmds CommandFile.txt
$ ./fdfmergeapp -p -l logfile.txt -cmds CommandFile.txt
CommandFile.txt contains a list of commands for FDF Merge Lite or FDFMerge to process. This is an example of a CommandFile.txt file:
-p -optimize -f /appligent/fdfmerge/samples/testfiles/testfile1.txt  -o /appligent/fdfmerge/samples/testfiles/outfile1.pdf /appligent/fdfmerge/samples/testfiles/testfile.pdf /appligent/fdfmerge/samples/testfiles/testfile.fdf
-p -x -o /appligent/fdfmerge/samples/testfiles/outfile2.pdf /appligent/fdfmerge/samples/testfiles/testfile.pdf /appligent/fdfmerge/samples/testfiles/testfile.xfdf
-p -w -x -f /appligent/fdfmerge/samples/healthform/healthform3.txt  -o /appligent/fdfmerge/samples/healthform/outfiles3.pdf /appligent/fdfmerge/samples/healthform/healthform.pdf /appligent/fdfmerge/samples/healthform/healthform.xfdf
FDFMerge Options
In this chapter…
.…you will learn about the options available within FDFMerge Lite and FDFMerge. Information that is specific to FDFMerge is followed by the notation: (FDFMerge only).
FDFMerge Lite and FDFMerge Options
Refer to FDFMerge Lite – General Command-Line Options or FDFMerge – General Command-Line Options for details on the general options.
Refer to FDFMerge Lite – Applying Standard Security or FDFMerge – Applying Standard Security for more information about the security options and working with encrypted documents.
The following are examples of simple command lines for calling FDFMerge Lite or FDFMerge:
$ fdfmergeliteapp [options] -o out.pdf input.pdf input.fdf
$ fdfmergeapp [options] -o out.pdf input.pdf input.fdf
The table below shows command-line options for FDFMerge Lite and FDFMerge.
Options summary
| Option | Parameter | Description |
|---|---|---|
| -x | Input is an XFDF file, not an FDF file. | |
| -s | Replace all fields with stamps. | |
| -stampnewvalues | Stamp fields with new values (FDFMerge only) | |
| -reverse | Make FDF file come first followed by multiple PDF files. | |
| -norebuild | Don’t rebuild appearances. | |
| -mergeflags | Merge F and Ff flags along with the field values in the FDF | |
| -f | <FormInfo.txt> | Field information file for partial field replacement (FDFMerge only). |
| -cmds | <CommandFile.txt> | Process multiple commands and files. Compatible with -l, -p, -r, -h or -help and -n. |
-x — Input is an XFDF file
Specifies that the input data file is an XFDF file, which is an XML version of an FDF file. Required if using an XFDF input file instead of an FDF file.
-s — Replace all fields with stamps (optional)
Flattens a form, changing active form fields into static text or images. For more information about how this works, see To merge and flatten, or to merge and not flatten.
-stampnewvalues — Stamp fields with new values (optional – FDFMerge only)
Partially flatten form fields passed in using FDF and XFDF files. When this feature is present on the command line, all unfilled fields will remain active.
-reverse — Make FDF file come first followed by multiple PDF input files (optional)
Processes multiple PDF forms with a single FDF file. An output directory must be used with -reverse. FDFMerge Lite and FDFMerge normally require the PDF form before the FDF file on the command line. However, when running multiple forms with the same FDF file, the FDF file must appear before the PDF form on the command line. For example, the following command:
$ fdfmergelite [options] -o ./merged -reverse fdf_filename.fdf pdf_filename1.pdf pdf_filename2.pdf...pdf_filename3.pdf
$ fdfmerge [options] -o ./merged -reverse fdf_filename.fdf pdf_filename1.pdf pdf_filename2.pdf...pdf_filename3.pdf
Merges the same form information into each PDF file, and writes the new files to the ./merged directory using the same PDF filename as the input PDF form file. Required when running multiple PDFs.
Note: FDFMerge Lite or FDFMerge will not create a directory, so be sure the directory for the output files exists.
-norebuild — Don’t rebuild appearances (optional)
Specifies that Acrobat, rather than FDFMerge Lite or FDFMerge builds the form appearances for an output PDF form. Use this option when merging text fields containing formats or calculations to have Acrobat keep the formatting.
Note: The -norebuild flag will be ignored if used with the -s flag.
-mergeflags — Merge F and Ff flags along with the field values in the FDF
Can be used to set fields to ReadOnly. For example, having the following in an FDF file will set the form field to ReadOnly when merging
/T(name) /V(John Smith) /Ff 1
-f <FormInfo.txt> — Field information file for field customization (optional) — FDFMerge only
Specifies that a FormInfo file be used for flattening, customizing form fields, or stamping them with JPEG, TIF or PDF images.
More information on merging and flattening form fields can be found below in To merge and flatten, or to merge and not flatten. For information on available parameters and how to put together a FormInfo file, see FormInfo Files.
Note: All form fields described in the FormInfo file are flattened in the output PDF document, whether or not the -s option (described below) is used.
To merge and flatten, or to merge and not flatten, and the FormInfo file — FDFMerge only
The results of using the -s option can vary if you also specify a FormInfo file. See flattening variations in the table below describes the different scenarios (see FormInfo Files).
Flattening variations
| -s | -f FormInfo file | Result |
|---|---|---|
|
All fields are flattened, and the original file formatting is retained. | |
| Only those form fields specified in the FormInfo file are flattened. Fields that are not specified remain active. (FDFMerge only) | ||
| All fields are flattened and formatted according to FormInfo file specifications, if available. Fields without customization information in the FormInfo file maintain their original formatting. (FDFMerge only) |
Note: See Notes on JavaScript and Formatting Fields for detailed information on formatting fields in the FDF file that will be flattened.
-cmds <CommandFile.txt> — Allows you to process a collection of files at one time
To process multiple commands quickly and efficiently, use the -cmds <filename> option. The file specified by -cmds, the commands file, should contain one or more single line commands. Each command is just like an ordinary FDF Merge Lite or FDFMerge command-line without the executable name. The commands file does not support wildcards in filenames. The following is an example of command-line syntax when running with -cmds:
$ fdfmergeliteapp -p -l logfile.txt -cmds CommandFile.txt
$ fdfmergeapp -p -l logfile.txt -cmds CommandFile.txt
CommandFile.txt contains a list of commands for FDFMerge to process. An example of a CommandFile.txt file:
-p -optimize -f /appligent/fdfmerge/samples/testfiles/testfile1.txt-o /appligent/fdfmerge/samples/testfiles/outfile1.pdf/appligent/fdfmerge/samples/testfiles/testfile.pdf/appligent/fdfmerge/samples/testfiles/testfile.fdf
-p -x -o /appligent/fdfmerge/samples/testfiles/outfile2.pdf/appligent/fdfmerge/samples/testfiles/testfile.pdf/appligent/fdfmerge/samples/testfiles/testfile.xfdf
-p -w -x -f /appligent/fdfmerge/samples/healthform/healthform3.txt-o /appligent/fdfmerge/samples/healthform/outfiles3.pdf/appligent/fdfmerge/samples/healthform/healthform.pdf /appligent/fdfmerge/samples/healthform/healthform.xfdf
Running FDFMerge
Running FDFMerge Lite and FDFMerge
You’re ready to start merging FDF data files and PDF forms. Before you begin, remember these important points about FDFMerge Lite and FDFMerge:
For FDFMerge Lite or FDFMerge to run successfully, the PDF form file name must precede the FDF data file name on the command line unless you are running with the -reverse option.
- The order in which options are listed on the command line is not important. However, any file names associated with an option must immediately follow that option.
- The proper directory paths must be given for the fdfmergelite or fdfmerge executable and all of the files that you use.
- To prevent overwriting your original PDF file, save your output to a new file using the -o <outfile.pdf> option.
Example Command-Line Syntax
Listed below is an example of a simple command line for calling FDFMerge Lite or FDFMerge:
$ fdfmergeliteapp [options] -o out.pdf input.pdf input.fdf
$ fdfmergeapp [options] -o out.pdf input.pdf input.fdf
Note: Do not call the fdfmergelite or fdfmerge script from another script or application. Call fdfmergeliteapp or fdfmergeapp directly, as shown in the first example above.
Examples of Merging FDF Files and PDF Forms
For your first merge of FDF data files and PDF forms, try using the samples included with the installation of FDFMerge Lite or FDFMerge in the /samples/testfiles directory.
Basic merging data and forms on UNIX
- Make sure you’re in the directory you want to be in; the examples below assume you are in the directory where FDFMerge Lite or FDFMerge is installed.
- Using the sample files try:
$ ./fdfmergelite -p -o ./samples/testfiles/out_testfile.pdf ./samples/testfiles/testfile.pdf ./samples/testfiles/testfile.fdf
$ ./fdfmerge -p -o ./samples/testfiles/out_testfile.pdf ./samples/testfiles/testfile.pdf ./samples/testfiles/testfile.fdf
In this example the -p flag shows progress, and the -o flag specifies an output file to prevent overwriting the input PDF file.
- When you press Return the following progress messages appear on your screen:
Processing : ./samples/testfiles/testfile.pdf
Open : ./samples/testfiles/testfile.fdf
Close : ./samples/testfiles/testfile.fdf
Done : ./samples/testfiles/out_testfile.pdf
fdfmerge completed successfully.
Note: If you run FDFMerge Lite or FDFMerge without -p and no errors occur, nothing is written to the screen.
- Open out_testfile.pdf to see the completed form.
Basic merging data and forms on Windows
If you are not familiar with using the command line, refer to FDFMerge – Command Line Introduction or FDFMerge Lite – Command Line Introduction.
- Click the Start button.
- Go to Programs > Accessories and select Command Prompt.
- Make sure you’re in the directory you want to be in; the examples below assume you are in the directory where FDFMerge Lite or FDFMerge is installed.
- Using the sample files try:
>.\fdfmergelite -p -o .\samples\testfiles\out_testfile.pdf .\samples\testfiles\testfile.pdf .\samples\testfiles\testfile.fdf
>.\fdfmerge -p -o .\samples\testfiles\out_testfile.pdf .\samples\testfiles\testfile.pdf .\samples\testfilestest\file.fdf
In this example the -p flag shows progress, and the -o flag specifies an output file to prevent overwriting the input PDF file.
- When you press enter the following progress messages appear on your screen:
Processing : .\samples\testfiles\testfile.pdf
Open : .\samples\testfiles\testfile.fdf
Close : .\samples\testfiles\testfile.fdf
Done : .\samples\testfiles\out_testfile.pdf
fdfmerge completed successfully.
Note: If you run FDFMerge Lite or FDFMerge without -p and no errors occur, nothing is written to the screen.
- Open out_testfile.pdf to see the completed form.
Additional Merging Examples for UNIX and Windows
In the previous sections the resulting out_testfile.pdf file was a filled-in form with active form fields. Here we give a few more examples, using command-line options and FormInfo files for form flattening (or stamping).
The examples are shown in the UNIX format, which is only slightly different from the DOS format on Windows in that directories are separated by a forward-slash ( / ) in UNIX, rather than the backslash ( ) in Windows/DOS.
Merging data and forms with the sample FormInfo file — FDFMerge only
$ ./fdfmerge -p -o ./samples/testfiles/out_testfile.pdf -f ./samples/testfiles/testfile1.txt ./samples/testfiles/testfile.pdf ./samples/testfiles/testfile.fdf
The out_testfile.pdf file is a new form with text attributes as specified in testfile1.txt. Some form fields remain active while the fields specified in testfile1.txt are flattened.
Merging data and forms with form flattening
$ ./fdfmergelite -p -s -o ./samples/testfiles/out_testfile.pdf ./samples/testfiles/testfile.pdf ./samples/testfiles/testfile.fdf
$ ./fdfmerge -p -s -o ./samples/testfiles/out_testfile.pdf ./samples/testfiles/testfile.pdf ./samples/testfiles/testfile.fdf
The out_testfile.pdf file is a new PDF document with no active form fields; the text is stamped into the document as it appears in testfile.pdf.
Merging data and forms with FormInfo and form flattening — FDFMerge only
$ ./fdfmerge -p -o ./samples/testfiles/out_testfile.pdf -s -f ./samples/testfiles/testfile1.txt ./samples/testfiles/testfile.pdf ./samples/testfiles/testfile.fdf
The out_testfile.pdf file is a new PDF document with no active form fields; the text is stamped into the document as specified in testfile1.txt.
Merging data and forms using several options
$ ./fdfmergelite -p -l logfile.txt -o ./samples/testfiles/out_testfile.pdf -s ./samples/testfiles/testfile.pdf ./samples/testfiles/testfile.fdf
$ ./fdfmerge -p -l logfile.txt -o ./samples/testfiles/out_testfile.pdf -s -f ./samples/testfiles/testfile1.txt ./samples/testfiles/testfile.pdf ./samples/testfiles/testfile.fdf
All of the progress messages are written to logfile.txt. The out_testfile.pdf file is a new PDF document with no active form fields. The text is stamped into the document by FDFMerge Lite. FDFMerge stamps the data into the form fields and fields specified in testfile1.txt have their attributes changed to what is set in this file.
FDFMerge Command Line Option Reference
Introduction
This chapter describes the fdfmerge command syntax and summarizes the options you can use with the fdfmerge command. Command-line syntax in the tables below refer to a path to any input or output file. In the Windows environment directory paths use a back slash “\” character. In the UNIX environment directory paths use a forward slash “/” character. Examples in the tables below show a Windows type path.
The following is an example of paths to the default installation directory for FDFMerge:
Windows
> C:\Appligent\FDFMerge\
UNIX/Mac OS X
$ /Appligent/FDFMerge/
Command Syntax
$fdfmergeapp [options] -o outputFile.pdf inputFile.pdf inputFile.fdf
Product Information Options
The following table describes options you can use to obtain information about the FDFMerge product. For more detailed information about these options, see General Options.
| Option | Function | Description | Example |
|---|---|---|---|
| -v | Show version information | Displays the version of FDFMerge you are running. | fdfmerge -v |
| -h or -help |
Show help | Displays all available command-line options, plus version information. | fdfmerge -h fdfmerge -help |
Input and Output Options
The following table describes the options for managing file input and output. For more detailed information about these options, see General Options.
| Option | Function | Description | Example |
|---|---|---|---|
| -o <outFilename> | Output filename | Specifies an output file. The PDF file name, including the path, must immediately follow the -o option. Directories in paths must exist, the FDFMerge will not create a new directory. | fdfmerge [options] -o path\outputFile.pdf path\inputFile.pdf path\inputFile.fdf |
| -i | Save using incremental save | An incremental save appends changed information to the end of the file. This is faster than a full save, but may result in a larger file. | fdfmerge -i [options] -o path\outputFile.pdf path\inputFile.pdf path\inputFile.fdf |
| -w | Linearize the PDF file upon save | Save the output file as a linearized document. Linearization reorganizes the file to make it more efficient for web delivery. | fdfmerge -w [options] -o path\outputFile.pdf path\inputFile.pdf path\inputFile.fdf |
| -optimize | Optimize output file | This option will try to reduce the file size of the output PDF. | fdfmerge -optimize [options] -o path\outputFile.pdf path\inputFile.pdf path\inputFile.fdf |
| -iso32000 | Set file for ISO 32000 compliance | Creates an output PDF file that is version 1.7 | fdfmerge -iso32000 [options] -o path\outputFile.pdf path\inputFile.pdf path\inputFile.fdf |
Reporting Options
The following table describes the options for reporting progress and error messages. These options are helpful for debugging and understanding how FDFMerge works. For more detailed information about these options, see General Options.
| Option | Function | Description | Example |
|---|---|---|---|
| -p | Show progress | Write progress messages to the screen (STDOUT—the standard output of your system). This option is helpful for debugging and for understanding how the software works. | fdfmerge -p [options] -o path\outputFile.pdf path\inputFile.pdf path\inputFile.pdf |
| -l <logfile> | Write progress and error messages to the given log file name | Saves the progress and error messages to a user-specified text file instead of the default log file, fdfmerge.log. | fdfmerge -l path\mylogfile.txt [options] -o path\outputFile.pdf path\inputFile.pdf path\inputFile.fdf |
| -p and -l combined | Write progress and error messages to the given log file name | If the -p and -l options are both specified, progress and error messages will be written to the file that you specify. | fdfmerge -p -l path\mylogfile.txt [options] -o path\outputFile.pdf path\inputFile.pdf path\inputFile.fdf |
Registration Number
The following table describes how to supply the registration number to FDFMerge. For more detailed information about this, see General Options.
Note: Do not call the fdfmerge script from another script or application. Call fdfmergeapp directly with the registration number option flag, as shown in the examples below.
| Option | Function | Description | Example |
|---|---|---|---|
| -r <RegNum> | FDFMerge registration number | Use this option to supply your registration number when you call FDFMerge from a script or another application. | fdfmergeapp -r XXXX-XXXX-XXXX-XXXX-XXXX-XXXX [options] -o path\outputFile.pdf path\inputFile.pdf path\inputFile.fdf |
Merging Options
The following table describes the merging options available for FDFMerge, for more detailed information see FDFMerge Options.
| Option | Function | Description | Example |
|---|---|---|---|
| -x | Input is an XFDF file | Specifies that the input data file is an XFDF file, which is an XML version of an FDF file. Required if using an XFDF input file instead of an FDF file. | fdfmerge -x [options] -o path\outputFile.pdf path\inputFile.pdf path\inputFile.xfdf |
| -s | Replace fields with stamps | Flattens a form, changing active form fields into static text or images. | fdfmerge -s [options] -o path\outputFile.pdf path\inputFile.pdf path\inputFile.fdf |
| -stampnewvalues | Stamp fields with new values | Partially flatten form fields passed in using FDF and XFDF files. When this option is present on the command line, all unfilled fields will remain active | fdfmerge -stampnewvalues -o path\outputFile.pdf path\inputFile.pdf path\inputFile.fdf |
| -reverse | Make FDF file come first followed by multiple PDF files | Processes multiple PDF forms with a single FDF file. An output directory must be used with -reverse.
The FDF file should appear before the PDF files on the command line. |
fdfmerge -s [options] -o path\outdirectoryname -reverse path\inputFile.fdf path\inputFile1.pdf path\inputFile2.pdf… |
| -norebuild | Don’t rebuild appearances | Specifies that Acrobat, rather than FDFMerge builds the form appearances for an output PDF form. | fdfmerge -norebuild [options] -o path\outputFile.pdf path\inputFile.pdf path\inputFile.fdf |
| -f <FormInfo.txt> | Field information file for field customization | Specifies that a FormInfo file be used for flattening, customizing form fields, or stamping them with JPEG, TIF, or PDF images. | fdfmerge -f path\FormInfo.txt [options] -o path\outputFile.pdf path\inputFile.pdf path\inputFile.pdf |
| -cmds <CmdFile.txt> | Allow user to run multiple commands and process multiple files at one time | Process a collection of files. Allows user to process multiple command and files at one time.
Note: Compatible with -l, -p, -r, -h or -help, and -n. |
fdfmerge -p -l path\logfile.txt -cmds path\CommandFile.txt |
Applying Standard Security with FDFMerge
Acrobat Standard Security
Acrobat standard security allows you to control who can access your document and, by setting permissions, how much they can edit or print. Acrobat offers three levels of security:
- Low-level encryption (40-bit key length) — Compatible with Acrobat versions 3 and later.
- High-level encryption (128-bit key length) — Compatible with Acrobat versions 5 and later.
- AES encryption (128-bit key length) — Available only with Acrobat 8 and later.
- AES encryption (256-bit key length — available for SecurSign & APCrypt only) — Available only with Acrobat X, XI and DC.
High level encryption provides a higher level of security and finer control over security features. The minimum level of security that you can set is to allow any changes except extracting pages.
Once you set encryption on a document, it cannot be processed in other ways unless the password is available to the processing software. You can also change or remove encryption in Acrobat.
Owner and user passwords
All levels of security allow you to set passwords for the document:
- User password: controls who may view a document.
- Owner password (required): controls who may make changes to permissions and passwords securing a document.
You must set an Owner password to apply encryption. Do not use the same password for both User and Owner. If the same password is used for both, only the User password will be set.
Different versions of Acrobat use different terminology to refer to the same concepts. You’ll see more of this in High-level encryption password nomenclature as described in the following table for various versions of Adobe Acrobat:
| Type | Acrobat X, XI & DC |
|---|---|
| User | Document Open |
| Owner | Change Permissions |
Encryption Permissions
Acrobat allows you to set various permissions to limit access to the information in the document. Adobe changes the use of permissions when they moved from 40-bit key lengths to 128-bit key lengths. The sections below detail the different options and permissions based on using 40-bit or 128/256 bit key lengths.
The following is an example of the security options in Acrobat X, XI & DC:
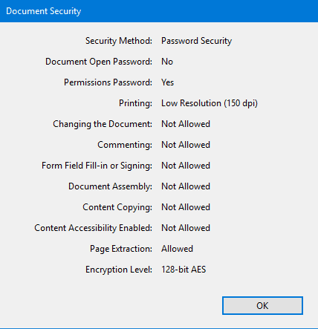
Refer to Verifying Security Features for instructions on displaying the security options.
Encryption options
The table below describes low-level encryption options.
High level encryption provides additional security options as are defined in the table below.
| Type | Option | Parameter | Description |
|---|---|---|---|
| Encryption | -encrypt | Encrypt using the RC4 stream cypher (same as -rc4) | |
| -aes | Encrypt using the Advanced Encryption Standard (AES) algorithm (SecurSign & APCrypt) | ||
| -rc4 | Encrypt using the RC4 stream cypher | ||
| -keylength | 128 | Key length. Valid options are 40, 128 or 256. Default is 128. (256 bit – SecurSign & APCrypt Only) | |
| -ownerpass | oPassword | New owner password (required) | |
| -userpass | uPassword | New user password | |
| -onlyattach | Encrypt document attachments only using AES; to use the PDFas a secure envelope for the attachments (requires -userpass) (SecurSign Only) | ||
| -remove | Remove all encryption from the PDF document. (Requires -ownerpass) | ||
| -d | Password | Old owner password – (Except AppendPDF & AppendPDF Pro) | |
| Permissions | -noaccess | Do not allow accessibility (128 & 256) – (256 bit – SecurSign & APCrypt Only) | |
| -nocopy | Do not allow copying text or graphics | ||
| -noprint | Do not allow printing | ||
| -nohighres | Do not allow high resolution printing (128 & 256) – (256 bit – SecurSign & APCrypt Only) | ||
| -nomodify | Do not allow modifying the document | ||
| -nonotes | Do not allow adding or changing notes or form fields | ||
| -nofill | Do not allow filling in form fields or signing (128 & 256) – (256 bit – SecurSign & APCrypt Only) | ||
| -noassembly | Do not allow document assembly (128 & 256) – (256 bit – SecurSign & APCrypt Only) |
The first four permissions can be used in any combination, except you can’t use -noprint and -nohighres together. Choose one or the other. The last four must be used in specific combinations that Acrobat accepts.
-encrypt — Encrypt output file (optional)
Specifies applying encryption to the output file using the RC4 stream cypher. This option is the same as -rc4.
-aes — Encrypt using the AES cryptography algorithm (optional) (SecurSign & APCrypt Only)
Encrypt the output file using the Advanced Encryption Standard (AES) cryptography algorithm.
-rc4 — Encrypt using the RC4 cryptography algorithm (optional)
Specifies applying encryption to the output file.
-keylength <int> — Encryption level (optional)
Specifies the encryption key length used to encrypt the document: either 40-bit, 128-bit or 256-bit. (256- bit SecurSign & APCrypt Only)
If you do not specify key length, the default is 128-bit.
-ownerpass <password> — New owner password (required)
Specifies a new Owner password to apply encryption. An Owner password restricts you from altering the security settings. You are not prompted for a password to open the document, only if you try to change the security settings. Passwords are case sensitive and are required when applying encryption.
Choose passwords carefully. They should not be able to be guessed easily but at the same time should not be too difficult for you to remember. If you forget a password, there is no way to recover it from the document. Therefore, it is a good idea to note passwords in another secure location.
-userpass <password> — Set user password (optional)
Specifies a User password for the document. Setting a User password prevents a document from being opened unless the correct password is supplied. Passwords are case sensitive.
Below is the Document Open Password dialog box.
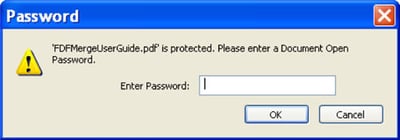
When someone tries to open the document in Acrobat they will be asked for the password.
User password is optional. If you do not specify a User password, anyone can open the document.
-onlyattach — Secure Envelope(optional) (SecurSign Only)
Utilize PDFs as secure envelopes; apply 256-bit AES security to PDF and non-PDF file attachments while leaving the PDF itself unencrypted.
-remove — Remove all encryption from the PDF document
Removing encryption from the PDF document requires the document owner password using -ownerpass.
-d <string> — Old owner password to decrypt the file (Not available for AppendPDF & AppendPDF Pro)
If a PDF file already has encryption set and you wish to change the settings or remove encryption (APCrypt/SecurSign only), you need to supply the owner password in order to make changes to the file.
Document Permissions
-noprint — Do not allow printing (optional)
Specifies that the document cannot be printed. When the document is opened, the print icon on the toolbar and the Print option under the file menu will be grayed out.
At the 128-bit and 256-bit encryption level there is also an option to allow low resolution printing only. See the section High-level encryption for more detail.
-nomodify — Do not allow modifying the document (optional)
Specifies that the document cannot be modified. You will not be able to modify text or pages in the document when this option is used. You can fill in form fields, or add notes or other annotations.
With -nomodify, the following tools are grayed out and cannot be used when the document is opened in Acrobat:
- Crop tool
- Movie tool
- Link tool
- Article tool
- Form tool
- Digital Signature tool
Text can be selected for copying but cannot be cut, pasted or cleared.
-nocopy — Do not allow copying text or graphics (optional)
Specifies text and graphics cannot be copied.
With -nocopy, the following tools are grayed out and cannot be used when the document is opened in Acrobat:
- Text Select tool
- Touch-Up Text tool
- Table/Formatted Text Select tool
-nonotes — Do not allow adding or changing notes or form fields (optional)
Specifies that annotations cannot be added or changed in the document. Annotations include notes, highlighted text, form fields and pencil marks. Annotations can be in text, graphic or audio format, or even attached external files.
With -nonotes, the following tools are grayed out and cannot be used when the document is opened in Acrobat:
- Notes tool
- Pencil tool
- Highlight Text tool
- Form tool
- Digital Signature tool
- Free Text tool
- Sound Attachment tool
- Stamp tool
- File Attachment
- Square tool
- Circle tool
- Line tool
-noaccess — Do not allow accessibility (optional)
Specifies content accessibility is not allowed. Content accessibility provides the vision and motion-challenged community with the tools and resources to make digital information more accessible. To learn more about content accessibility consult the Acrobat Help guide within Acrobat.
-nohighres — Do not allow high resolution printing (optional)
Specifies low resolution printing only. Acrobat prints each page as a low resolution (150 dpi) bitmap. The document cannot be recreated from these printouts.
-nofill — Do not allow filling form fields or signing fields
Specifies that no changes can be made to form fields or digital signature fields. This setting effectively prevents a filled-in form from being changed.
-noassembly — Do not allow document assembly
Specifies that no new pages can be added or removed from the PDF document. Also prevents rotating pages in the document. Effectively prevents pages being removed from the PDF document to be used elsewhere.
Permissions Allowed with 40-bit Encyption
The table below shows how the software application security options correspond to Acrobat’s security restrictions. The “Changes Allowed” column below lists the features still available after the document is secured.
| Option | Restrictions Set (Not Allowed) |
Changes Allowed |
|---|---|---|
| -nocopy | Content Copying or Extraction Content Accessibility |
|
| -noprint | Printing | |
| -nomodify -nonotes |
Changing the Document Document Assembly Authoring Comments and Form Fields Form Field Fill-in or Signing |
None |
| -nomodify | Changing the Document Document Assembly |
Commenting, filling in form fields, and signing |
| -nonotes | Authoring Comments and Form Fields | Page layout, filling in form fields, and signing |
| none | Any except extracting pages |
Permissions Allowed with 128-bit or 256-bit Encryption
Acrobat accepts certain combinations of the “Changes Allowed” options. The Changes Allowed options are:
- -nomodify — Do Not Allow Modifying the Document
- -noassembly — Do Not Allow Document Assembly
- -nonotes — Do Not Allow Adding or Changing Notes or Form Fields
- -nofill — Do Not Allow Filling In or Signing of Form Fields
The table below shows security options vs. restrictions set with high level encryption. These combinations are discussed below.
| Option | Restrictions Set (Not Allowed) |
|---|---|
| -noaccess | Content Accessibility |
| -nocopy | Content Copying or Extraction |
| -noprint | Printing |
| -nohighres | Only Low Resolution Printing is allowed |
| -nomodify -nonotes -nofill -noassembly |
Changing the Document Authoring Comments and Form Fields Form Field Fill-in or Signing Document Assembly |
| -nomodify -nonotes -nofill |
Changing the Document Authoring Comments and Form Fields Form Field Fill-in or Signing |
| -nomodify -nonotes -noassembly |
Changing the Document Authoring Comments and Form Fields Document Assembly |
| -nomodify -noassembly |
Changing the Document Document Assembly |
| none |
Allow no changes with -nomodify -noassembly -nonotes -nofill
Turning off all changes means: do not allow document modification (-nomodify), do not allow document assembly (-noassembly), do not allow the adding or changing of notes or form fields (-nonotes) and do not allow the fill-in or signing of form fields (-nofill). These options must all be used together for this setting to be made.
Allow inserting, deleting, and rotating pages with -nomodify -nonotes -nofill
This setting only allows document assembly.
These options specify: do not allow document modification (-nomodify), do not allow the adding or changing of notes or form fields (-nonotes) and do not allow the fill-in or signing of form fields (-nofill).
Allow filling in form fields, and signing with -nomodify -noassembly -nonotes
This setting only allows form field fill-in or signing.
These options specify: do not allow document modification (-nomodify), do not allow document assembly (-noassembly), and do not allow the adding or changing of notes or form fields (-nonotes).
Allow commenting, filling in form fields, and signing with -nomodify -noassembly
This setting allows the adding or changing of notes or form fields and the fill-in or signing of form fields.
These options specify: do not allow document modification (-nomodify), and do not allow document assembly (-noassembly).
Allow any except extracting pages with no options
If you don’t use any Changes Allowed options, Acrobat will allow any changes except extracting pages.
Verifying Security Features
To view the current security settings:
| Acrobat X, XI and DC | Select File > Properties. Click the Security tab, then click the Show Details… button. |
|---|
In the example shown below, both a User password and an Owner password are set, only low resolution printing is allowed, changing the document, content copying and extraction, authoring comments and form fields, and form field fill-in or signing are not allowed, content accessibility and document assembly are allowed and encryption is 128-bit.
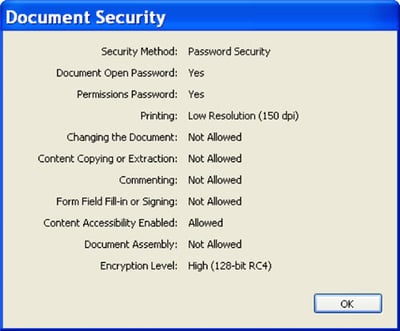
Applying Standard Security with FDFMerge
- 1 Merging PDF Forms with Encryption Examples
- 1.1 Merging data and forms with form flattening and 128-bit encryption
- 1.2 Merging data and forms and 40-bit encryption
Merging PDF Forms with Encryption Examples
Here are some examples of using FDFMerge with encryption options.
Merging data and forms with form flattening and 128-bit encryption
$ ./fdfmerge -p -s -o ./Samples/Testfiles/out_testfile.pdf -encrypt -ownerpass Pa55w0rd -userpass paSsWoRd -nomodify -noassembly -nonotes -nofill -nohighres -nocopy ./Samples/Testfiles/testfile.pdf ./Samples/Testfiles/testfile.fdf
The out_testfile.pdf will be a new PDF document, without active form fields, with text stamped into the document as it appears in testfile.pdf. The out_testfile.pdf will be encrypted with 128-bit encryption, with owner and user passwords. It will not allow changes, high resolution printing, or copying of text or images in the document.
Merging data and forms and 40-bit encryption
$ ./fdfmerge -p -o out_testfile.pdf -encrypt -keylength 40 -ownerpass PaSsWoRd -noprint -nomodify -nocopy ./Samples/Testfiles/testfile.pdf ./Samples/Testfiles/testfile.fdf
The out_testfile.pdf will be a new PDF document, with active form fields. It is secured with 40-bit encryption and an owner password. It will not allow printing, modifying and copying of text or images, but the form can be filled out.
Automating FDFMerge
FDFMerge Lite or FDFMerge and CGI Scripts Together
If you are using FDFMerge Lite or FDFMerge to process information taken from a web server, you will find that you will rarely run FDFMerge Lite or FDFMerge from the command line. In order to incorporate FDFMerge Lite or FDFMerge into the operation of your web server you can use CGI scripts to provide a world wide web interface. CGI stands for Common Gateway Interface, and allows a web server and browser to interact. When a user clicks a web link, the CGI script associated with the link runs.
To create CGI scripts you can use any programming language that can call a command-line driven application. Some of the more popular languages include Visual Basic, Perl, ASP, Java, and C.
Sample Scripts
We make sample ASP, Perl, Java, PHP, and Visual Basic scripts available for you to review at our web site. The scripts are written for FDFMerge and can be found on our Sample Scripts webpage.
How the sample script might work
The following steps briefly summarize how a sample script works:
- A customer fills out an HTML form and submits it. A PDF form version of the HTML form exists on the server. As an alternative, you could use a PDF form that submits the export format of HTML form (URL encoded).
- The CGI script parses the form data and creates the FDF file with the field names and values the customer submitted.
- The CGI script calls FDFMerge Lite or FDFMerge.
- FDFMerge Lite or FDFMerge runs with the -o flag and makes a unique output file when it merges the form data and the PDF form document.
- The CGI script renames the merged file by appending the system time to the name to make it unique. For more information about this step, see below.
- The CGI script opens up the new merged PDF document.
Generating a unique filename for the completed form
Because the output filename is the same each time the CGI script runs, the script needs to rename the file so it won’t be overwritten. The current sample script appends the system time to the completed form name.
As an alternative to appending the time to your form name, you can have your CGI generate incrementing numbers instead. Each time the script runs, the number can be incremented by 1 and appended to the filename.
Using FDFMerge Lite or FDFMerge as a Database Solution
You can use FDFMerge Lite or FDFMerge to allow customers to retrieve and update information in a database. For example, a customer of a bank might want to visit her bank’s website to change her mailing address and access balances for several accounts.
- The customer fills out and submits a form that requests specific information. The request will require authorization in the form of an account number and password.
- A CGI script finds and extracts the requested information from the bank’s database and saves it to an FDF file.
- The CGI script runs FDFMerge Lite or FDFMerge to merge the data with a PDF form and returns the completed form to the customer’s browser.
- The customer views the completed form, makes the desired changes, and submits the updated information.
- The script can then update the database with the new information the customer has submitted.
FDFMerge Command Line Introduction
Introduction
FDFMerge is a command-line application. If you are used to the Microsoft Windows operating system, you may not be familiar with running command-line tools. This section shows you all you need to get started.
- Windows tells you how to use FDFMerge on Windows.
Note: You can refer to the Getting Started With Command Line Applications for additional information on using command-line applications.
Windows
To run FDFMerge in Windows, you need to open a Command Prompt window.
In Windows:
- Click Start > Programs > Accessories > Command Prompt
The Command Prompt window opens.
Some basic commands
At the command prompt, you type each command, and press the Enter key to execute it. You can use the mouse to select text to copy or cut to the clipboard, but you cannot position the cursor with it. The command line is completely keyboard driven. Navigation keys are shown below:
| KEY | ACTION |
|---|---|
| Backspace | Delete previous character |
| Right arrow | Move right one character |
| Left arrow | Move left one character |
| Up arrow | Recall previous command |
| Tab | File or directory name auto complete |
| Enter | Execute command |
In addition to running programs, you have many commands to navigate and maintain the system. Two important ones are cd and dir.
Changing directories
Use the cd command to change directories. For example, to change to the directory that FDFMerge is located in, type:
C:\>cd \Appligent\FDFMerge\
The command prompt changes to:
C:\Appligent\FDFMerge>
to show you where you are.
To move back one level, use the shortcut of two periods (..)
C:\Appligent\FDFMerge>cd..
Don’t forget to press the Enter key after every command. You will now be in this directory:
C:\Appligent>
Move back to FDFMerge:
C:\Appligent>cd FDFMerge
Listing the contents of a directory
Use the dir command to list the contents of a directory:
C:\Appligent\FDFMerge>dir
The computer responds with a listing of all the contents of the FDFMerge directory.
If the directory contents fly by too fast to read, do this:
C:\Appligent\FDFMerge>dir /p
The /p switch tells DOS to display one page at a time. Press the Enter key to see the next page.
To see the contents of all the subdirectories at the same time, type:
C:\Appligent\FDFMerge>dir /s
This displays the contents of FDFMerge and all the subdirectories under it.
Running FDFMerge
To run FDFMerge, type the commands on the command line as shown in other sections of this manual and press Enter. In the next example, we’ve truncated the command prompt path for clarity.
> .\fdfmerge -o \path\samples\healthform\output.pdf \path\samples\healthform\healthform.pdf \path\samples\healthform\healthform.fdf
The healthform.fdf file will be merged into healthform.pdf to create a filled-in form. If you do not specify the correct path, you will get a “file not found” error. Now, refer to the rest of this User Guide for details about using FDFMerge.
Sample Perl CGI Scripts
This sample script is based on an FDFMerge sample script on the Appligent website. The algorithm of the script is discussed in FDFMerge – Automating or FDFMerge Lite – Automating.
#PERL cgi source for FDFMerge Mutual Fund Demonstration

####################################################################################
##Configuration section-replace paths with your own data if not using default.##
####################################################################################
## Webmasters E-mail address, replace with your own. Make sure
## a \ is included before the @ and .
# Address appears on server error page if error occurs.
$webmaster = "webmaster\@appligent\.com";
$Platform = "WIN"; # WIN or Unix

# set up general paths and program locations
## Path to fdfmerge without extension
$FDFMergeRoot  = "C:/Appligent/FDFMerge/fdfmerge";

## Main Directory where files are located
$MainDir = "C:/Appligent/Demos/WebSiteExamples/FDFMerge_PerlDemo";

## Path/filename for FDFMerge to create output file.
## ("output file" is the new copy of PDF returned by FDFMerge
## with the merged/stamped data)
## If you do not want to include the time in the output file name,
## remove the $tm.
## Prints as filename120101.pdf. (if time was 12:01:01)
$outputDirName = "output"; # name of folder to contain all output files
$outputDir = "$MainDir/$outputDirName"; #Full path to output files
$outfileName = "out_SimpleDemo.pdf"; # name for output pdf file
$outfile = "$outputDir/$outfileName"; # Path & name for output PDF file

$pdffile = "$MainDir/input/SimpleDemo.pdf"; #Path & name for input PDF form
$fdffile = "$outputDir/SimpleDemo.fdf"; #Path & name for fdf or xfdf file
$logfile = "$outputDir/logfile.txt"; #Path & name for log file for FDFMerge

# Remove Comment marks to print to Debug text file
#open(DEBUG,  ">" . "$outputDir/debug.txt")  || die "problem: $!";
#print DEBUG "Starting Log\n";

############################## End Configuration Section ########################
#################################################################################

### Start main section of script ###

# set up executable and reg number
$FDFMerge = $FDFMergeRoot . "app";

# Read the Data submitted from the server:
&parse_form_data (*simple_form);

# Read submitted data into variables and set merge option
$merge = ReadFormData();

# Write FDF file to disk.
&WriteFDF($fdffile);


# Run FDFMerge
$execute = "$FDFMerge -r $FDFMergeRegNum $merge -p -l $logfile
  -o $outfile $pdffile $fdffile";
`$execute`;
#print DEBUG "$execute\n";

#start of html page with link to newly created file
$wpth = "$outputDirName/$outfileName ";
print "Location: $wpth\n\n";
print "Content-type: application/pdf\n";
print "<html>","\n";
print "<head>","\n";
print "<title>FDFMerge Demo PDF File</title>","\n";
print "</head>\n";
print "</html>";

##############################################################################

## If you need help setting up this demo or if you have any questions about
## FDFMerge, please contact our Technical support dept. by e-mail,
## support@appligent.com
## or by phone, 610-284-4006

## Copyright©2002 Appligent, Inc. All rights reserved.
## Sample Code supplied as example, use at your own risk.
## We have tried to make this example easy to read and use.
## However, Appligent makes no guarantees of any kind that this
## code will work on your system.

############################## Subroutines ##################################
#############################################################################
# Parse the submitted HTML form data or the PDF Form data submitted as HTML.
## Parse form
sub parse_form_data
{
    local (*FORM_DATA) = @_;
    local ( $request_method, $query_string, @key_value_pairs,
           $key_value, $key, $value);

    $request_method = $ENV{'REQUEST_METHOD'};
    if ($request_method eq "GET") {
        $query_string = $ENV{'QUERY_STRING'};
    } elsif ($request_method eq "POST") {
        read (STDIN, $query_string, $ENV{'CONTENT_LENGTH'});
    } else {
        &return_error (500, "Server Error",
                       "Server uses unsupported method");
    }

    @key_value_pairs = split (/&/, $query_string);

    foreach $key_value (@key_value_pairs) {
        ($key, $value) = split (/=/, $key_value);
        $value =~ tr/+/ /;
        $value =~ s/%([\dA-Fa-f][\dA-Fa-f])/pack ("C", hex ($1))/eg;

        if (defined($FORM_DATA{$key})) {
            $FORM_DATA{$key} = join ("", $FORM_DATA{$key}, $value);
        } else {
            $FORM_DATA{$key} = $value;
        }
    }
}

############################################################################
## Get data from parsed form to variables

sub ReadFormData{

$name = $simple_form{'name'};
$co = $simple_form{'company'};
$city = $simple_form{'city'};
$state = $simple_form{'state'};
$country = $simple_form{'country'};
$email = $simple_form{'email'};
$merge_option = $simple_form{'merge_option'};

if ($merge_option eq "merge") {
 $merge = "";
 } else {
 $merge = "-s";
 }

$ReadFormData = $merge;
}


############################################################################
## Create FDF File
sub WriteFDF {

$fdffile = $_[0];
open FILE, join ("",">",$fdffile);

#if above line fails with your version of perl try the line below.
#open (FILE, ">" . $fdffile);

print FILE<<EOT;
%FDF-1.2

1 0 obj
<<
/FDF
<< /Fields [
<< /V ($city)/T (city)>>
<< /V ($co)/T (company)>>
<< /V ($country)/T (country)>>
<< /V ($email)/T (email)>>
<< /V /$merge_option /T (merge_option)>>
<< /V ($name)/T (name)>>
<< /V ($state)/T (state)>>
]
>>
>>
endobj
trailer
<<
/Root 1 0 R
>>
%%EOF
EOT

close FILE;
}

############################################################################
## Return Error
sub return_error
{
    local ($status, $keyword, $message) = @_;

    print "Content-type: text/html\n\n";
    print "Status: ", $status, " ", $keyword, "\n\n";

    print <<End_of_Error;

<title>CGI Program - Unexpected Error</title>
<h1>$keyword</h1>
<hr>$message</hr>
Please contact $webmaster for more information.

End_of_Error

    exit(1);
}
FDFMerge Example ASP and Java
Apart from Perl, whose sample script appears in the previous appendix, ASP and Java are two more popular technologies used today. Here are some sample code fragments and notes to help you get started using FDFMerge Lite or FDFMerge within either ASP or Java. These samples are provided “as is” and Appligent does not provide scripting support other than the provision of these examples.
If you have trouble running FDFMerge Lite or FDFMerge within a script, try to run the software directly from the command line. This will tell you whether the problem is with the script or with FDFMerge Lite or FDFMerge.
Note: The scripts on this page demonstrate running FDFMerge but can be modified to call FDFMerge Lite or any of our other applications.
FDFMerge with ASP
This first example uses Windows Scripting Host to call FDFMerge. Windows Scripting Host comes with most current versions of Windows. This example states where FDFMerge is located, sets up the command to be used, and sets up a shell for running FDFMerge.
'Built the Executable statement
sFdfMergeAppl = sFdfMerge & " -r " & sFdfMergeRegNum
sFdfMergeParms = " -s -p -l " & sLogFile & " -o " & sOutPDFFile
sFdfMergeParms = sFdfMergeParms & " " &InPdfFile & " " & sInFdfFile
sFdfMergeCmd = sFdfMergeAppl & " " & sFdfMergeParms

'Create the Shell object to run the FDFMerge command line.
Set wShell = Server.CreateObject("WScript.Shell")

'Execute the FDFMerge command line and get the return code.
iReturn = wShell.Run( sFdfMergeCmd, 10, True )
Set wShell = Nothing
FDFMerge in a Java Servlet
The following is a sample Java servlet that runs FDFMerge. This example has been adapted from a Sun example. Users may wish to visit Sun’s Java website for more information. Keep the following tips in mind when using this example:
- Use the full path for the fdfmerge executable and for each of the argument files (out.pdf, in.pdf, and in.fdf).
- Give the target directory full permissions to be certain that the Servlet can execute and write without restriction.
- Since FDFMerge outputs to STDOUT when the -p option is included, the Servlet can report the results in addition to creating the target PDF file.
- By capturing this output in a string variable, “Initializing…done.” can be included in the generated HTML.
- In the Windows environment directory paths are separated using the backslash (\) character. Since the backslash (\) is also an escape character you must use double backslashes (\\) for directory paths on Windows.
The sample Java servlet is shown below.
// Example Servlet -- Sample execution of Appligent FDFMerge

import java.io.*;

import javax.servlet.*;
import javax.servlet.http.*;


/**
* This is a simple, Sun-provided, example of an HTTP Servlet.
* The example has been modified to demo Appligent Merge execution!
* It responds to the GET and HEAD methods of the HTTP protocol.
*/

public class FDFMerge_Servlet_27 extends HttpServlet
{
/**
* Handle the GET and HEAD methods by building a simple web page.
* Include the execution and output of Appligent FDFMerge
* HEAD is just like GET, except that the server returns only the
* headers (including content length) not the body we write.
*/
public void doGet (HttpServletRequest request,
HttpServletResponse response)
  throws ServletException, IOException
  {
   PrintWriter out;
   String title = "Example Apache JServ Servlet --
    Executing Appligent FDFMerge!";

   // set content type and other response header fields first
   response.setContentType("text/html");

   // then write the data of the response
   out = response.getWriter();


  // define the FDFMerge command-line components
  String fdfmerge_cmd = "/usr/apache/servlets/fdfmerge -p -s -o ";
  String fdf_file = " /usr/apache/servlets/gen_srvlt_frm1.fdf ";
  String pdf_infile = " /usr/apache/servlets/GenDBform01.pdf ";
  String pdf_outfile = " /usr/apache/servlets/test_srvlt_27_1200.pdf ";
  String fdf_result = "FDF Result:= ";
  String fdf_error = "FDF ERROR MESSAGE:= ";

  if (fdfmerge_cmd !=null && fdf_file !=null
   && pdf_infile !=null && pdf_outfile !=null) {

   Runtime rt = Runtime.getRuntime();

    String exec_strg = fdfmerge_cmd +
     pdf_outfile +
     pdf_infile +
     fdf_file;

  // DEBUG: use a standard OS cmd like 'cat' or 'type' to test the Servlet
  // String exec_strg = "cat /usr/apache/servlets/TEST_STDOUT_1.txt";

   try
{

   Process p = rt.exec(exec_strg);   // Start the cmd

   InputStream os = p.getInputStream();   // Read bytes from cmd

   InputStreamReader osr = new InputStreamReader(os);
   // Convert to chars

   BufferedReader br = new BufferedReader(osr);  // Read Lines of chars

     String s = br.readLine();

    fdf_result = "std_out> " + s;

   br.close();

   }
    catch(IOException e)
   {
   // System.err.println("Caught ioexception in
     // testdatamerg.runFDFtest: " + e);
   fdf_error = "std_err> " + "Caught ioexception in
    testdatamerg.runFDFtest!!!" + e;
   // System.out.println(e.toString());
   }


  } else {

   fdf_result = "Error: Null FDFMerge cmd or arguments!";

  }


    out.println("<HTML><HEAD><TITLE>");
       out.println(title);
    out.println("</TITLE></HEAD><BODY bgcolor="#FFFFFF">");
    out.println("<H1>" + title + "</H1>");
    out.println("<H2> ApacheJServ 1.1.2 - Sample Appligent
     FDFMerge Servlet!<br>");

   out.println("FDF_RESULT> " + fdf_result);
   out.println("<br>");
   out.println("FDF_ERROR> " + fdf_error);
   out.println("<br>");
    out.println("</BODY></HTML>");
    out.close();
   }
}
Troubleshooting
In this chapter…
…we present a collection of hints and tips for working with FDFMerge Lite and FDFMerge. If you are having trouble with the software, consult this list of issues for a possible solution. Information that is specific to FDFMerge is in green text followed by a notation: (FDFMerge only).
Common Error Checklist
Before proceeding, if you are having problems with your PDF files, check that they are well formed, and not corrupt. Refer to Cleaning Up PDF Documents.
- When using FDFMerge Lite or FDFMerge in a script, be sure to use full path names for all files and applications accessed from within the script. If you cannot get your script to work, make sure that you can run FDFMerge Lite or FDFMerge from a command line.
- If you find your files are not working as you had expected, you may wish to try re-saving them in Acrobat as Optimized.
- Check to see that the PDF file is listed before the FDF file on the command line. However, if you are running with -reverse, then the FDF should be listed before the PDF file.
- Review the command-line options to be sure they are entered properly. Make sure options -f <FormInfo file>, -cmds <CommandFile.txt>, -l <logfile> and -o <output file> have file names specified after them. Missing file names will cause unintended results.
- Make sure all file and path names are correct. If you are working in one directory and FDFMerge Lite or FDFMerge resides in another, you must account for that in the command-line call. We recommend that you always use full paths to all files including FDF, input, output and log files.
- Even if you are running FDFMerge Lite or FDFMerge in its own directory, enter the command with the dot-slash in front (./fdfmergelite or ./fdfmerge), to tell your system that the application is in the current directory. This is more important for UNIX than for Windows.
- We recommend that you always use the -o <output file> option so that you do not overwrite your original file in case you may need it later.
- If you get an error from FDFMerge Lite or FDFMerge that the file was unable to write, check to make sure that the file isn’t open in Adobe Acrobat or any other application. Also be sure the file is not set as read-only or encrypted.
If you are using a FormInfo file with FDFMerge, double check the following (FDFMerge only):
- Are all the Form Field names correct, including capitalization and spelling?
- Are the parameter names correctly spelled, such as ColorRed, not Color Red, etc.?
- Are the paths correct for font files?
- Are the .pfm and .pfb files for the fonts in the same directory?
- If you are using colors for fonts, borders, backgrounds, etc., have you specified values for all three colors: Red, Green, and Blue? or all four colors: Cyan, Magenta, Yellow, and Black?
Support
You can contact support directly by sending an e-mail to support@appligent.com. Support e-mails are answered within one business day during the normal business hours listed below.
Telephone & Fax
- Telephone: +1 610 284 4006
- Fax: +1 610 284 4233
To better serve you, please call us during our normal business hours, Monday - Friday, 8:00 am - 5:00 pm U.S. EST/EDT.
A member of our friendly, knowledgeable support staff will reply as soon as possible, generally within one business day.
International Support
Customers from locations outside the United States, including Germany, United Kingdom, Canada and Australia can contact us directly or connect with one of our many resellers.
When contacting support please provide the following information:
- Name of the Product
- Product Version Number
- Operating System
- Your Name
- Company Name
- Your Email Address
- Your Phone Number
- Product Registration Number
- Any files to help us reproduce your problem (if needed)
FDFMerge Readme
New Features
Please see the FDFMerge Options for the full documentation of the new features.
FDFMerge 7.3
-Comb fields on rotated pages are now supported
FDFMerge 7.2
-Support for comb fields
NOTE: This feature is not currently supported on rotated pages
–stampnewvalues – partially flatten form fields passed in using FDF and XFDF files. When this feature is present on the command line, all unfilled fields will remain active.
FDFMerge 7.0
-mergeflags – Merge F and Ff flags along with the field Values in the FDF. For example, having the following in an FDF file will set the form field to ReadOnly when merging (will not work when stamping form fields, –s on command line)
/T(name) /V(John Smith) /Ff 1
-listfonts – Display a list of the fonts available to FDFMerge
-nowarning – Do not issue warnings about unused fields that are in the FDF/XFDF files but not present in the PDF form.
AutoSize fields are now supported
Font Support (Additional fonts now supported)
OpenType, TrueType, Type1 and Unicode fonts are now all supported in FDFMerge. In previous versions, FDFMerge used the FontFile parameter in the Form Info file when specifying a Type 1 font. In FDFMerge 7.0, you should only specify the FontName parameter in the Form Info file when using an OpenType, TrueType, Type 1, Unicode font.
Some of the classic Base14 fonts are no longer included with the application resources. In particular Times and Helvetica. Both of these fonts are automatically substituted; but, may not appear identical to the classic fonts. If the new font appearance are not accept-able; simply use the versions of Times and Helvetica available on your system. This can be done by setting the Font Directories; please see below. You can run the command
$ fdfmerge –listfonts
to see a list of all font names available for stamping. The font name should be entered into the Form Info file exactly as it is shown in the font list.
Font Directories
There are two font directories.
The default font directory is found under the AppligentHome directory in APDFLX.X.X/Resource/Font. On Windows, the AppligentHome directory is in the AllUsers Application data directory.
Windows : C:\Documents and Settings\All Users\Application Data\Appligent
Windows 7 and later: C:\ProgramData\Appligent
Unix:/usr/local/appligent
You can also specify an additional font directory, the AP font directory. The path to the AP font directory is saved in an environment variable called AP_FONT_DIR. You will be prompted to enter a font directory during installation.
On Windows: Environment variables can be set on Windows under the System Properties. To display the System Properties, right click on “My Computer” and select properties. On the bottom of the Advanced tab, click the button labeled “Environment Variables”. Under system variables, you will see an entry for AP_FONT_DIR. Select this entry, and click edit. You can then change the variable’s value to the path of the current font directory.
On Unix: As the other environment variables for FDFMerge, AP_FONT_DIR is set in the fdfmerge script. The directory set in an environment variable in the script, or be set for the shell.
FontFile (deprecated)
The FontFile parameter has been deprecated. To use a non-base14 font with FDFMerge, add the font to one of the font directories and specify the FontName in the Form Info File. The FontFile parameter entries will be ignored. Previous versions of FDFMerge would allow the specified font file to override the FontName; currently the FontName has priority.
Support for Arabic in form fields
FDFMerge now supports Arabic in form fields. In order for the information to appear correctly, the form field must be set “Right To Left”, alignment set to “Right” and contain a font that supports Arabic characters.
Known Issues with Version 7.0
1) Auto size is not supported for button fields and radio buttons. Auto size not supported in rotated fields
2) At times, text in form fields may automatically crop to the field borders. To disable this behavior, set CropToField (No) in the Form Info file.
3) FontXScale and FontYScale are currently not working in this release
FDFMerge 6.0
Document optimization (-optimize)
For document optimization, use -optimize. This flag will do the following:
- encode any non-encoded streams using Flate compression
- remove ASCII85 filters from all streams
- replace LZW encoded streams with Flate encoding
- merge identical XObjects and images
- optimize common sequences in page content
- merge identical font descriptors and encodings
This option will usually result in a smaller file size.
ISO 32000 compliance (-iso32000)
To create a document that is ISO 32000 compliant, use -iso32000. This flag will do the following: Set the file for ISO 32000 compliance, resulting in a document that is PDF version 1.7.
Command collections (-cmds)
To process multiple commands quickly and efficiently, use the -cmds <filename> option. The file specified by -cmds, the commands file, should contain one or more single line commands. Each command is just like an ordinary FDF Merge command-line without the executable name. The commands file does not support wildcards in filenames.
When you use the -cmds option, many of the FDFMerge options should be set in the -cmds file instead of on the command line. The following options are supported on the command line when using the -cmds option: -r, -l, -n, -p
If the same option is set on the command line and in the a record of the -cmds file, the option value from the -cmds file record will be used.
For more information on the -cmds option, see Command Collections.
Known Limitations and Issues
Unicode issues
Higher order ASCII characters not supported in XFDF file. If you use higher order ASCII characters, you must use an FDF file, not an XFDF file.
Adobe® Acrobat® problem with newline characters. Due to a problem with the way Acrobat handles newline characters in form fields, use either the -s option or -norebuild option when merging double-byte characters.
First character in a CJK form field must be a CJK character.
/octal values no longer supported in XFDF. Use hexadecimal codes for CJK characters or FDF files for higher order ASCII characters.
Unicode on rotated pages. Unicode characters do not appear correctly on rotated pages.
Do not mix UTF-16 hexadecimal codes with UTF-8 characters or ASCII. If you use UTF-16 hexadecimal codes in a value field, use all UTF-16 characters for that value. Do not mix UTF-16 characters with UTF-8 characters or ASCII text. Make sure the font for the Field in question is set to one of the supported CJK fonts.
Display problems in Acrobat
Acrobat sometimes displays crosses in check boxes in a plain font. This is an issue with Acrobat and not FDFMerge. They should display correctly if you do not use the -norebuild option.
No support for Signatures
Although the Adobe Acrobat forms tool may be used to add a Signature field, it will be ignored by FDFMerge. If you flatten the file, the signature field will be removed as well.
No support for FDF Templates
The Form Data Format (FDF) supports a construct known as “Templates” where, within the Acrobat environment, the FDF file will cause additional pages to be added to the PDF file as they are needed. FDFMerge does not support FDF Templates and will not add additional pages to a PDF file. Templates also allow use of non-exact names for form fields. FDFMerge will not work unless the field name in the FDF file exactly matches the name of the form field in the PDF file.
Encrypted files may not be used
FDFMerge cannot open encrypted files. Users must have Edit permission for any files used by FDFMerge.
Autosize is not supported
When using text fields in PDF forms, be sure to specify a point size for the text since the Autosize feature is not supported by FDFMerge.
The sort and multiple select options for list boxes are not supported
If your form has one item selected, FDFMerge’s stamped output will show the selection in red (i.e., the list is displayed in full with the selected choice printed in red). If more than one selected list item is entered into the FDF file, FDFMerge will fail. If multiple selection or sort is checked in the form field properties for the list box, it will not display properly (the entire list will not be displayed, and the selected entry will print in black). If your list box is set to be sorted, FDFMerge will not sort the data in the PDF form—any list will be printed as it is listed in the PDF form. This behavior is true for both stamped and merged documents.
Button stamping and merging behavior with regard to formatting
In Acrobat, when you put in a button field, you can specify the button to be Text, Icon, or Icon and Text. Buttons containing text (Text or Icon and Text) will be maintained after a merge, but will not be stamped on the form. When stamping a mixed button of Icon and Text, only the icon will stamp.
When you set a border around a PDF icon, specify the PDF from within the Acrobat form (so the PDF form displays the button and the border when you view it in Acrobat), and use FDFMerge on the form with the -s option, with no reference to the button in the FormInfo file or the FDF file (i.e., not changing the button in any way using FDFMerge), the button will display with the border. If you use FDFMerge to put the PDF icon into the button, there will not be a border. In other words, if only Acrobat touches the field, the border will come through. If FDFMerge touches the field, the border will not appear.
FDF files must be in PDDocEncoding
Files exported directly from Acrobat will work correctly. Files created by hand must use the PDDocEncoding scheme for high ASCII characters. See PDF Reference Appendix D on Adobe’s website.
This issue concerns using a page of a PDF document to stamp into a button. When using a page for a button that has been rotated to be in a landscape format and it is stamped or merged into a PDF, the image in the output document will be rotated. The current workaround is to set the rotation of the button in the form field to be 90 or 270 degrees. To change the rotation of a form field go to the Field Properties, Common Properties tab, Orientation.
To Get Help
Contact technical support by:
emailing support@appligent.com, or calling 610-284-4006
Please provide the following:
Product name and version number
Operating system
Your name, company name, email address, and phone number
Description of your question or problem
Responses are typically emailed within one business day.